capdiamont
Active member
Thank you Pware. I’m grateful for such a wonderful guide. I just need to wait until it comes out for my system. Thanks again.
Follow along with the video below to see how to install our site as a web app on your home screen.
Note: This feature may not be available in some browsers.
- The Eyedropper Tool identifies objects in a route>> TIP: Hold the Alt key and mouseover any item to see the name of the asset. Alt + L-click to select the mouseover item in the Asset Palette.
Thank you Pware. I’m grateful for such a wonderful guide. I just need to wait until it comes out for my system. Thanks again.
A new Wiki Page on how to use the Surveyor 2.0 tools is now "up and running". It will probably still need some tweeks, fixes, updates and there is still one menu option that I have not been able to work out what it does, but the page is now fully useable.
The page is at https://online.ts2009.com/mediaWiki/index.php/How_to_Use_S20_Tools
Regarding the Alt key, use this when the Eyedropper tool is not selected. So if you're using Free Move, holding Alt will activate the Eyedropper tool, but releasing Alt will take you back to your previously selected tool.
Could it be possibile to be able to use the "scenery", "spline", "tracks" and so on selection withing a pick list filter?
I suggest splitting your picklist into scenery types.
In the classic surveyor version this is very easy because the track splines always remain visible even when you are in the object spline mode.
In S2.0 the track spline points are not visible Am I missing something here?
")
OK, you got the point. In Poland, any trolley poles were replaced with pantographs very early in the history of public transport, so I completely forgot that they exist when writing the post.
In pantographs, the zig-zagging prevents cutting a row in the pantograph slide over time due to the friction. In Poland, the norm is - if I remember correctly - 15 cm to the left, then 15 cm to the right, so it's clearly visible when you drive. On the tram networks, where the pylons are much closer one to another, this zig-zagging is also well-visible from the surrounding grounds and streets.
One solution is adding surveyor-only templates to the hanger assets, so that it is much easier to position everything. But this requires the asset authors to think about them when they create their work.
- it's counter-intuitive for the newcomers not to have this active. https://youtu.be/ZgfNbqpQYyI?t=1620 - here you have a part of the video of one of the people I know where he tries to use S20 for the first time, and tries to change the height of the object. The video is in Polish, but it's possible to notice which tools he tries to use (and that he tries to use the wrong ones). I provide some translation:
* "OK, my track is elevated by 20 cm, so I'd like to elevate my gantry by 20 cm, too. Yes, I'd like... But... how? To do that... automatically? "
* "Well, we can type it in here [types into 'Focus' text boxes, which has misleading translation, by the way]... 0 point 2. Why doesn't it work. 0 point 2 enter. And if I type 1... it's still 0"
* "... and if now I type 0 point 2... still doesn't work..... ech... it displays the height over there... there's that rectangle to manipulate... 0 point 2... nothing. Interesting... okay, I think I need to sit a bit more on it."
* second attempt 2 minutes later, about "Tool options": https://youtu.be/ZgfNbqpQYyI?t=1967
* "OK, I'm stubborn, I want to elevate it SOMEHOW by 20 cm. I know I can raise it with the gizmo, no problem. You see, 0.14, 0.26, but I want perfectly 0.2... it doesn't work too well. OK, here we have."
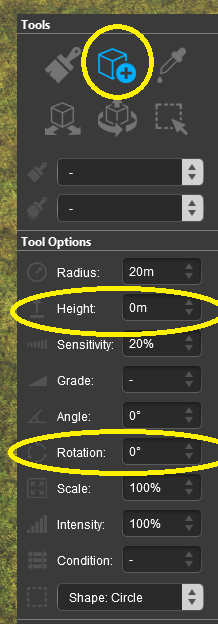
* "I really want not to look all the time here at the left side [at the "Info" box], what height I have.... ooohhh! Here we have the height editor!!! [discovers "Tool options", everything greyed out]... hmm... I want 0 point 2... nothing... no way, guys. I'm really wondering why do I have actually this information over there, why do I need all this box. Because I was really convinced that we can use it to set the height exactly there".
- when I tried S20 for the first time a year ago... I also tried to set the rotation in "Tool options", ending up with "hmmm... it doesn't work... but why?"
I still don't understand this window showing compass/cursor position information. I've been a surveyor for about 15 years and believe me, I don't know anyone who needs it. This window is very unintuitive. The first place should be information about the position of the object, not the cursor. The second thing that you can't see at first glance - that it can be developed.
Just as unintuitive and very strange is the system of turning the trackside to the other side of the track. Either an additional icon with such an add-on or a keyboard shortcut would be useful.
And finally - as you can see my English is not great. Congratulations for translating the entire S2.0 into Polish. (sorry - it's ironic). Despite the fact that for so many years a man knows what he used, what he is looking for - it is impossible to find it. The truth is - it needs to be explained again!
Speaking as someone who does use the compass/cursor information, I find it to be quite useful. I use it to get the height of a point (the compass position) from the terrain and transfer that height to the Tool Options Palette Height value. See https://online.ts2009.com/mediaWiki/...tment:_Heights
Many of the controls that were once separate icons in the different tool tabs in Surveyor Classic are now in the Context Menu of each object which makes them easier to find. Yes, a keyboard shortcut would be ideal and N3V did state that the Surveyor 2.0 interface is still in development and that more keyboard shortcuts will, eventually, be added.
Change, anywhere and everywhere, takes time to get used to. I have had my battles with major software programs which suddenly changed their User Interface but, in all cases, I eventually adapted. Surveyor 2.0 is no different. Now I rarely have to drop back into Surveyor Classic to perform any tasks.
A user that actually uses the program and makes great routes, proposes something
or points out where it can be improved, followed by pware and tony defending the status quo
of the current WIP phase it is in. This is counter productive.
I still don't understand this window showing compass/cursor position information. I've been a surveyor for about 15 years and believe me, I don't know anyone who needs it.
I find it to be quite useful. I use it to get the height of a point (the compass position) from the terrain and transfer that height to the Tool Options Palette Height value.
All in all, okay, you're right, point to you,