my building uses more than one texture file.
Install the app
How to install the app on iOS
Follow along with the video below to see how to install our site as a web app on your home screen.
Note: This feature may not be available in some browsers.
You are using an out of date browser. It may not display this or other websites correctly.
You should upgrade or use an alternative browser.
You should upgrade or use an alternative browser.
GMax and 3DSMax (And any other modeling program) screenies/renders
- Thread starter Mr.Kamikaze
- Start date
Mine too, where is your problem? The textures used for generating the baked one can be countless, no limitations. They should be as huge and detailed as possible and you do not have to care about their ratio (power of two), but can have whatever size.
How many baked textures you want to generate is also not limited, usually it should not exceed two ore three. If the model and its grade of detail does allow it, one should be the aim.
The size of the baked texture can have a maximum of 2048x2048, Trainz can handle bigger sizes but at least TS12 automatically reduce them to 2048x2048.
So mostly I render 4096x4096 or higher and prefer to reduce them controlled with Photoshop to 2048x2048.
Mick!
Zeldaboy14
Owner of ZPW.
As far as I know from a Blender Standpoint is that it should bake it all on the 1 big mapping. It's not that hard to figure out.my building uses more than one texture file.
Mine too, where is your problem? The textures used for generating the baked one can be countless, no limitations. They should be as huge and detailed as possible and you do not have to care about their ratio (power of two), but can have whatever size.
How many baked textures you want to generate is also not limited, usually it should not exceed two ore three. If the model and its grade of detail does allow it, one should be the aim.
The size of the baked texture can have a maximum of 2048x2048, Trainz can handle bigger sizes but at least TS12 automatically reduce them to 2048x2048.
So mostly I render 4096x4096 or higher and prefer to reduce them controlled with Photoshop to 2048x2048.
Mick!
Mick,
I followed your tutorial, but it won't let me insert a file name in this box:

ALSO, how do I open the UV editor to stitch the art (number 10)?
Thanks
Dave
norfolksouthern37
what's a normal map?
Dave, this is probably because you have 130 objects selected. By default it will make a map for each object and use the object name as the image. this will result in 130 image files so your best bet is usually to bake them as one object.
--- your best bet is usually to bake them as one object.
I don't know how to do that. Do I have to attach everything? I can't attach everything if I'm using two texture files.
G'day davesnow,
...yes you can, Dave!! When you attach an object to another (using the "attach" function in the object rollout), after those objects have been textured, 3DS Max gives you the option (via a small dialogue box) to retain the existing mapping (keep things as they are), remapping the added object with the texture on the 'old' object or to map the 'old' object with the added object's texture. The added object then becomes an 'element' of the 'new' object (accessible via the 'element' sub-object selector of the object's sub-object selection panel). Your choice should be obvious...
Jerker {") }
}
...yes you can, Dave!! When you attach an object to another (using the "attach" function in the object rollout), after those objects have been textured, 3DS Max gives you the option (via a small dialogue box) to retain the existing mapping (keep things as they are), remapping the added object with the texture on the 'old' object or to map the 'old' object with the added object's texture. The added object then becomes an 'element' of the 'new' object (accessible via the 'element' sub-object selector of the object's sub-object selection panel). Your choice should be obvious...
Jerker {
}G'day davesnow,
...yes you can, Dave!! When you attach an object to another (using the "attach" function in the object rollout), after those objects have been textured, 3DS Max gives you the option (via a small dialogue box) to retain the existing mapping (keep things as they are), remapping the added object with the texture on the 'old' object or to map the 'old' object with the added object's texture. The added object then becomes an 'element' of the 'new' object (accessible via the 'element' sub-object selector of the object's sub-object selection panel). Your choice should be obvious...
Jerker {
Okay. Thank you.
But after I "unwrap only" how do I open the new art to do the stitching (in the tutorial, number 10)??
G'day davesnow,
...once you've got to stage 9 in the tutorial, Dave, in order to proceed to stage 10, you must select the 'object' and then add an "Unwrap UVW" modifier (from the Object Tab Modifier List Drop Down List) and then click the [Edit] button, this will open the dialogue box that Mick1960 shows in that tutorial at stage 10. It would seem that Mick fell into the usual trap of most tutorial creators; assuming that the user knows what he (the tutorial creator) knows and what he is doing, leaving out otherwise "unimportant" steps, as a consequence (I always assume the end user knows nothing and include every step)...
Jerker {}
...once you've got to stage 9 in the tutorial, Dave, in order to proceed to stage 10, you must select the 'object' and then add an "Unwrap UVW" modifier (from the Object Tab Modifier List Drop Down List) and then click the [Edit] button, this will open the dialogue box that Mick1960 shows in that tutorial at stage 10. It would seem that Mick fell into the usual trap of most tutorial creators; assuming that the user knows what he (the tutorial creator) knows and what he is doing, leaving out otherwise "unimportant" steps, as a consequence (I always assume the end user knows nothing and include every step)...
Jerker {
}

EverTrainz
Electric Blue
That's some nice progress.
Zeldaboy14
Owner of ZPW.
Never give up! You'll figure it out at some point. It took me some time to learn to bake texture's in Blender, and took 2 years to "accidental" learn baking external texture's.
G'day davesnow,
...indeed, Dave, giving up is pointless. We are here to help and if there is something causing your disparagement, then it can be clarified. If you don't understand some part of the process or have any issue, you only need to tell, us...
Jerker { }
}
...indeed, Dave, giving up is pointless. We are here to help and if there is something causing your disparagement, then it can be clarified. If you don't understand some part of the process or have any issue, you only need to tell, us...
Jerker {
}Just a quick pointer.
Texture baking is done only on the object you have selected, using the mapping of the selected object. As such, any overlap will be baked to the same spot on the texture.
This means that, when attaching objects together, you need to avoid mixing textures/materials. Personally, on everything I make, I attach together all meshes of a single texture. I find it makes it easier to map properly, and saves me hassles when baking.
It isn't a 'click and go' process, there is a bit involved. But a good baked texture can make a model IMO.
I haven't watched it through for quite a while, but this video may be of assistance: https://www.youtube.com/watch?v=WzdRulFgSLE
I personally prefer the Ambient Occlusion bake over others, but it can be quite slow. There are other options (light tracing is the main one), but I don't have any tutorials on hand (I have been planning to do some, but not had the time to sit down and do them ).
Regards
Zec
Texture baking is done only on the object you have selected, using the mapping of the selected object. As such, any overlap will be baked to the same spot on the texture.
This means that, when attaching objects together, you need to avoid mixing textures/materials. Personally, on everything I make, I attach together all meshes of a single texture. I find it makes it easier to map properly, and saves me hassles when baking.
It isn't a 'click and go' process, there is a bit involved. But a good baked texture can make a model IMO.
I haven't watched it through for quite a while, but this video may be of assistance: https://www.youtube.com/watch?v=WzdRulFgSLE
I personally prefer the Ambient Occlusion bake over others, but it can be quite slow. There are other options (light tracing is the main one), but I don't have any tutorials on hand (I have been planning to do some, but not had the time to sit down and do them
).Regards
Zec
MeowRailroad
CKRail
Here is An Inspirational Video:
Never give up! You'll figure it out at some point. It took me some time to learn to bake texture's in Blender, and took 2 years to "accidental" learn baking external texture's.
Who was the lucky guy that it happened too!
I give up.[...]
You shouldn't. It is your first try!
In general, the texture baking process shall only be started if
1.
The mesh is absolute ready and no changes whatsoever are necessary
2.
Each and all objects are complete textured and no changes whatsoever are necessary
3.
Normally there should be only one single object (attach or attach multi)
4.
You should spend some thoughts about the number of textures which are needed to meet your quality specs
4.1
If two ore more textures are necessary the mesh shall have two ore more corresponding objects. i.e. one for the roof and one for the walls etc.
The best way is to save the last state of your work into a file i.e. myproject-ready.max and a second time under myproject_r2t.max.
This last file you use for your work on texture baking.
To your question regarding the UV editor:
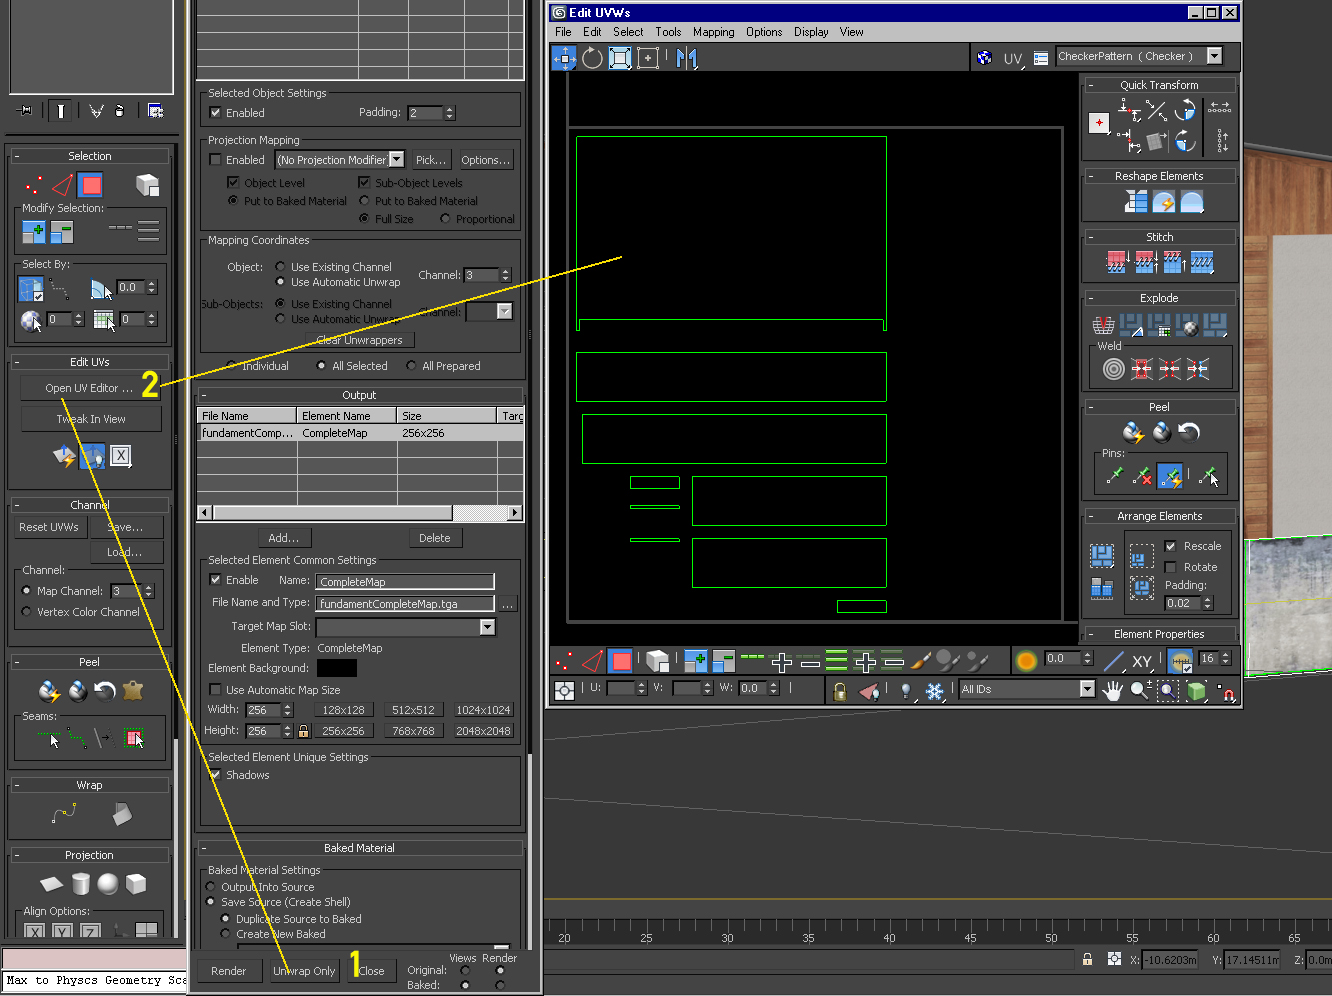
If you click on Unwrap Only (1), next simply open the UV editor (2). It can be that it is to find in your UI setting somewhere else than in my picture.
Mick!
Similar threads
- Replies
- 0
- Views
- 15K
- Replies
- 22
- Views
- 10K