Scenery – let’s get real!

I’m not familiar with CMP. I believe you should be able to get the assets via the DLS “Black Pages” though.

Hopefully someone else will be able to confirm/advise. I'm not much good on the technical side!

If all else fails, the Trunda trees shrub and grass sets are available on two pages via this this link. The downloads are .zip files.
 
Last edited:
Hi All : I'm putting this on this thread just to show you what you can with texuring..I had a friend put the water color on the DLS it is called YR Stream..
2012-39.jpg
 
Well done Casper, this is a really useful thread, this should be a sticky, so as to easy access when your after inspiration.

There are some excellent tips here and really nice screenshots too.

Joe Airtime
 
Tower Cam...

:cool: Have you ever thought about a camera in a tower or other building?
towercam.jpg


You point down the track, set a camera in tracking view & manipulate to fit...it may take several tries.

Approaching...
leftview.jpg


Departure...
rightview.jpg


You can post a car or locomotive within range for a static view...:hehe:
 
Manipulating textures

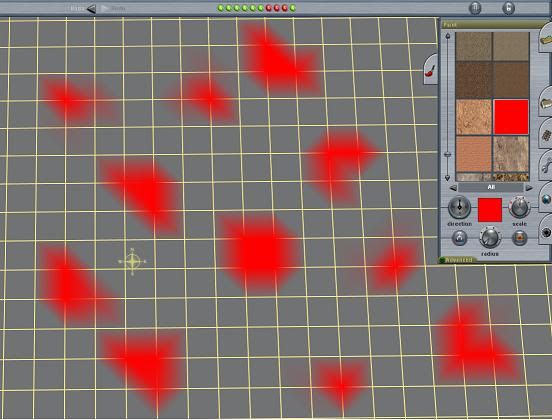
Paint seems to be applied by the Trainz software in an unusual spray pattern. I’ve noticed it varies according to where the mouse pointer is in relation to the grid square when the texture is placed. Here are some examples with radius on minimum which show a plain red texture separately sprayed several times with a very quick click of the LMB.

Although the radius and scale is identical in each example, the pattern is very different. This seems to occur because the cursor point was moved each time to a different relative position within the grid space. A click at the centre of a 10m square will produce a very different result to one placed nearer the edge.

847e0bba.jpg~original


For the most part this won’t matter too much, but these shapes can be exploited to help provide some creative effects. Examples where it can be useful is when want to place piece of feature texture like a rock, shrubs or a puddle. Sometimes these just won’t go exactly where you want. But by rotating and/or changing the cursor position point where the spray is directed it can usually get very close after a bit of trial and error.


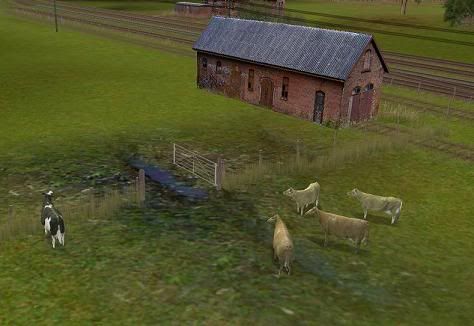
With this example I’ve tried to get a muddy effect in one of the two fields. The “plash” (is that Trainz speak for a cross between a puddle and a splash?) is asset 
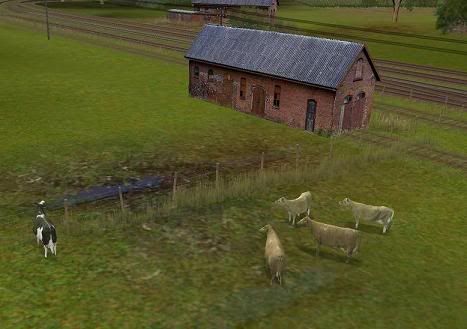
plash 03 kuid:149987:21403. In this first image it neatly lines up with the fence.

df06cc36.jpg~original


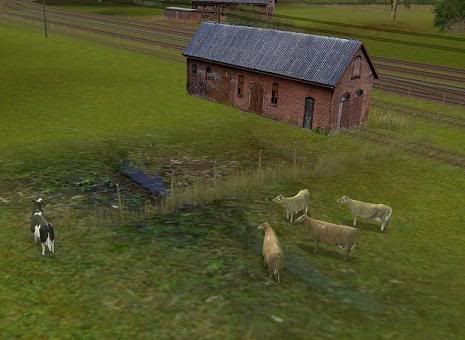
With the rotation tool I can shift it 90 degrees to bisect the fence which could make a neat gateway where the ground has been trodden down by the livestock.

9d51ab47.jpg~original


Just break up the spline fence and put in a gate. For best effect in examples like this it’s usually best put in the texture first, then place the gate and fence spline. It’s not always possible to get a detailed texture exactly where you want it, but you have total control over the placement of objects and splines, so I tend to move those to fit in around the less obliging required texture.

You’ll notice that there is some grass placed under the fence where the farmer can’t cut, or the cattle can’t graze. I’ve removed it from the open gate area.

27b2f7af.jpg~original


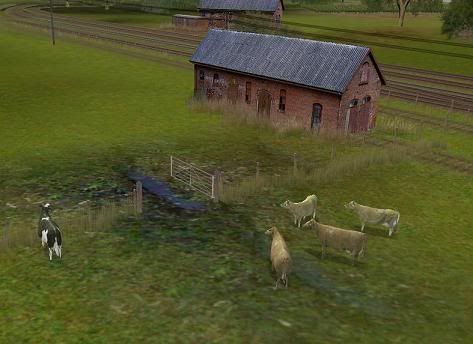
The other texture effect you should be able to see in the above three shots is the area around the group of four cattle. The plash texture has started to “tile” which can give an unwanted checkerboard effect if repeated. That’s why it’s best to give just a sparing single small radius squirt with these detailed textures.

In this instance I think it is acceptable because it is on the edge of where it is blended with the next texture and therefore quite pale. If you want to eliminate it just increase the scale a bit when it won’t be seen if you keep the radius small.

However, what it does show is that blended textures have the effect of doubling the amount of viewable texture in the same area because the newest texture has not completely obliterated the previous one. You can get some great effects doing this thus creating your own unique textured effects in much more detail than a single texture on its own. These effects work well towards the edges where the different textures merge together.

It’s worth experimenting with positioning as well given the variations shown with the red example shapes shown above. It doesn’t always come good first time. A very light touch on the LMB is needed with a very (very!) quick squirt of paint. I do use the undo button a lot!


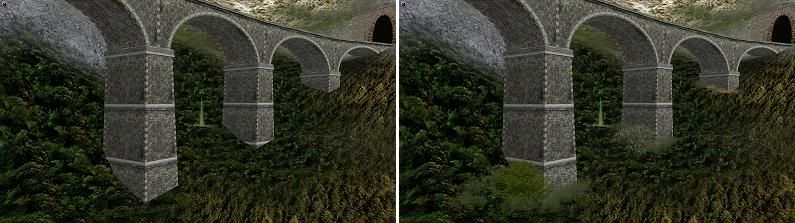
That old rail shed doesn’t look too good in the above images. It seems to be floating because there is nothing visually “anchoring” it to the ground. A quick fix for this is to place some vegetation around the base which helps to fix it to the landscape.

ed2a25e2.jpg~original


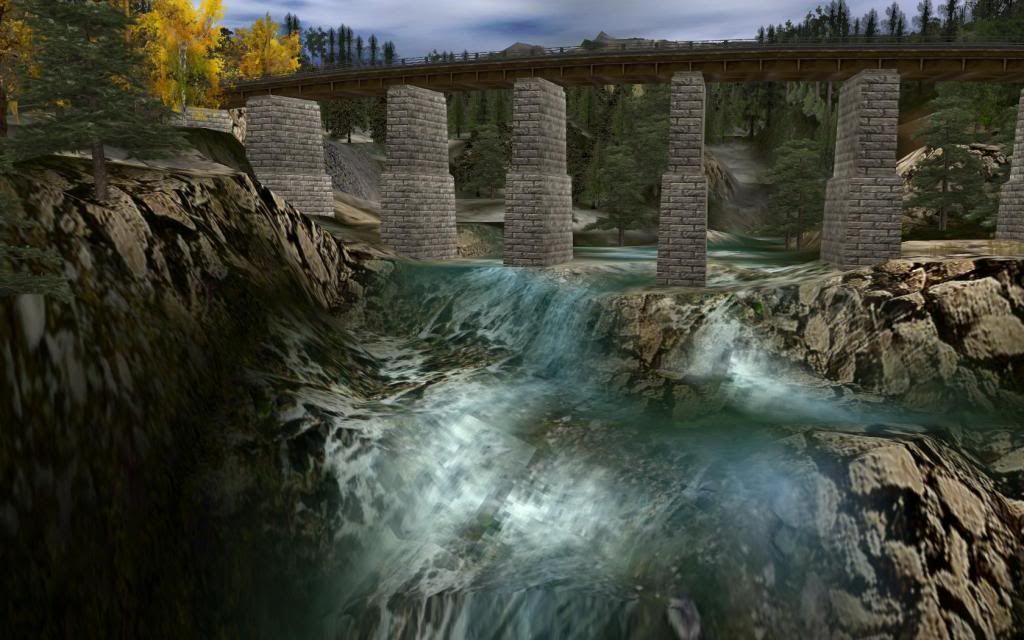
Obscuring those edges at the base can improve the look of all sorts of hard objects where they meet the ground. Here’s another comparison with some bridge supports.

d72e9a64.jpg~original


That's all for now.

Cheers
Casper
 
Last edited:
Casper.

You are spoiling us with your creative capabilities. The use of the "plash" has got me re-texturing some of the route i am working on.
I agree the use of textures and foliage around bridge supports does add a better effect.
Thanks for creating this thread. As i said in an earlier post this should be made a "Sticky".

Regards Dave.
 
I dont know if this is the right place for this, but it is a very interesting subject. I would like to create my own textures. The manual says I can but it dont say how. Are you folks talking about using preloaded textures or creating your own. Does anyone know how to create and load one's own textures. I know they have to be a 128x128 BMP file but where do I go from there
 
Hello hosebag.

I assume you mean ground textures (rather than textures which are applied to modelled assets). This thread might be helpful if you want to make your own.

All of the textures used in any of my examples in this thread, or any other posted screenshot, were made by other members from available downloads, or from the original Auran box.

I might experiment with my own some day, but I find that blending and lightly overlaying ground textures from what is already available gives me more than enough scope. It’s pretty easy to create unique ground imagery every time. The possible permutations must run into billions!

Cheers
Casper
 
Thanks for the links. I have looked at your screenshots, and I think I agree with your method. The textures are there
and just have to be applied properly.i picture you in front of a computer monitor, with a brush and a pallet of oil colours
in you other hand.
Richard
 
Certainly a testament to your skill Casper, but I'm sure if you had 12, you would enjoy the new textures there as well.
 
Certainly a testament to your skill Casper, but I'm sure if you had 12, you would enjoy the new textures there as well.

Or '09 or '10.

Just think, the high-resolution textures allow you to see the leaves in a leaf texture, the grass blades in a grass texture, the stones in a gravel texture, etc.

I really ought to do comparison screenshots between the low-resolution version of one of my ground textures in TRS2004 and the high-resolution version in TS2010. There is a noticeable difference in the quality.

Regards,

Zachary.
 
I dont know if this is the right place for this, but it is a very interesting subject. I would like to create my own textures. The manual says I can but it dont say how. Are you folks talking about using preloaded textures or creating your own. Does anyone know how to create and load one's own textures. I know they have to be a 128x128 BMP file but where do I go from there

If you are using 2009 upwards you can use far larger textures 512 x 512 or 1024 x 1024 or even 2048 x 2048 you are not restricted to 128 x 128, best to have a read of this thread which is more up to date for the newer versions of Trainz as textures now require normal mapping. http://forums.auran.com/trainz/show...-step-ground-texture-tutorial-for-TS12-please
Read the whole thread as there are a few bodged work rounds (including one from me) before we arrived at the correct method.
 
I do not intend to create textures. With a 2048x2048 texture is it safe to assume the size/single click coverage is the same as smaller res textures? I use only high res textures that are several megabytes in size. I pay an occasional stutter penalty. However, the visual quality is excellent and, for me, that comes first. Otherwise, I could build a fantastic route on bare baseboards.

As an aside that is why I have pretty much set aside the "other" commercial train program. While their lighting and shadows are superior to Trainz, the ground is a blur of artificial geometric shapes that the vendor hopes to convince the customers to ignore just how unreal they are.
 
@Euphod
Thanks Ed. I’m sure I would enjoy the textures in the new versions.

@Retro0064
Zachary, some comparisons would be very interesting.

I’ve seen some really good new high resolution textures posted in screenshots which look beautiful in their settings.

However, I’ve also seen some which although very good in image quality, have been badly deployed. It seems that the more detailed these textures are, the more care needs to be taken to make and place them. They need to be correctly orientated and used sparingly otherwise perspective distortion and other oddities will be very obvious. Placing them in the wrong combination with other assets can also make scenes look less real. Some examples:

Rocks where the shadows appear from lighting which appears to have come from underground.
Up lit objects give a look which cannot emulate lighting as nature intended. In practice the image has simply been painted upside down on the terrain in Surveyor by the user.


Detailed textures conflicting with 3d assets.
I guess the purpose of a detailed texture is so that it looks good when you get in close, and that’s great. But seeing a hard building line between say a detailed grassy texture which is disappearing under the base of a house or wall, to my eyes, is not a good look. It usually shows an inevitable chopped off look to the vegetation which makes it look like, well – a painting on a flat piece of paper with a three dimensional object placed over it. The grass doesn’t appear to grow up the wall because as a texture it can’t.

OK, this can be easily fixed by placing a few grass tufts over the join so the vertical stalks of the 3d grass can hide or soften the join, and they will always remain vertical regardless of the viewpoint. However, I find that there can be visual conflict when a 3d grass tuft is placed over a detailed texture. It is made worse when the perspective of a very detailed textured image doesn’t match true direction of the scene; even if it does from the initial viewpoint, as soon as you move it becomes visually distorted. That’s probably where a less detailed texture provides a better “base coat” where 3d vegetation assets are being placed.

All of the above problems are easily solvable within the hands of anyone with good Surveyor skills where a careful selection of textures and assets can be combined to good effect.

Scaling
This can be a problem. Many textures are made from images where the detail is simply too big. Rocky textures can be very successful because there is no real yardstick with regard to how big or small the strata should be. However, with subjects such as blades of grass, leaves or stones, some of these look too large. Many of these natural items, in reality, are smaller than a person’s hand.

I have used a rocky shore texture which appears to have been taken on a beach. The image is a close up of pebbles and sand, where the grains of sand are so large they look like mini rocks when seen in scale against the surrounding items. Try placing a detailed human asset alongside some of these and check them out – even at minimum scaling. Many won’t look right.

When creating such assets the scaling does need to be correct, preferably when the at the mid scaling level so that the Surveyor scaling tool has the scope to increase or decrease the size to fine tune individual needs.

Please don’t get me wrong. This isn’t a war on detailed texturing, it’s just a few personal observations on what I feel can make things look worse if some of the implications aren’t considered, and how improvements could be made.

The principles equally apply with low resolution textures. In high resolution, however, bad construction or ill considered use of textures is likely to be a little more obvious.

There can be no doubt though, with the new ultra-detailed stuff, there is scope for some stunning effects. Much has already been seen and I’m sure the best is yet to come.
 
Last edited:
Brilliant thread!
I couldnt agree with you more Casper, some (not all) of the hi-res texture are a bit tricky to work with at times, and as a result i find I only tend to use them very close to the trackside or on slopes and with the scale set on minimum. Would you mind if I stuck in a couple of pics to show how I create a scene? No-one could match your quality or attention to detail but I'd still like to give it a try :) I don't want to stop you if your on a roll! Maybe on the topics of trackside scenery and/or cropping your screenshots
 
~snip~ Would you mind if I stuck in a couple of pics to show how I create a scene? No-one could match your quality or attention to detail but I'd still like to give it a try :) ~snip~

Thanks scratchy.

Feel free to post. The intention is for all to contribute and share ideas on techniques.

Look forward to seeing your ideas - I'll probably nick them!

Cheers
Casper
:p
 
Casper, I just saw this thread for the first time. I think this is an interesting subject for a thread. Along with your amazing artistic skills you are excellent at communicating your process and ideas about scenery. I look forward following this.
Gordon
 
Back
Top