Reskinning issues with a 222

Hello, all. Last night, I embarked on a journey to reskin Peter Hicks' 222 into Virgin Trains colours. I've hit a couple of problems, however. I've taken a few screenshots to illustrate my issues.

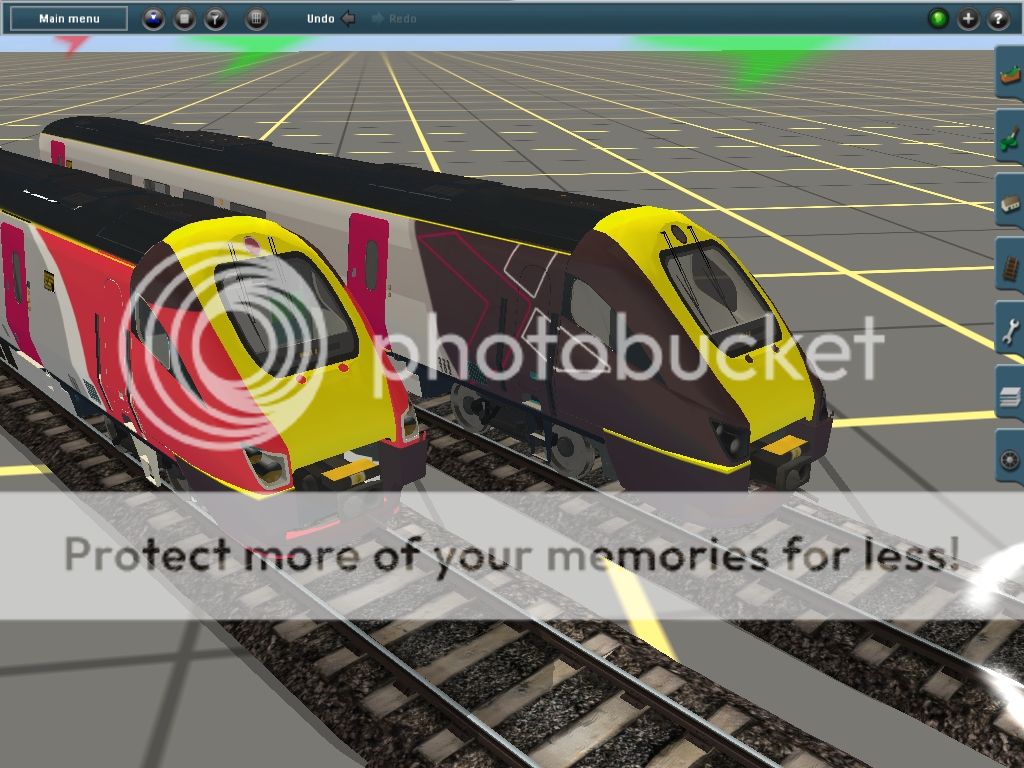
The reason the doors are pinky/purple are because I'm creating this Virgin 222 from my recent reskin of the 222 in Cross Country colours. As you can see, there are a few problems with it:


Also, this yellow strip. Now, it's visible on both my Cross Country and Virgin reskins seen here, stretching from the right headlight to the rear of the right-hand side of the cab, but it isn't visible on the East Midlands and Hull Trains variants that I downloaded from the DLS:


This problem mainly stems from the complexity of the body.tga file and which section of the file relate to which section of the train, and so my question is, is there any other way I can reskin a train without using GIMP 2? Like, in a 3D modelling software where I can physically see the train and choose exactly which section to reskin which colour?


Regards, Jack
 
Your problem is how the texture is mapped to the mesh, this is the UV-map and can only be done by the maker.
 
Welcome to the joys of reskinning....

The Voyager reskin is one that's been needing done for a long long time, well done for taking on the challenge, pity Peter is no longer contactable to give permission to release your reskins.

Finding out where a piece of mesh is mapped can sometimes be extremely frustrating, I've personally reskinned hundreds of assets and the little details like this usually take the longest to sort.

The best way to discover where the map originates from is to compare the original class 222 texture and your new texture side by side. Look for a part of the original texture that is blue (I'm assuming blue- can't tell from your screenies) and which you have changed from blue to yellow and that might help you locate it, it's helped me lots of times over my years of reskinning. If you can get your head around that method it will really help.

I've had a look at your comparison screenshots and from these can't tell where this might be, if anything you've reduced the area of yellow not expanded it.

Beware that the map may be over a tiny area, maybe a few pixels in length and may be one pixel in height so zoom in as far as you can and check all the new yellow graphic on the new texture areas against the original blue.

Another method I've used in the past is to use a temporary chequer board texture with small squares all in different colours, it soon shows up where each part of the mesh is mapped on the graphic when you don't have the meshes available.

As a last resort what I've had to do in the past is build a bit of mesh in GMax myself to hide the colour below, I've done this with the green class 27 reskins, class 37/4s without snowploughs etc....this is definitely not for a beginner though but I'm mentioning it here to show that anything is possible.

You'd mentioned the resolution and pixellation in another thread of the logo, yes the only way to cure this is to increase the size of the texture, this does work, my Cross Country HST reskin is 2048x2048 which is allowable now by N3V and is nice and sharp, so increasing the size will work. If it affects your pc performance you can always reduce it later for your own use, keeping the larger one in case you ever get permission to release?

Any plans to swap the nameplates, or if you prefer remove them completely using a blank alpha texture? You'll find an alphablank in my Cotswold class 47 nameplate texture asset (blanka.tga or blankb.tga), these are the only ones that don't invoke the uniform texture warning. Rename it (but don't open it) to replace the nameplate texture, this will probably need a change in the script to work properly though.

Hope some of that helps!

EDIT- what happens when you try to change the top of the roof around the highest headlight to black like the real thing, does that mess up the reskin?
 
Last edited:
Firstly, tell me about the frustration! :hehe: I only started the Virgin one last night and it's really grinding at me, aha! I think I'm going to have to chequer board the cab area of the file to find out roughly where that bit of yellow is. I can not put my finger on it, at all. It's an awkward train to repaint. The thing with this train is, if you paint the left side of the cab, it copies itself onto the right hand side, and since the yellow strip is only on the right hand side, it mustn't be attached to the cab section (or it would be on both sides).

Notice also, that behind the coupler of the Virgin reskin, is a white patch. Now, I don't know for the life of me where that has come from! There is no white on the body.tga file!

I think the logo of the XC an Virgin ones will be the very last thing I do ;) the problem is finding a logo that I can edit the background out of accurately, and copying it onto the train. I'm happy with the XC one, apart from the yellow strip and the front destination (Hull, I didn't know XC went there) but I can't change it from when it was Hull Trains because I can't find the file! Ah, a challenging train :D

As for the black bit above the highest headlamp, are you referring to the XC or Virgin one?

Regards, Jack
 
Help yourself to the logo in my Cross Country HST if it's of any use, I had to do a lot of photo editing to get it usable for the HST.

The white patch you are seeing may have come from the white stripe on the virgin livery separating the red from the grey as shown in your screenshot above.

You'll notice on some meshes the position of the mapping seems logical on the texture, on others it can be taken from any other part that is the same colour. Of course this isn't wrong as it's up to the creator how they texture an individual model, that's another thing worth bearing in mind.
 
Ooh thanks for the offer, I did actually have a look at the HST and couldn't really work the logo :(

I've started again with the Virgin repaint. Taking my time ;)


Not too sure about the logo, and the doors still need repainting, but the main bulk is done :) took me an hour but I also managed to get the black bit done above and around the cab :)

Jack
 
That's so much better with the black roof, well done :) you've shown that reskinning the 222 into a 220 is viable and it's looking excellent.

I'd advise using a phototexture for the doors and using a large graphic. Are you able to phot a Voyager locally? If not, I might be able to get a pic for you, can't give any gaurantees on the timescale though.

Re the destinations, I've checked in driver and surveyor and it doesn't look like these are changeable. If you do get permission to release this I'd be willing to look into adding changeable destinations for you like on our new class 158.

A few things to be picky:

-the logo needs moved up (and maybe a bit smaller?) as there is a bigger gap to the lower edge of the body

-the yellow IMO should be more orange than lemon

-the black round the side windows should be red

-the lower half of the fairing is black, this one might be difficult to achieve but would really help the reskin, maybe worth a try?
 
I did have a feeling the logo was slightly in the wrong place, yeah :( I'll keep at it, though :) changeable destinations would be excellent. I've been looking through the whole train and its dependencies searching for a .tga file with "Hull" on it to edit it, but to no avail :( as for the side windows and fairing, I think these are fixed colours... although as I type this I realise that the East Midlands 222 doesn't have black around the cab windows, so I'll compare between the two :) I'm gonna have a bit of a drive on the Heartbeat route this morning but I'm aiming to have the Virgin 222 and XC 222 done by tonight :) thanks for the tips!

As for the Virgin 220, I think the nearest they run to me is Crewe, or probably Wigan North Western, with me living in Manchester and whatnot. However, I do believe there is an hourly service currently being operated from Crewe to Preston via Manchester Piccadilly with a double Virgin class 220 because of engineering works on the WCML. I don't know whether this is just a weekend thing, but I'll be in Manchester on Saturday so I'll nip up to Piccadilly and try and get one whilst I'm there. Of course, my camera is only a phone, so any contributions you have would be greatly appreciated :)

Many regards, Jack

Edit: Is the yellow on the front end the same colour as the yellow on the front end of all British DMU's? I'm just struggling to find a google image of the front end of a class 220 to get the colour of :(
 
Last edited:
I've looked at the 222 asset, the destination is mapped to a graphic destination.tga (that's a bit obvious!). It's a separate texture so yes in theory could be scripted with changeable destinations.

The original class 222 yellow front in your screenshot above looks a closer shade to me.
 
Yeah I found the destination.tga file but that's the destination on the side which shows the calling points, not the one at the front in the window :( I had an idea that it might have been in the interior dependency so I opened it for edit and looked through every image file with GIMP and couldn't find anything. I'm also struggling with the fairing, I'm comparing the East Midlands body.tga file with the Virgin one and trying to find any blue section on the East Midlands one that is grey/silver on the Virgin one, so I'll know that it's the fairing and then I can paint it black

Jack
 
I reckon destination.tga maps onto the front window destination as well, so if you change Hull at the top it will change the front destination and the doorside destinations as well, let me know if that doesn't work.

Bottom left of body.tga is my guess for the fairing location?
 
Last edited:
I reckon destination.tga maps onto the front window destination as well, so if you change Hull at the top it will change the front destination and the doorside destinations as well, let me know if that doesn't work.

I have done a number of re-skins of this 222 and tmz06003 is correct. The destination sign at the front of the cab is taken from the name used at the top of the destination.tga file.

I've looked at the 222 asset, the destination is mapped to a graphic destination.tga (that's a bit obvious!). It's a separate texture so yes in theory could be scripted with changeable destinations.

I also have made my re-skins with changeable destinations by making a new destination library asset with different .tga destination images using a downloaded LED font, and by adding the appropriate lines from Eldavo's Chameleon script into the 222 script file and making the changes required in the config file.

Scottish
 
Thanks for the confirmation Scottish.

Really should have checked this earlier; here's the license in the Hull Trains class 222 asset which actually allows distributed reskins:

licence "This content is available free and should not be sold, either by itself or as part of a larger product. Permission to alter the mesh is withheld. However, feel free to reskin this model if you would like. Reskins can only be redistributed via the download station, the UKTrainz forum, or the personal website of the reskin creator. You can include the original mesh with your reskin, providing peterdhicks is acknowledged as the author of the original mesh."

@Jack, are you willing to upload this to the DLS once you're finished?

@Scottish would you be willing to share you're altered asset for this project or for an upload of your own reskin?
 
@Scottish would you be willing to share you're altered asset for this project or for an upload of your own reskin?

Because my versions of Peter's 222 are not just re-skins but are modified assets, I am not sure if the licence would cover what I have done. I have used the unmodified original meshes but have added a dependency (the destination library) and modified the script to include Chameleon and a few other changes.

Obviously as long as I do not re-distribute it, I have not infringed the licence, but I am unsure if I am permitted to upload to the DLS a modified asset which is not just a re-skin.

Scottish
 
Adding the working destinations is also a reskin of Peter's destination texture, this does not affect the mesh at all which remains unmodified.
 
@tmz: I am more than willing to upload, of course :) I think I may have mis understood, though. The cowling...is this the section along the side? Just, I've been looking to repaint the boxes (?) along the frame beneath the passenger compartment that are currently silver...and I still haven't managed to get the black bit around the side cab windows painted red. I've managed to get pretty much everything else done but this is getting me rather frustrated :hehe:

@Scottish: Is there any way you can give me an explanation, either on here or over PM of how you created changeable destinations, and would they be changeable in Driver? I'd be incredibly grateful, as I think it will really complete the train :)
 
That would be appreciated Jack, as you've agreed to upload then I'll offer to help you out with the reskin if you need me.

It's the lower fairing where the Virgin set numbers are displayed, a black section running from the front to the bogies.

@Scottish, it would be helpful if you could advise if you could assist with this project, if you can't then I'll start from scratch to make changeable destinations. If you're not happy about uploading a destination asset then I'd be willing to do it, it's just I'm very pushed for time working on a huge route rework that I'm sure everyone will be interested in seeing as soon as possible.
 
@tmz Would you like me to send you the reskin in an email? :)

Also, I'd love to see this route! Will it be seeing Virgin and XC 222's in use on it, I wonder? ;)

Regarding the changeable destinations, is there any way I could use the one from Marky7890's class 150/2?

Jack
 
Last edited:
@jack and tmz

Here is a few shots of a couple of my re-skins with changeable destinations. I have also other fictional re-skins such as East Coast and others.


Using Chameleon, these are selected in Surveyor. To select them in Driver, the method used by tmz on his 156 would be required.

When I did my re-skins, I was not completely happy with the result because of the resolution and mapping of the original body texture. When viewed close in, the separation of the different colours in the livery became blurry, similarly with the small bodyside logos. The resolution of the original image body.tga is 2048x512 so I tried doubling this to 4096x1028 but this did not improve the result. From a reasonable viewing distance they are OK, but I have considered making separate attachment meshes for the logos because these could be made to give much sharper resolution like the destination boards. Perhaps jack has found a method to improve this problem?

I had not previously considered uploading when I did my re-skins but I understand tmz's point about changeable destinations is still a reskin even if it requires changes to the .gs script. I am not sure if you are both suggesting a 3 way collaboration or whether you would prefer carrying on independantly.

Scottish
 
Back
Top