Thanks, Pascal. After some more searching, I found what aircraft it reminded me of: Messerschmitt Me 262, although after looking at the pictures, it was the fuselage and not the engines that were flattened on the bottom.
Install the app
How to install the app on iOS
Follow along with the video below to see how to install our site as a web app on your home screen.
Note: This feature may not be available in some browsers.
You are using an out of date browser. It may not display this or other websites correctly.
You should upgrade or use an alternative browser.
You should upgrade or use an alternative browser.
New Aircraft
- Thread starter seeseeme
- Start date
Thanks for the encouragement guys,
Pascal's absolutely right. (More of the history lesson...) When Boeing upgraded the 737 from the 200 series with more powerful engines, they had to improvise &, as Pascal says, move some of the accessories around the sides so that the engines didn't drag on the ground.
This engine shape is one of the more subtle model tweaks Vulcan has done with the 737 series. Others include tail geometry & some smoothing of the fuselage. There are now four different body sizes that align with the 200, 600, 700 & 800 series. (the 500 & 600 series are very similar & pretty close to the 300). That's just scratching the surface. There are rotating turbines, start up features & extra triggers.
I hope everyone likes these new 737s. Vulcan has spent a lot of time upgrading these. Look out for many more upgrades & new re-skins in coming weeks/months/years...
The Messerschmitt Me262 exists at the DLS, by Arraial, but it is static only and portrays an early prototype with a tail wheel.
This one is not German, but Austrian (the airline), for an aircraft made in Brazil: the Embraer 190.
Flyniki, was created by former Formula 1 pilot Niki Lauda. Belongs now to Air Berlin.

Usual features of Vulcan's startup models, plus an animated front door, for passengers access.
Embraer 190 FlyNiki Startup,<kuid2:74222:12187:1>
Pascal
This one is not German, but Austrian (the airline), for an aircraft made in Brazil: the Embraer 190.
Flyniki, was created by former Formula 1 pilot Niki Lauda. Belongs now to Air Berlin.
Usual features of Vulcan's startup models, plus an animated front door, for passengers access.
Embraer 190 FlyNiki Startup,<kuid2:74222:12187:1>
Pascal
RAAF - Desert Ops
Now for something more like current news rather than a history lesson.
Australia & many other countries are heavily involved in the turmoil in the Middle East at present. At an air base in the UAE, the RAAF's new generation of larger aircraft sit on the apron before dawn getting final checks & fuel loads before a busy day over Iraq.

Just as the sun starts to peer over the horizon, a Wedgetail & a KC-30A Tanker are waiting for final approval for take off.

The A30 Wedgetail air control is first to climb into the blue circling right over the Persian Gulf.

Next the KC-30A lifts off for a day re-fueling RAAF Wedgetails & Super Hornets along with British Tornadoes amongst others. With a boom & drogue hoses, it has the versatility to refuel anything from a Hornet to a C-5 Galaxy.

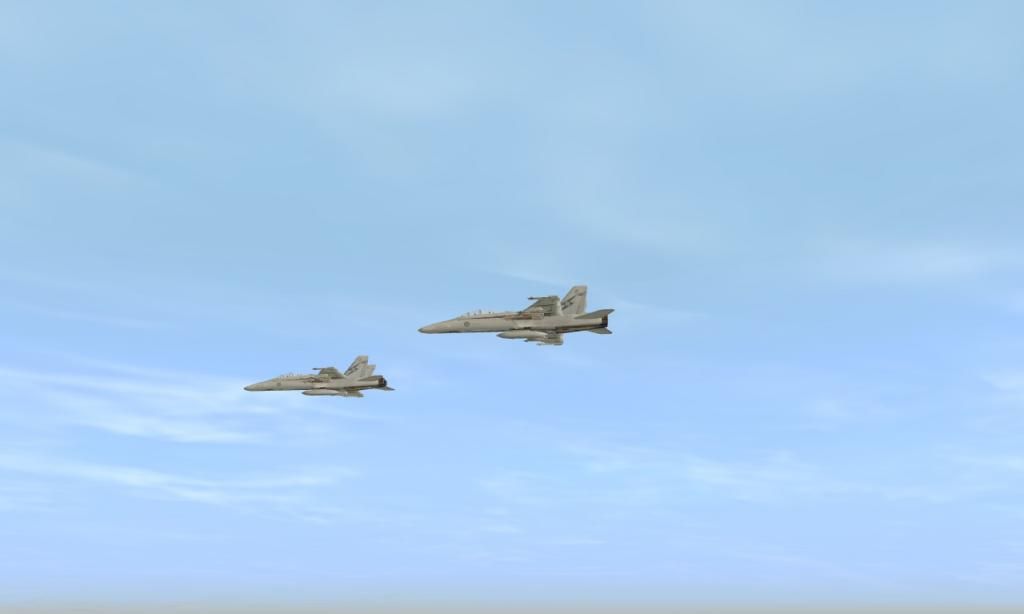
A bit slower out of their hangers are a pair of the RAAF's new Super Hornets.

The Hornets re-fuel before heading for the combat zone.

With the whole team in the air & re-fuelled, it's time to go to work.
Now for something more like current news rather than a history lesson.
Australia & many other countries are heavily involved in the turmoil in the Middle East at present. At an air base in the UAE, the RAAF's new generation of larger aircraft sit on the apron before dawn getting final checks & fuel loads before a busy day over Iraq.
Just as the sun starts to peer over the horizon, a Wedgetail & a KC-30A Tanker are waiting for final approval for take off.
The A30 Wedgetail air control is first to climb into the blue circling right over the Persian Gulf.
Next the KC-30A lifts off for a day re-fueling RAAF Wedgetails & Super Hornets along with British Tornadoes amongst others. With a boom & drogue hoses, it has the versatility to refuel anything from a Hornet to a C-5 Galaxy.
A bit slower out of their hangers are a pair of the RAAF's new Super Hornets.
The Hornets re-fuel before heading for the combat zone.
With the whole team in the air & re-fuelled, it's time to go to work.
Last edited:
RAAF - Desert Ops
The Super Hornets spend their days in a pattern over Iraq with aircraft from other countries waiting for a target.

The US & RAAF airborne control aircraft control procedures high above the Hornets that buzz across the desert just out of reach of the militants.

The call up comes & it's missiles away.

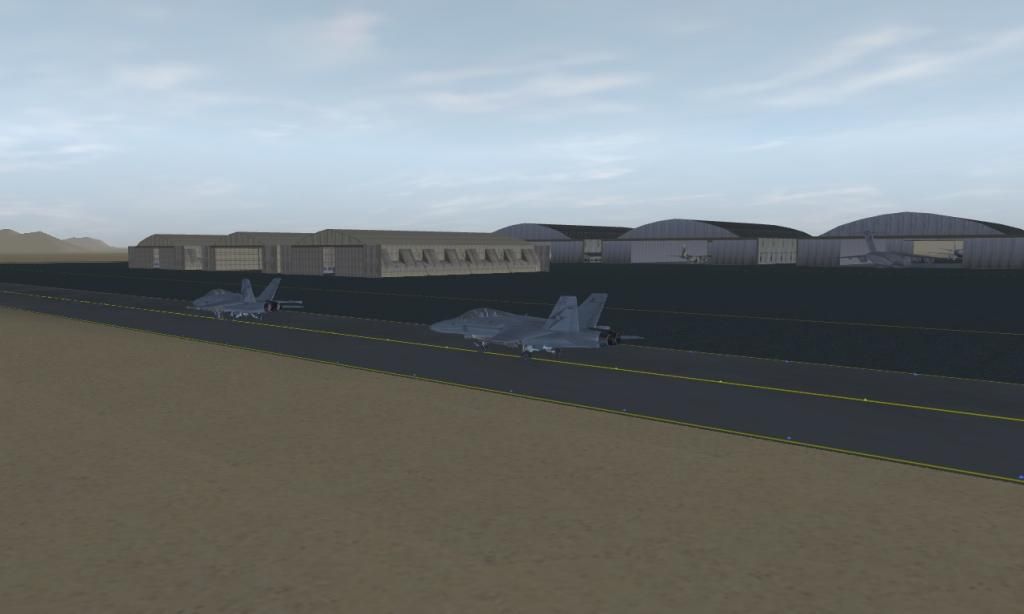
Late in the day, the Hornets are first to touch down. It's been a long but successful day.

With the light gone, the exhausted Wedgetail crew finally return to base after spending all day in the air.

Time for the ground crew to go to work clearing the desert sand out of the aircraft.


Recently, Vulcan has been doing some work on the three aircraft featured in this story. The Super Hornet will probably be a new asset as it is a new startup version. I'm still working in the background testing these with Vulcan. The Wedgetail is done but the KC-30A & Hornet have a few outstanding issues. Look out for the updated versions soon on DLS.
The Super Hornets spend their days in a pattern over Iraq with aircraft from other countries waiting for a target.
The US & RAAF airborne control aircraft control procedures high above the Hornets that buzz across the desert just out of reach of the militants.
The call up comes & it's missiles away.
Late in the day, the Hornets are first to touch down. It's been a long but successful day.
With the light gone, the exhausted Wedgetail crew finally return to base after spending all day in the air.
Time for the ground crew to go to work clearing the desert sand out of the aircraft.
Recently, Vulcan has been doing some work on the three aircraft featured in this story. The Super Hornet will probably be a new asset as it is a new startup version. I'm still working in the background testing these with Vulcan. The Wedgetail is done but the KC-30A & Hornet have a few outstanding issues. Look out for the updated versions soon on DLS.
Last edited:


New Taxiway Junction System
Here's one for you airport builders.
Recently Vulcan & I have been looking at an improved system for airport taxiway junctions.
The existing Vulcan turn out junctions available are a little limited as they only allow a two way switch much like a rail junction. Airport Taxiway junctions are a lot more complex and we needed to come up with a way to make them a bit more prototypical & functional.
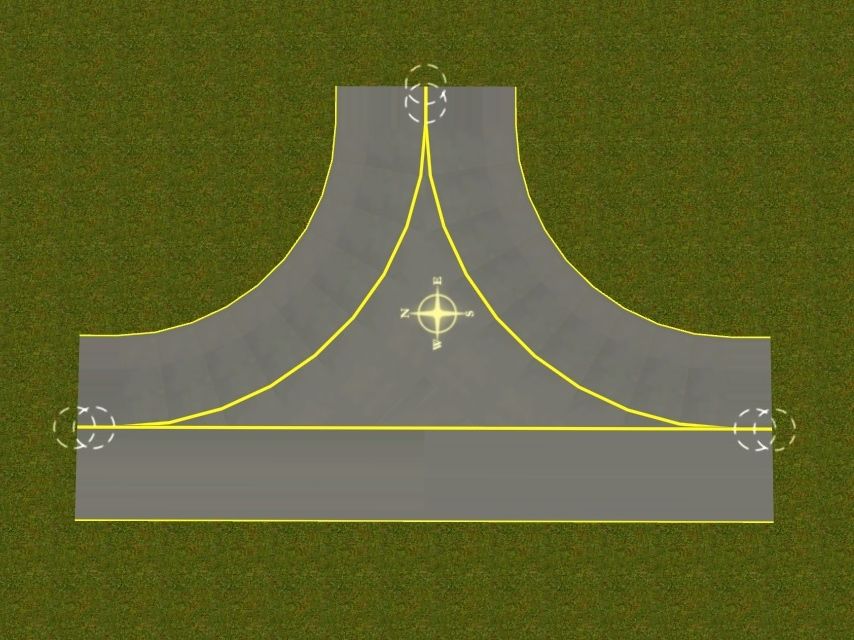
There are a number of different types that are listed below. The following is a tutorial of sorts, that will both help you understand the concept and understand how to place them effectively. I've used the tee junction for this example.
Place the junction from the object placement tool.
Once the junction is placed, the ? will allow you to see a help page with some screen shots and tips. These are great as a learning tool for the first few times or if you get lost along the way.
Connect the taxiway splines to the outer connect points.
Next, add invisible in driver track splines (blue, green, purple etc by Vulcan) between the inner connect points. You will have to add at least one node between the junction connect points. We've found it best to run the straight through runs first (highlighted in pink). This is also the best strategy for the more complex junctions. It is also best to add the 3 nodes as shown below. The left & right node will become junctions. Unfortunately you can't see the track you've just placed because it sits below the top surface of the junction, but have faith.
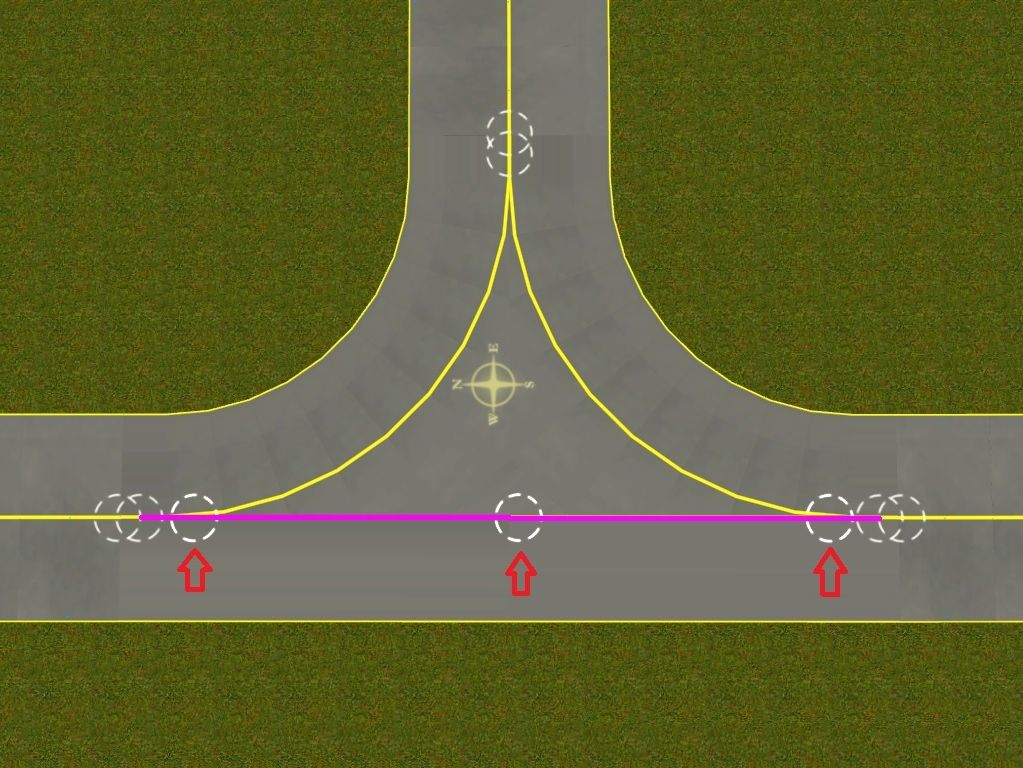
Next, add the curved sections. Add a short straight from the branch node. This node will be the other junction. Then add the two curved sections making sure the mid length node is included and the switches place correctly. The mid span nodes help the track have the right shape. This is very important when using the more complex junctions.

At this stage I like to change the switches for "Lever Invisible" switches. If you have them set as the default placement, you won't have to.
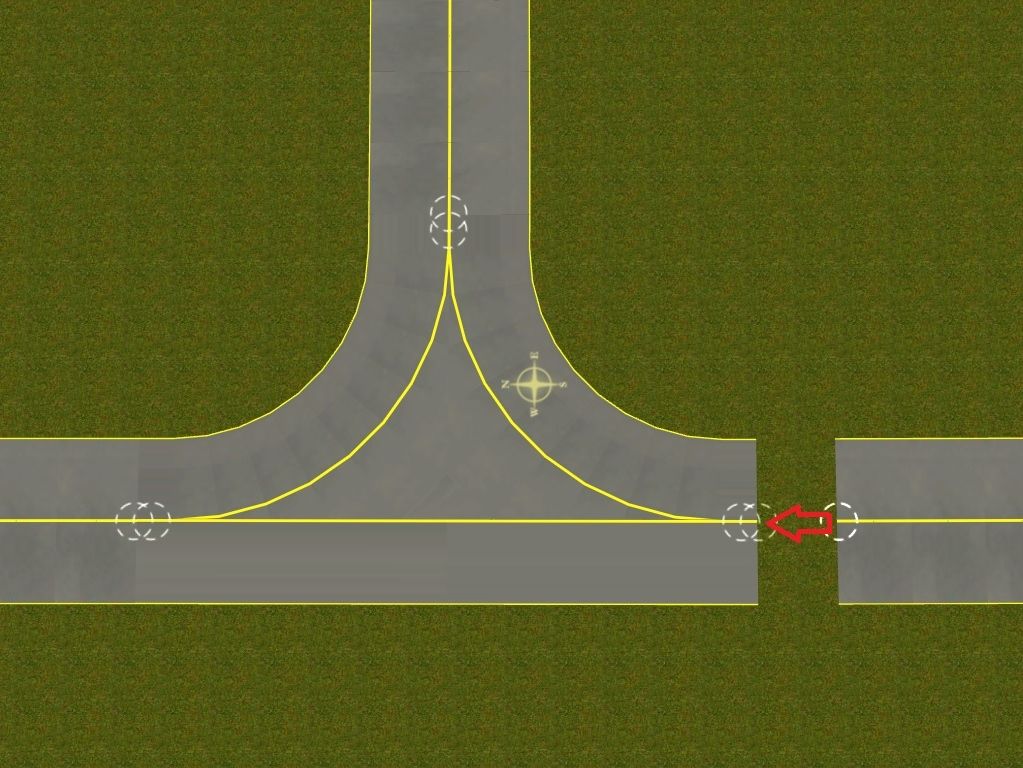
If you delete the junction asset, this is what it should look like. You can delete, then undo if you want to be sure of what you've placed which is recommended the first few times at the very least.
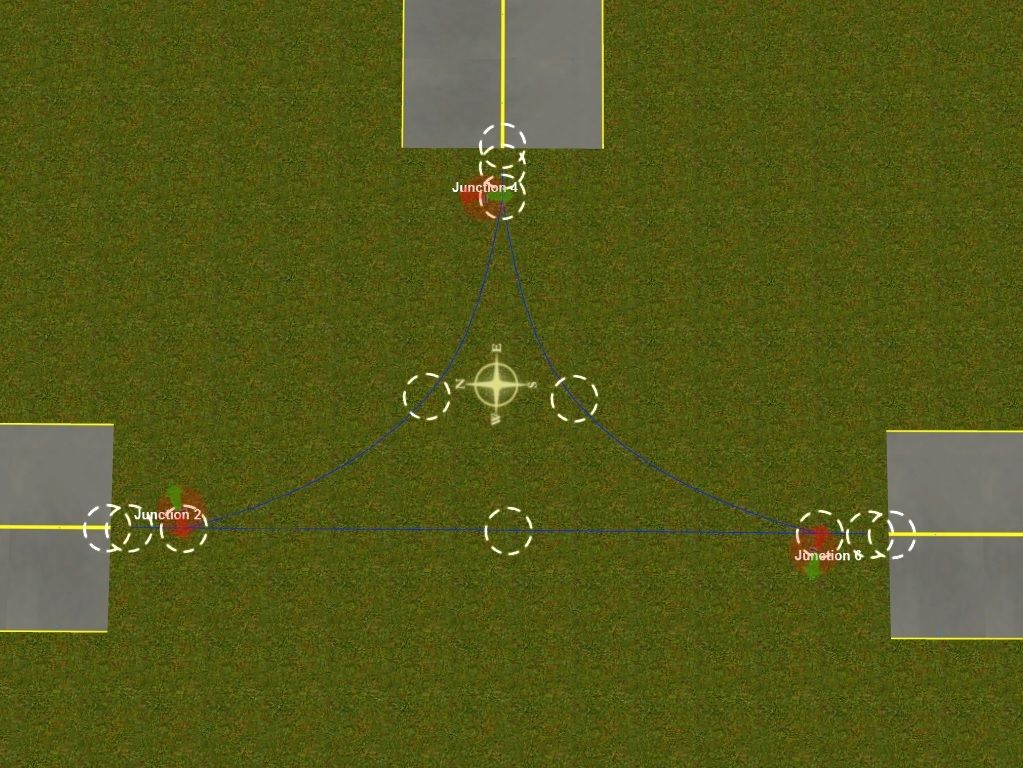
When you're done it should look a bit like this.

In Driver you can <ctl><H> to hide the switches (this doesn't happen with the existing junctions) & at night you'll see the lights along the yellow lines like the taxiway track splines. The result is well worth a little bit of pain to build the junction. Visually & functionally the new system is a really good result.

Hopefully this helps some of you guys building your airports.
There are standard 90 tees & crosses in 25m & 40m wide along with 40m wide angled tees for the high speed runway exits on the bigger city airports. Try them & post some comments & screenshots on this forum. We'd love to know what you think of them & whether there are improvements we could make. Below are to set that are now available on DLS under Vulcan's username.
Airport Taxiway Cross 25 metre radius
Airport Taxiway Cross 40 metre radius
Airport Taxiway Diagonal Cross 30 degrees 40 metre radius
Airport Taxiway Tee 25 metre radius
Airport Taxiway Tee 40 metre radius
Airport Taxiway Turn Left 30 degrees 40 metre radius
Airport Taxiway Turn Right 30 degrees 40 metre radius

Many thanks to Vulcan for deciphering my ramblings to produce these excellent models. If you have specific junctions for your airports that don't fall into any of these assets (as I do), either leave a message on this thread or contact Ian directly with a PM. I'm sure he's got nothing better to do. :hehe:
Now. Back to my aircraft skins....
Here's one for you airport builders.
Recently Vulcan & I have been looking at an improved system for airport taxiway junctions.
The existing Vulcan turn out junctions available are a little limited as they only allow a two way switch much like a rail junction. Airport Taxiway junctions are a lot more complex and we needed to come up with a way to make them a bit more prototypical & functional.
There are a number of different types that are listed below. The following is a tutorial of sorts, that will both help you understand the concept and understand how to place them effectively. I've used the tee junction for this example.
Place the junction from the object placement tool.
Once the junction is placed, the ? will allow you to see a help page with some screen shots and tips. These are great as a learning tool for the first few times or if you get lost along the way.
Connect the taxiway splines to the outer connect points.
Next, add invisible in driver track splines (blue, green, purple etc by Vulcan) between the inner connect points. You will have to add at least one node between the junction connect points. We've found it best to run the straight through runs first (highlighted in pink). This is also the best strategy for the more complex junctions. It is also best to add the 3 nodes as shown below. The left & right node will become junctions. Unfortunately you can't see the track you've just placed because it sits below the top surface of the junction, but have faith.
Next, add the curved sections. Add a short straight from the branch node. This node will be the other junction. Then add the two curved sections making sure the mid length node is included and the switches place correctly. The mid span nodes help the track have the right shape. This is very important when using the more complex junctions.
At this stage I like to change the switches for "Lever Invisible" switches. If you have them set as the default placement, you won't have to.
If you delete the junction asset, this is what it should look like. You can delete, then undo if you want to be sure of what you've placed which is recommended the first few times at the very least.
When you're done it should look a bit like this.
In Driver you can <ctl><H> to hide the switches (this doesn't happen with the existing junctions) & at night you'll see the lights along the yellow lines like the taxiway track splines. The result is well worth a little bit of pain to build the junction. Visually & functionally the new system is a really good result.
Hopefully this helps some of you guys building your airports.
There are standard 90 tees & crosses in 25m & 40m wide along with 40m wide angled tees for the high speed runway exits on the bigger city airports. Try them & post some comments & screenshots on this forum. We'd love to know what you think of them & whether there are improvements we could make. Below are to set that are now available on DLS under Vulcan's username.
Airport Taxiway Cross 25 metre radius
Airport Taxiway Cross 40 metre radius
Airport Taxiway Diagonal Cross 30 degrees 40 metre radius
Airport Taxiway Tee 25 metre radius
Airport Taxiway Tee 40 metre radius
Airport Taxiway Turn Left 30 degrees 40 metre radius
Airport Taxiway Turn Right 30 degrees 40 metre radius
Many thanks to Vulcan for deciphering my ramblings to produce these excellent models. If you have specific junctions for your airports that don't fall into any of these assets (as I do), either leave a message on this thread or contact Ian directly with a PM. I'm sure he's got nothing better to do. :hehe:
Now. Back to my aircraft skins....
Last edited:
Hi Rob, airport management now? These junctions are welcome, giving authenticity to our taxiways. Good tutorial, much needed!
We have now a Russian civil aircraft, thanks to Vulcan.
It is an Antonov An-24, widely used in all eastern Europe, and in many other countries. First flown in 1959, and some are still flying.
This one was operated by Tarom, in the 70s.

Antonov An-24RV Tarom Startup,<kuid2:74222:12188:1>
Just uploaded.
Pascal
We have now a Russian civil aircraft, thanks to Vulcan.
It is an Antonov An-24, widely used in all eastern Europe, and in many other countries. First flown in 1959, and some are still flying.
This one was operated by Tarom, in the 70s.
Antonov An-24RV Tarom Startup,<kuid2:74222:12188:1>
Just uploaded.
Pascal
Thanks Rob, a good suggestion by Rob, to do a series of junctions using this technique. Your post covers the issues nicely I think.
The idea was to be able to make multiple junctions compactly, and match existing track splines. Fixed track junctions have been limited to one divergence and it was not possible to show the usual red and green direction markers. It is quite easy to add the additional track to the new objects, and temporarily deleting the object itself is a good way to check the connections. Don't forget the popup help screens.
Some new aircraft, the RAAF Wedgetail is an update:

The Embraer 190 in KLM colours:

The new Antonov AN24, you have seen Papou's reskin above - this is the SCAT model used in Pakistan:

Ian
The idea was to be able to make multiple junctions compactly, and match existing track splines. Fixed track junctions have been limited to one divergence and it was not possible to show the usual red and green direction markers. It is quite easy to add the additional track to the new objects, and temporarily deleting the object itself is a good way to check the connections. Don't forget the popup help screens.
Some new aircraft, the RAAF Wedgetail is an update:
The Embraer 190 in KLM colours:
The new Antonov AN24, you have seen Papou's reskin above - this is the SCAT model used in Pakistan:
Ian
Last edited:


mattsmith28
New member
WOW that looks amazing
I think it is also amazing that these aircraft enthusiasts have adapted or created, with little or no trouble, many of the Trainz assets normally used for train operations and are very successfully using them for very realistic aircraft operations.
Nice work!!!
Andrew
Nice work!!!
Andrew
In the bottom pic you'll see a blue circular track around the tower, I placed a tracking camera in the tower and made a half domed camera loco and
placed that on the track, named the driver tower camera so that now I can use the loco with the view switched to tracking a follow all the ground movement from the tower.
Hope that makes sense, will upload it soon to the DLS.
Gordon
placed that on the track, named the driver tower camera so that now I can use the loco with the view switched to tracking a follow all the ground movement from the tower.
Hope that makes sense, will upload it soon to the DLS.
Gordon
Last edited:
mattsmith28
New member
track work at CHCH
Gordon
Are all the taxiways, parking docks etc all available for download?

mattsmith28
New member
Ok Thanks, I'm just starting to try and build an airport
Similar threads
- Replies
- 3
- Views
- 288
- Replies
- 4
- Views
- 344