Found this in the forum archive from the way-back-machine. thought it would be handy. some of the stuff covered here is old.
[FONT=verdana,arial,helvetica]Originaly Posted by: vulcan
Making, Using and Posting Screenshots in Trainz[/FONT] [FONT=verdana, arial, helvetica]There have been a number of questions on how to manage screenshots and how to post them on the forum. Here is a brief tutorial, that may be of assistance, and it covers -
1. setting up a scene for a screen shot;
2. taking the shot in Trainz Surveyor or Driver;
3. adjusting the screenshot size and type;
4. posting in the forum; or
5. using the screenshot in a model upload cdp package.
1. Setting a realistic scene
A scene in Driver will usually show a locomotive and rolling stock and the surrounding background, the whole picture being of importance. In Surveyor, you may require a picture of a model you have created, and while the background is important, the model is the prime focus, so a light textured background may be best to set off the model.
Try not to have distracting objects in the background for a model, nor have the yellow grid lines showing in a picture.
Lighting is important, so set the start time in Driver for the best effect, or place the models in Surveyor so the model is lit from the correct side. You can adjust the time of day in the Surveyor World menu.
Your screen resolution will determine the size of the screenshot. You will likely crop or reduce the final image later, to suit the purpose.
2. Taking the screenshot
The menus in Driver or Surveyor can get in the way, so in Driver, choose the view you wish, Cab, External, Tracking or Free Roaming, then press the F5 key (for TRS) to remove the menu displays. Press the F5 key again to get the menus back again. In UTC, press the Ctrl and Spacebar keys together to remove the menus.
In Surveyor, there will also be distracting spline circles, the compass and menus. Hold down the Alt key and type in the letters w a l k, and the distractions will disappear, leaving a view at eye height. Using the mouse and cursor arrows you can now move around your layout for the best angle for a screenshot. Press the escape key (Esc) to return to the menu display.
A better option is to hold down the Alt key and type in the letters f l y. This removes the menus, and allows you to move freely around the scene, using the mouse, the cursor keys and also the Page Up and Page Down keys. These Surveyor options do not remove the arrows that show on locomotives in TRS, so you may have to edit the picture later to remove these. Press the escape key (Esc) to return to the menu display.
When you have the best picture angle, with good lighting, and no distracting backgrounds, press the PrintScreen key at the top of your keyboard (make sure you move the mouse cursor out of the way first). This saves a copy of the scene to the clipboard, and also to the folder C:\Program Files\Auran\TRS2004\ScreenShots (for a default installation of TRS).
If you wish to have a look at the picture in your painting program without closing Trainz, use the Alt and Tab keys together to exit Trainz, load your paint program and paste the clipboard directly into the program (Ctrl v is the short cut key to paste in most paint programs). If you do not like the shot, just Alt Tab back into Trainz (or click on the Jet icon in the bottom task bar) and take another shot.
Remember, you also have a copy of the picture, at the default screen resolution, in the Screenshots directory. This is saved as Screen_001.tga, and each subsequent save from Trains increments the file number, without overwriting the already saved files.
3. Editing the images
Open the image in your paint program. Many use Paint Shop Pro, or Photoshop, but there is a free image manipulation program that is very useful, Irfanview, from this website: http://www.irfanview.com/
If you wish to post a picture on the forum for others to see, remember that size effects computer performance, and large screenshots take time to download. The .tga screenshot will be too large a file, set by your Trainz screen resolution. You should convert the pictures to JPEG (.jpg) format.
A good size is 640 by 480, some use larger, but I mostly use 450 by 340, giving enough clarity and keeping website file storage size small. Again, the image file type for web transmission should be .jpg
If you are making a picture to be included in a model cdp package, it should be 240 by 180 .jpg type. This is selected when you are incorporating a screenshot in your package, and it will be displayed on the Download Station.
If you can Crop the original picture to the desired size, you retain the best quality. To reduce the size, use the Resize or Resize/Resample tools available in your paint program. If you have to reduce the picture size, you will blur the image. You should use the Sharpen tool to improve the image definition after size reduction. The very small final image size (240 by 180) for a model package is usually very blurred and the Sharpen tool is essential here.
Often, you may need to lighten the image, so it is not too dark when displayed on the forum. Remember that you want your picture to be presented in the best possible light.
There may be some parts of the image that need editing, like the arrows above locomotives. You may be able to paste sections of sky or scenery over the arrows, or use a Clone tool available in Paint Shop to copy adjacent scenery colours and textures over the problem areas.
I firstly save the modified file to the Screenshots directory, then copy or move it later. A system I use is to include some "code" in the name, to tell me what size file it is, for example, bridge450.jpg is a 450 by 340 file, a bridge2640.jpg is 640 by 480, and is number 2 in a picture series for this bridge. When you have many screenshots of different sizes some way of identifying pictures is useful.
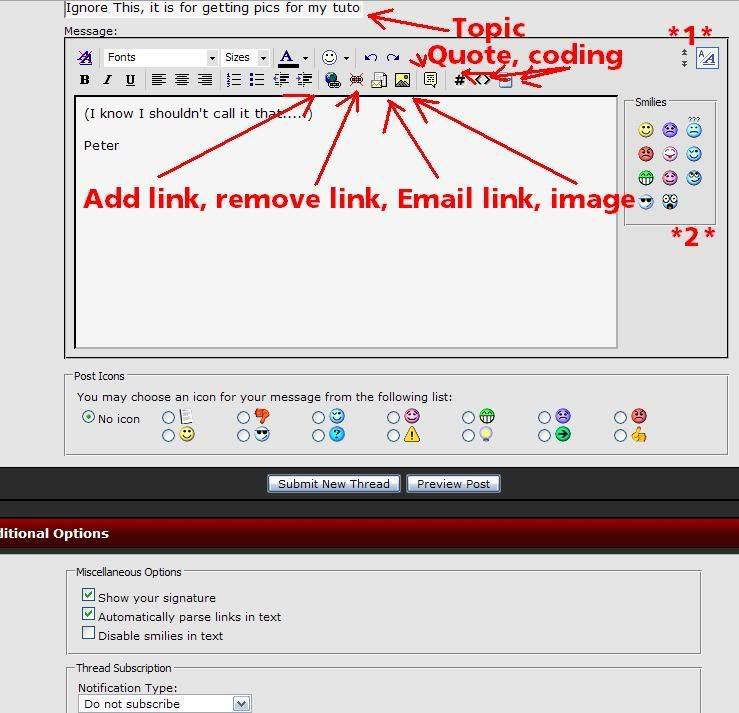
4. Posting an image on the forum
Firstly, you can only post an image if it is placed on a website somewhere. You then link to the URL address of the image. You cannot link to an address on your hard disk. While there are some free website services, some limit the bandwidth and the data transmission, based on so much per hour. Data is transmitted when anyone looks at your image on the forum, and some website providers shut the link down for a period when the transmission allowance is exceeded, and then a small red cross will show in your post until the link is restored by the service provider, very frustrating.
The images should be in the .jpg format to minimize file size, and you should be aware of the effect on modem connections with large files. Many will not wait for your image to load, so will not see the nice model or scene you have created.[/FONT]
Last edited: