Install the app
How to install the app on iOS
Follow along with the video below to see how to install our site as a web app on your home screen.
Note: This feature may not be available in some browsers.
You are using an out of date browser. It may not display this or other websites correctly.
You should upgrade or use an alternative browser.
You should upgrade or use an alternative browser.
Scenery – let’s get real!
- Thread starter mezzoprezzo
- Start date
Kurt,
I would make the ballast texture extra wide then blend the grass back into the ballast. It's easier that way and gets rid of the square bumps of texture as the track goes around a curve.
John
Hello John,
Thank you for your reply. The track laying has been done using Transdem. As this is a part of my first route, due to my inexperience in route making, I sometimes do not know how to solve a certain problem. I'm always thinking in a direct way, however I have been getting some issues in Trainz were I have to go from point A to C in order to get in B.
For this case, I will place the tracks as far as possible.
Best regards
Kurt :wave:
Kurt,
I use both Transdem, old Hog and a lot of hand-created terrain. The path that is created in Transdem and Hog is not always 100% accurate, but more of a good indication of where the track should be. This is more of a problem with rough terrain because the the interpolation with the heights.
This however shouldn't stop you from placing textures. I use a darker ballast for the outside of the tracks, even extending out in to the grass, then blend the grass back. This takes many swipes of the paint tool all done very lightly, so the textures blur and blend, along with rotating the brush using the [ ] keys, so that the textures aren't all in the same direction. Once these base textures are down, I then ballast the track its self. Sometimes the ballast will be a lot more outside the tracks than in other places, but railroad RsOW are like that for real.
If I find some good pictures, I'll post them for you to see.
John
Hello John,
Thank you for the extra information. I will try to use your technique.
I often wonder what kind of technique is being used when I see some lovely pictures. And I'm not a gifted designer, never been any good at making drawings and paintings. So playing with different textures, isn't always that easy for me.
In the Trainz-Dutch section of this forum, I have found some pictures of Stevado - here's the link http://forums.auran.com/trainz/showthread.php?63085-2010-content-van-Stevado.
And there is also my fellow countryman Darkdan - I noticed that his pictures ( screenshots section of this forum - period 2008/2009 have been removed from within this forum
Best regards
Kurt :wave:
Hello belgian46/Kurt,
I do not understand why you "would like to find a solution for the ground colouring without using splines". There is no solution - if you want sharp edges.
Look, how easy you can solve the problem you showed in your picture above:

I placed a ballast-spline between and right/left of the tracks, as you can see in the front of the picture. Problem solved!
jost62
I do not understand why you "would like to find a solution for the ground colouring without using splines". There is no solution - if you want sharp edges.
Look, how easy you can solve the problem you showed in your picture above:
I placed a ballast-spline between and right/left of the tracks, as you can see in the front of the picture. Problem solved!
jost62
Last edited:
misterchugg
Active member
hi mateI placed a ballast-spline between and right/left of the tracks, as you can see in the front of the picture. Problem solved!
will that ballast spline act up in 2010EE?
most splines seem to not worrk the way they should.
i too have the same problem with ballast and texturing
thanks
ron
hi mate
will that ballast spline act up in 2010EE?
most splines seem to not worrk the way they should.
i too have the same problem with ballast and texturing
thanks
ron
Hi Ron,
I agree. I've always had trouble with blinky splines like that and avoid them as well. They maybe good for flat routes, but not those with a grade because being a spline, they'll tend to float. The other issue to is with TS2010 and TS12. They'll disappear until the train is on top of them which doesn't look good either as well as cause performance problems since they're splines.
John
misterchugg
Active member
hi john
yep. it just doesn't look right when its like that.
i haven't had much time over the last week to work on detailing the new route, but hopefully this week i'll get some
cheers
ron
yep. it just doesn't look right when its like that.
i haven't had much time over the last week to work on detailing the new route, but hopefully this week i'll get some
cheers
ron
Hello belgian46/Kurt,
I do not understand why you "would like to find a solution for the ground colouring without using splines". There is no solution - if you want sharp edges.
Look, how easy you can solve the problem you showed in your picture above:
I placed a ballast-spline between and right/left of the tracks, as you can see in the front of the picture. Problem solved!
jost62
Hello jost62,
Thank you for showing me a solution for the ground texturing issue. I realise that splines can offer a solution in some cases.
Nevertheless, I also agree with John Citron ( see post #87 ).
Best regards
Kurt :wave:
Notice the lighter Background..
I'm sorry to keep quoting pics all the time, but I feel pics are worth a thousand words..This time I would like to say how important lighting is..You can pickup nice shadows even if you don't think there is anything there..shadows always inhance what have..The following Pic was taken at 7:00 AM..
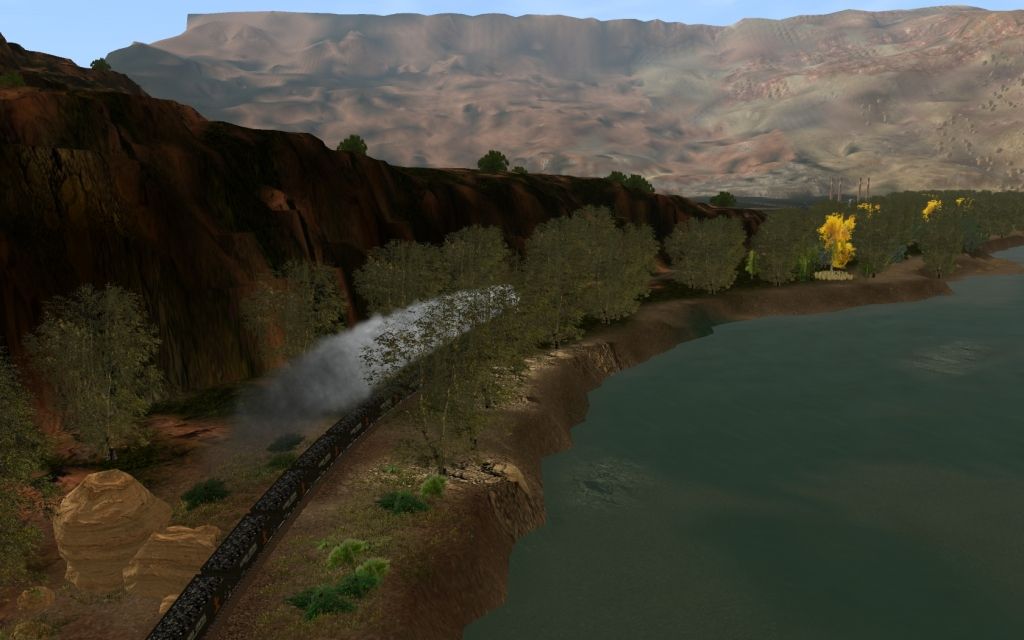
I'm sorry to keep quoting pics all the time, but I feel pics are worth a thousand words..This time I would like to say how important lighting is..You can pickup nice shadows even if you don't think there is anything there..shadows always inhance what have..The following Pic was taken at 7:00 AM..
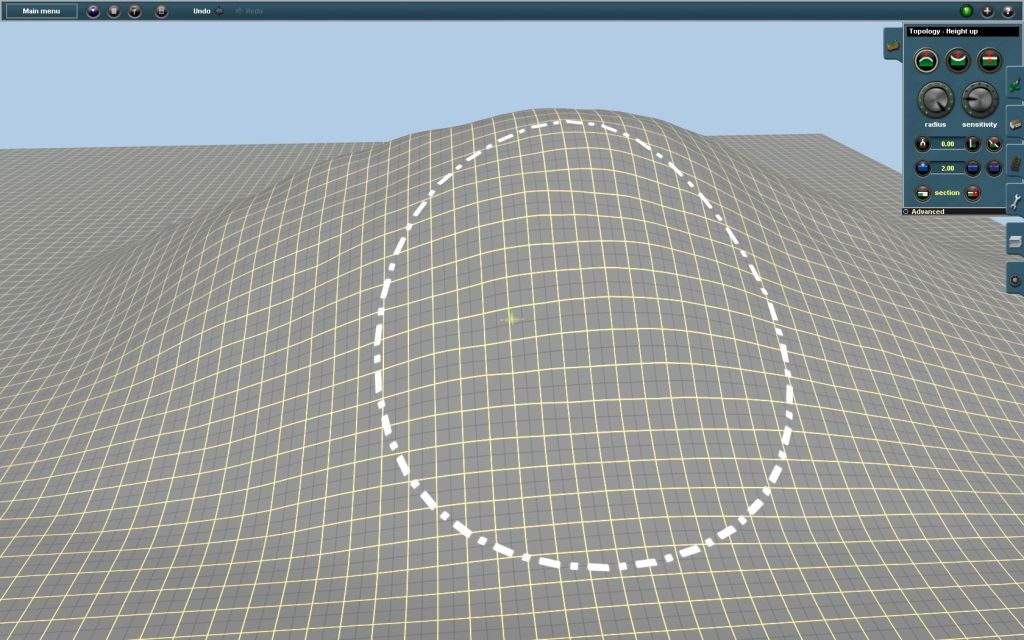
Creating old mountains like the Scottish Highlands.
I always wanted to know if there is a good way of creating this type of rounded mountain scenery. Creating young mountains like the Rockies or the Alps I find reasonably straightforward with our surveyor tools. but the old mountains with the smooth faced gentle slopes always end up covered with 'warts' no matter how many times I go over it with the plateau tool.
Because I want to a create a mountain range rather than a single hill, I usually start with a series of blobs of different heights using the 'use height' tool and then try to blend them into a smooth slope with the 'plateau' tool but the slope is still uneven and 'warty' and not as good as some can achieve.
The 'height up' and 'height down' tools give a smooth slope which is a good start point for a single hill but because there is little control over these tools I find that it is difficult to create the appearance of a wide panorama like a long mountain rather than a series of lumps of different heights.
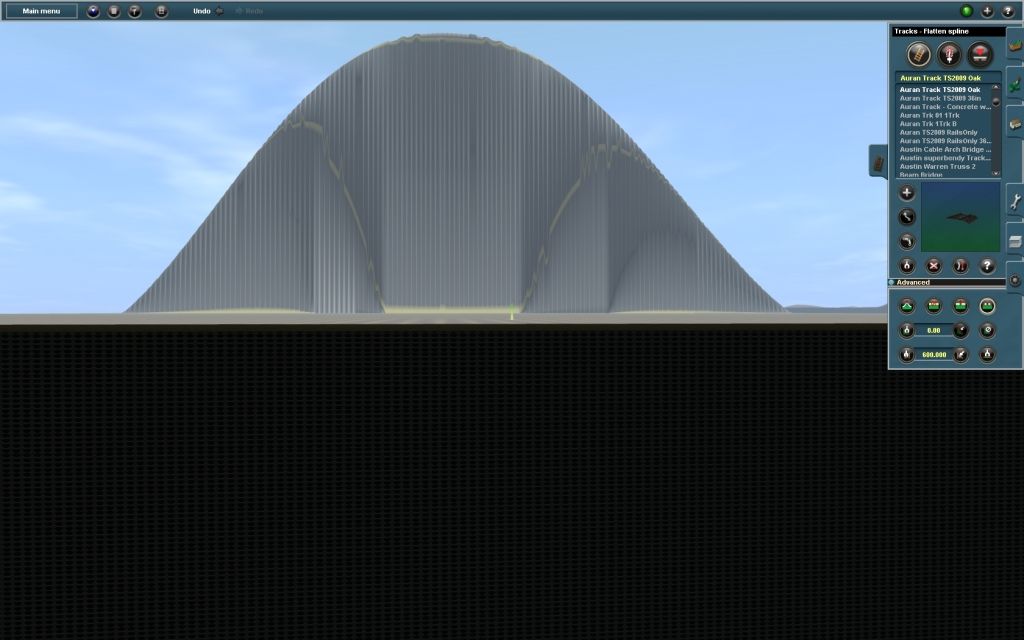
I have tried the technique of laying ribbons of track with different vertex heights along the ridge and using the 'smooth spline' tool. This works OK for a relatively short slope but trying to create a mountain ridge with this method not only requires a lot of track but leaves deep chasms between the tracks to be filled in with either the plateau tool or laying blobs at varying heights with the 'use height' tool. Therefore no advantage is gained with this method.
Any tips please?
Scottish
I always wanted to know if there is a good way of creating this type of rounded mountain scenery. Creating young mountains like the Rockies or the Alps I find reasonably straightforward with our surveyor tools. but the old mountains with the smooth faced gentle slopes always end up covered with 'warts' no matter how many times I go over it with the plateau tool.
Because I want to a create a mountain range rather than a single hill, I usually start with a series of blobs of different heights using the 'use height' tool and then try to blend them into a smooth slope with the 'plateau' tool but the slope is still uneven and 'warty' and not as good as some can achieve.
The 'height up' and 'height down' tools give a smooth slope which is a good start point for a single hill but because there is little control over these tools I find that it is difficult to create the appearance of a wide panorama like a long mountain rather than a series of lumps of different heights.
I have tried the technique of laying ribbons of track with different vertex heights along the ridge and using the 'smooth spline' tool. This works OK for a relatively short slope but trying to create a mountain ridge with this method not only requires a lot of track but leaves deep chasms between the tracks to be filled in with either the plateau tool or laying blobs at varying heights with the 'use height' tool. Therefore no advantage is gained with this method.
Any tips please?
Scottish
Hi Bob,
I use this method but it is difficult to keep it looking real when the mountain peak is about 600 feet above board level. The tendency is to get multiple peaks rather than one peak with a slightly lower ridge running away towards ground or towards another peak say a mile away. That is why I try to do it using the 'use height' tool to set some predetermined height blobs and blend with the plateau tool (hence the warty appearance rather than a smooth surface).
By the way, I like the way you use textures instead of spline objects.
Scottish
One of the things I noticed with texturing and scenicking is we tend to rush when we get to this stage as though scenicking the route is a second thought, or perhaps it's just we can't wait to get in the driver's seat and see our creation. For me this has been a discipline thing to try to take my time, to fiddle around with everything instead of dumping the green textures down and hoping for the best afterwards.
I can say that this took quite a number of years to get to this point, but then again I also went through a bit of a "wrecking" period where things really weren't that great. I guess we could chock this up to experience, learning how to texture and create convincing scenes instead of overly ambitious ones with either too much detail, or foolishly trying to include every little detail even if it's not needed.
John
If you guys don't mind, here's a tip from the Snowman.
It always amazes me when I see a fairly nice route --- until I see the map-maker has laid his highways and rural roads right on top of the grass, like so:

Most highways, 2-lane or otherwise, have shoulders on each side of the road, and most shoulders are gravel, so why not go for that effect in Trainz? Add gravel on each side of the road to make it look more realistic, at least in my view:

To my way of thinking, this just adds more realism.
Cheers,
Dave
PS I like this thread.
It always amazes me when I see a fairly nice route --- until I see the map-maker has laid his highways and rural roads right on top of the grass, like so:
Most highways, 2-lane or otherwise, have shoulders on each side of the road, and most shoulders are gravel, so why not go for that effect in Trainz? Add gravel on each side of the road to make it look more realistic, at least in my view:
To my way of thinking, this just adds more realism.
Cheers,
Dave
PS I like this thread.
Similar threads
- Replies
- 6
- Views
- 667
- Replies
- 11
- Views
- 467
- Replies
- 4
- Views
- 1K
- Replies
- 10
- Views
- 576