Scenery – let’s get real!

<snip>

468379_323244521078153_100001778243253_733108_1377685569_o.jpg


<snip>

Roy;)

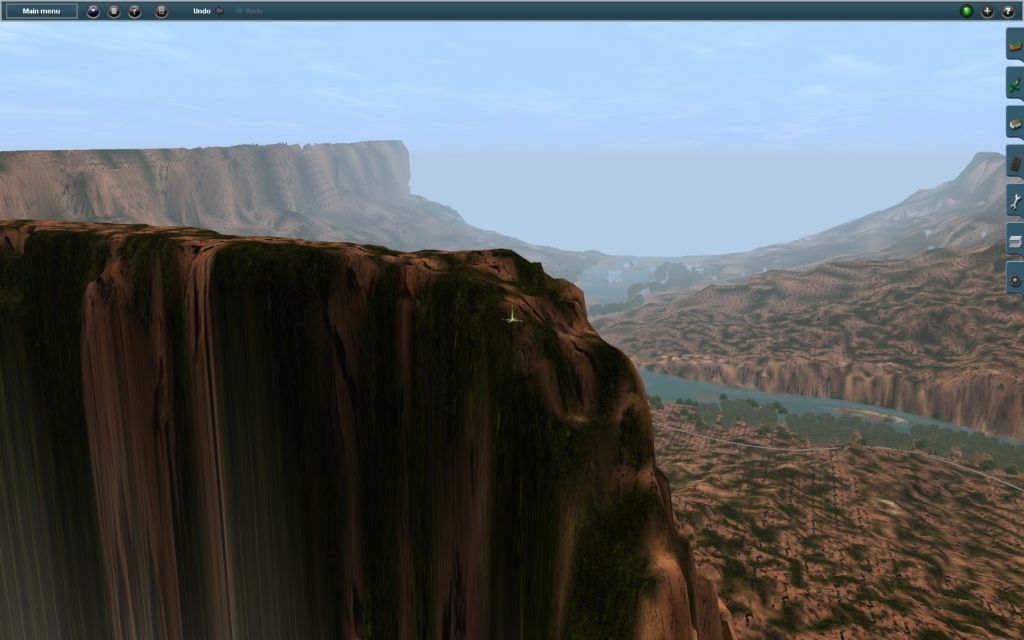
Oh man, that looks good. I mean really good.

It made me think of some of them old Roger Dean album covers.

All your page 5 are belong to me.
 
With all due respect Bob, I still find some of your rock faces too "stretchy". I would say about the top 25% of that cliff in the foreground looks great. I could even accept the top 40%, but below that with the exception of the leading edge I am not pleased. Of course, if that's track down there, and this exposure faces away from the route, (as it appears to), then it's perfectly understandable.:)
 
Thanks Ed: The wall is facing the track down below..Also I see now where I have picked up a pattern in my rocks below..
 
No, thank you for taking my comment well. It's a shame the textures get so stretched on near vertical surfaces like that. It's not your fault of course, just the limitations of the program.
 
I believe that the missing element in Trainz 2012 is shadowing. Attempts to do this with "art" seem to fall short. Example the scene with the rocks and river. Everything looks very good but, for me, the lines between the individual rocks do not look like shadows. In fact if there were shadows in Trainz perhaps the area between the rocks would look much better. Until, and IF, N3v spends the money to incorporate universal shadowing much of the excellent art will not be seen in its proper appearance. If this was a painting then shadows could be painted in but in Trainz we move and the Sun moves so only modern game graphics will let these creations show their true excellence.
 
If I understood it correctly this thread was not thought to be just another screenshot-thread. I found it highly enlightening how mezzoprezzo in his first contributions described his artwork, designing, "tips and tricks" how to use the various tools of Trainz to design his wonderful scenery - beyond what Trainz offers automatically. I wished that mezzoprezzo (and others) share with us more of their explanations how they "design" there scenery to make it unique.

jost62
 
Paint seems to be applied by the Trainz software in an unusual spray pattern. I’ve noticed it varies according to where the mouse pointer is in relation to the grid square when the texture is placed. Here are some examples with radius on minimum which show a plain red texture separately sprayed several times with a very quick click of the LMB.

Although the radius and scale is identical in each example, the pattern is very different. This seems to occur because the compass point was moved each time to a different relative position within the grid space. A click at the centre of a 10m square will produce a very different result to one placed nearer the edge.

847e0bba.jpg


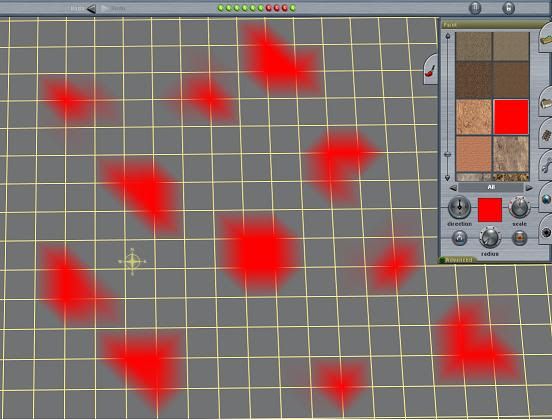
For the most part this won’t matter too much, but these shapes can be exploited to help provide some creative effects. Examples where it can be useful is when want to place piece of feature texture like a rock, shrubs or a puddle. Sometimes these just won’t go exactly where you want. But by rotating and/or changing the compass position point where the spray is directed it can usually get very close after a bit of trial and error.


Cheers
Casper

Hello everybody,

Is there an explanation for the following phenomenon? When you place the mouse pointer in the centre of a yellow square and you don't use any radius nor scale level, when you click with the left mouse button, you simply do not get any colouring of the selected square.

Is it possible to colour some squares without interference of the used colours. I like to have one colour in one square and another colour in the square which lays just right, left, above or under. Using the paint tool in trainz is for me like going back some 44 years in time. I was 5 years old, when I learned to colour my picturebook and stay between the lines. :hehe: Just impossible with the paint tool :(

Thank you.

Best regards

Kurt :wave:
 
Last edited:
belgian46: I agree with you..There are sometimes when you need a staight separation between colors..It would be nice too have something like that..The closes way I have found, is to the have Curser(circle) small as you can get and go from there..
 
Hello BobCass,

Thank you for your reply.
I have created a helpdeskticket concerning the paint tool.
The ticket contains my elements in reply #70 and also the following

When using the paint tool and selecting a specific area, whenever I click on the fill area button, it is simply impossible to get the selected area painted. Area's outside the selection are also coloured.

When a helpdesk reply is received, I will place it in this thread.

Best regards

Kurt :wave:
 
If I understood it correctly this thread was not thought to be just another screenshot-thread. I found it highly enlightening how mezzoprezzo in his first contributions described his artwork, designing, "tips and tricks" how to use the various tools of Trainz to design his wonderful scenery - beyond what Trainz offers automatically. I wished that mezzoprezzo (and others) share with us more of their explanations how they "design" there scenery to make it unique.

jost62

I don't know that there a 'how' to designing scenery. I find that photos, maps and Goggle Earth all contribute to a 'sense' of a place; helping to form a mental picture of what a scene should look like. Of course, walking the ground helps too, but is not always possible. I think forming that mental picture is the secret to realistic scenery. Surveyor, itself, is relatively simple to use, and there are few actual techniques involved in painting a scene. It seems to me that the great weight of the visusal effect in scenery is choosing the right textures to paint with, as well as choosing complimentary objects within the scene (trees, shrubery, etc.). This seems to be a 'trial and error' approach, guided by that mental picture. Refining a scene, adding, deleting, and changing textures and objects will eventually lead you to that'just right' image, which you can apply over and over again throughout your route.
 
Hello belgian,
your question "Is it possible to colour some squares without interference of the used colours?" has a clear answer: No. As mezzoprezzo demonstrated here in his posting 26 it is impossible to get sharp edges with the PAINT TOOL.
If you need a straight separation of the ground coloring you can do it by using splines. Example:

Trainz-SharpEdges.jpg


Some of the splines are even smaller than one square, and you can lay a number of them side by side as needed.
You can find such splines if you click down to "my content". Or search on the DLS for SPLINES and gras, concrete, streets etc.

jost62
 
I don't understand why anyone would want to paint within the yellow squares. Those are just part of an arbitrary grid that is painted on the baseboard. Why should texture boundaries follow that orientation versus any other? Few natural edges are so sharply defined. They usually fade from one to another, just like the paint tool does. For those occasions where sharper edges are needed, using one of the many splines as suggested before solves the problem.
 
Hello belgian,
your question "Is it possible to colour some squares without interference of the used colours?" has a clear answer: No. As mezzoprezzo demonstrated here in his posting 26 it is impossible to get sharp edges with the PAINT TOOL.
If you need a straight separation of the ground coloring you can do it by using splines. Example:

Trainz-SharpEdges.jpg


Some of the splines are even smaller than one square, and you can lay a number of them side by side as needed.
You can find such splines if you click down to "my content". Or search on the DLS for SPLINES and gras, concrete, streets etc.

jost62

Hello Jost62,

Thank you for your info and advice.

Best regards

Kurt :wave:
 
I don't understand why anyone would want to paint within the yellow squares. Those are just part of an arbitrary grid that is painted on the baseboard. Why should texture boundaries follow that orientation versus any other? Few natural edges are so sharply defined. They usually fade from one to another, just like the paint tool does. For those occasions where sharper edges are needed, using one of the many splines as suggested before solves the problem.

Hello martinvk,

Simple, it's the way I would like to work. In some cases I want to have just one colour in the square that I choose to colour. And I would prefer not to use ground splines to cover things that were created, using the paint tool, outside the area that I wanted to be coloured

And when you make a selection of an area, and you want to fill that selected area with just one colour, you just assume that the selected area, and only that area will be coloured. But this is not the case. So, in my case, why would I continue using the select area and fill area option in the paint tool

So, I hope the helpdesk will be able to give me ( and later this forum ) an explanation, why these things happen using the paint tool. And that a direct way of working would be possible

But, if using ground splines are the only solution, then I will have no other option than to use those ground splines.

Best regards

Kurt :wave:
 
A good reason would be if you were building LEGO Land for Trainz, that would need block only painting. :hehe:
 
Hello everybody,

Is there an explanation for the following phenomenon? When you place the mouse pointer in the centre of a yellow square and you don't use any radius nor scale level, when you click with the left mouse button, you simply do not get any colouring of the selected square.

Is it possible to colour some squares without interference of the used colours. I like to have one colour in one square and another colour in the square which lays just right, left, above or under. Using the paint tool in trainz is for me like going back some 44 years in time. I was 5 years old, when I learned to colour my picturebook and stay between the lines. :hehe: Just impossible with the paint tool :(

Thank you.

Best regards

Kurt :wave:

I believe it is a byproduct of adding the 5 meter grid system. On a baseboard with a 10 meter grid, paint is only applied on the yellow grid intersections fading outward to slightly beyond the radius setting. Clicking in the center of a square with the smallest radius leaves the program unable to determine which intersection you want to apply paint on. On a 5 meter grid, paint can be applied on the gray line intersections too.

It is not possible to turn off the fading of textures in all modern versions of Trainz. Years ago there was a setting that allowed this but it was a global setting so all textures were squares. It resulted in ugly patchwork landscapes.

The pointed textures fades in Casper's post have been around since one of the service packs of TRS 2004. It was referred to as the zipper effect back then. I think the changes to the grid system made it worse. I found that never using a brush smaller than 20 meters helps reduce the effect.

Hello wreeder,

Thank you for your constructive answer and information. I just would like to find a solution for the ground colouring without using splines or other object to cover it, and without placing the track further apart from eachother ( see pictures where I circled those unwanted area's ).

belgian46_0002.jpg


Best regards

Kurt :wave:
 
Back
Top