Mapping With Google Earth?

papkee

Tries to Make Assets
So hello everyone,

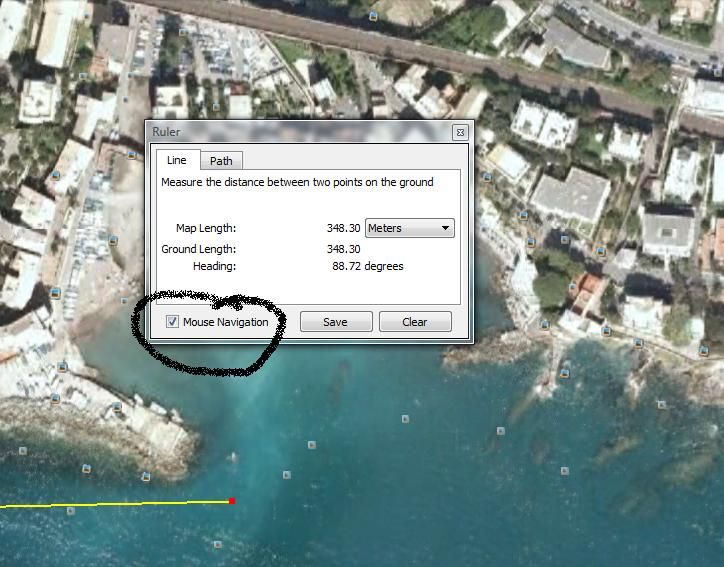
I'm new here, (as evident by this being post #1) as well as new to Trainz, but I've already started a new route. It's a fictional railroad, but takes place in a real location. Now, I want it to be as accurate as I can get, so I though using Google Earth Basemaps would be a good idea. But, I've run in to several problems, the biggest being how exactly do you get a nice 1km square out of Google Earth? I know how to save and edit images, but I'd like to know how you can get a nice 1km measurement so you know where to crop. Or is there an easier way to get maps than this? I've looked at several tutorials but none tell you how to get those 1km x 1km images to put on the basemaps.

Help is greatly appreciated!
 
I can give you much advice.

A DEM will give you accurate heights and terrain ... but will complicate your track locations, into a complete gradient nightmare.

===============================================================================================

Google Earth has a ruler tool that you should set to Meters - Line, or Path ... and too you should set Trainz to Metric (as the English Imperial Trainz ruler may be flawed).

Using the compass in both Trainz and Google Earth to North, draw RR a Path line in Google Earth.

You can print it out on paper if you wish, so as to scotch tape all the paper track plans together, and tape it to your wall, or use a chalkboard.

Lay your tracks on flat baseboards, and lay straights using the Trainz ruler, by approximating the compass angle heading of the track, and by measuring the length of the straigh-a-ways.

Straighten the straight-a-ways, then connect the straights with un-straightned curves

Being way to critical, and exact to the prototype, can give you major headaches, resulting in burnouts, and eventually make creating a route in Trainz an un-fun, full time job, a chore ... and you will find Trainz making you Obsessively Compulsive with exactness.

Trainz is meant to be fun ... not a scientific, chore of measurment exactness to the prototype.

Making Basemaps is an alternative, but is a chore also.

And if your basemaps are each off by 50 foot, your eventual route will be off by many miles from the prototype.

http://i525.photobucket.com/albums/cc339/cascaderailroad/Screen_005-17.jpg
http://i525.photobucket.com/albums/cc339/cascaderailroad/Screen_004-23.jpg

You can use FT Track as a tracklaying template, and slide real single track overtop of the FT Track, and delete the FT Track later on.
http://i525.photobucket.com/albums/cc339/cascaderailroad/Screen_001-34.jpg
 
Last edited:
That's some good advice.

I write music, and just like you said after a long session of producing it can get very boring and generally not worth it.

Thanks for the advice, as I probably would've gone at it for several days before just giving up.
 
I'll second the burn out thing, particularly when you work on an area that you know. You'll get caught up looking for Aunty's house because the houses on the DLS and other sites are close but not close enough. The alternative would be to customize every building, and then that becomes another project in its self. The other thing is the miles upon miles of terrain that you'll be slogging through. If you want, though, and I done this too, is use bits and pieces of a DEM that suited the area, blending in the terrain so there was no seams or odd adjustments.

Another thing I've done is add track to a place where none has existed. I did this using a DEM file that had the roads and everything already textured on the surface. I didn't place the new track in TransDEM, instead I did some surveying in Surveyor, sighting out the best grade, planning cuttings, and then planning the best route along a riverside. The end result was a pretty cool line. I left the roads as they were laid out in real life, and layed the tracks to fit the area rather than have the area fit the railroad, which is the way most routes are made.

John
 
I've been working with Google Earth & TransDem to produce "proto" routes for Trainz for a long time. I agree that it is a tedious and boring task to grade the railroad once you have the DEM map in TS. I don't normally use the UTM tiles, as I find them a bit awkward. Instead, I use the enhanced ground textures provided by TransDem. This produces a map right on the terrain instead of just below it as the UTM tiles do. The quality of the map isn't good enough to use as the final texture, but it really helps when you are painting textures. To use the enhanced textures in TransDem, you need to download and install the texture files plus one text file. The TransDem manual describes this process very clearly.

As for creating 1Km or other size squares in GE, I have never tried that. What I do is set my eye altitude to a level that works for the texturing. That is usually around 500m to 1Km. Don't get eye altitude confused with distance though. Your 1Km squares can be at any eye altitude. It's just a matter of how much detail you want.

I am currently engaged in a mind boggling project in Google Earth. I am trying to map the entire USA railroads. I use the path feature in GE to trace the rail lines (including multiple tracks, crossovers, etc where I can get that much detail). Once the paths are created in GE, I can import them into TransDem and create track splines for Trainz.
I doubt I will ever complete the entire USA though. I don't think I'll live long enough <g>. I can't begin to estimate how much time I have spent on this project thus far. I think I'll be happy if I can get the east coast and west to include PA done.

I have also been faced with the same problems with buildings as described earlier in this thread. It is impossible to find buildings that are even close to the real ones for any area I have attempted prototype route building. Unless you are doing a route that has already been built for TS, it's a lost cause to find accurate representation of buildings. So I am happy to just get the terrain, rail lines, roads, and water accurate.
When the project becomes boring, I have to switch to something else.

Good luck with your project.

FW
 
Last edited:
Welcome!

<snip> Once the paths are created in GE, I can import them into TransDem and create track splines for Trainz. </snip>

Approach_Medium,

I've been working quite a bit with TransDEM lately and seemed to have missed that feature (getting the paths from GE into TransDEM). Is that documented anywhere?

Edit: I answered my own question on that. Saved the path as a *.kmz file and then imported the route in TransDEM.

To papkee,

My advice is to start small. Maybe even in a area that you like, but not for your first "official" route. You will gain experience, have trials and errors and will gather tips and tricks along the way. After you've practiced a few months and feel that you know your way around Trainz and Surveyor, then you can attack your first "official" route and really do it justice. At least that's how I'm approaching my projects.

Oh, and welcome to the forums! :wave:

Andrew
 
Last edited:
That's some good advice.

I write music, and just like you said after a long session of producing it can get very boring and generally not worth it.

Thanks for the advice, as I probably would've gone at it for several days before just giving up.

Google Earth is a great tool, and freelancing a somewhat protoypical route is easy ... and you should not give up on your dreams !

Measurement of straight-a-ways, and guestimation, is good enough to make a belivable realistic route.
 
I’ve made a few 1km basemaps from Google Earth and have a few tips to add with regard to getting the basic flat 1km square.


1. Get north up and perfectly vertical over your GE terrain

The easy way to do this is in Google Earth is to press key ‘R’.


2. Google Earth Tools>Options

In the 3D View tab make sure the Show terrain box is unchecked (for now). This will ensure that you get a completely flat image for your basemap square lines to show as straight lines. The down side is that the elevations will all show as 0 metres, so you need to check it back on at a later stage, once your straight lines are drawn and image captured. You will then be able to get spot heights from GE when you are modelling after your basemap is laid.

Edit 2: GE have changed this function (discovered April 2013). You now need to go to Tools>Options>3D View. In the Terrain section set the Elevation Exaggeration to the lowest value (0.01) and make sure both the boxes immediately below it are unticked. This will prevent the lines making up your square appearing distorted, which will happen over hilly and mountainous terrain if you don’t change these settings. This appears to allow elevation data to remain visible at any setting, so no need to remember to make subsequent changes for getting spot heights.


3. GE Ruler tool

a. To draw your 1km lines to draw your box on the Google Earth imagery always use the GE Ruler>Line option. The Path option does not draw a straight line, only a breadcrumb trail.

b. Use the Heading values (degrees) in the dialogue box to get the correct N/S (0.00/180.00), E/W(90.00/270.00) orientation. Zoom into the imagery as you get closer to 1000.00m for more precision.

c. Keep the LMB held down as you zoom in/out or move across the terrain. Use the PageUp/PageDown for zooming and the L/R/Up/Down arrow keys to adjust the image position. A small movement of the mouse is necessary, after moving the image, for the line to extend. Remember to keep that LMB pressed until the end point of the line is correctly positioned, otherwise you will lose it. (Edit: See subsequent posts for alternative/better navigation method).

d. When the first line is correctly aligned, you can now let go of the LMB, bit don’t click on anything other than the Save button in the Ruler dialogue box. Save the line to your chosen name and it will then always appear on your GE terrain image (unless you want to hide it). Do the same for the remaining three lines then your square is complete.


4. Creating the image to attach to the basemap.

a. The image size in pixels must be square and the pixel length of each side continuously divisible by two.

b. I use 2048x2048 which provides enough clarity to see rail side signals, gantries etc. Some tutorials suggest 1024x1024, or 512x512, but I find these far too indistinct with a lot of line-side features lost in the fuzzy result. The larger number of pixels seems to put no extra load on my system.

c. To get the sharper image will require several close images of the GE 1km square to be taken and stitched together. I set the GE Eye altitude to 600m from which I take six separate screen grabs, using the PrintScreen key. These are combined and scaled down to the required pixel size in a simple image editor, (I’ve done it in both MS Paint and Gimp). Joining them together is fairly straight forward except for the edges which are generally out by a few pixels (either because of the map projection or my unsteady hand!). Provided the image falls within the 2048x2048 area, any remaining white areas within the boundary around the edge can be filled with a colour to match the GE path lines. These are useful to see in Surveyor when setting one basemap against another.


5. Other tips.

a. Choose a prominent landmark on your basemap image to place the Trainz World Origin “birdbath” in Surveyor. Get the co-ordinates of that landmark from GE. This will allow you to correctly position your basemap in Surveyor should it accidentally get moved at a later stage.

b. Get used to flipping between wireframe and normal view in Surveyor. Although basemaps can be raised and lowered, as soon as the terrain is being formed the flat basemap image may become partially buried and no longer be visible across the whole area.

c. View from overhead when laying any scenery item over a basemap, particularly road and rail spline points. A vertical view, with the yellow compass positioned exactly in the road/rail centre when you click to add the spline point, will avoid parallax errors.

d. To minimise accidental movement of the basemap some place them in a layer (in later Trainz versions). If you use a version without layers, try to stay off the Move Object button whenever possible, otherwise you can pick up the basemap and shift it in error. When you do need to use Move Object, e.g. when placing an item on your terrain with the basemap visible, get directly overhead when grabbing the object, which will then take priority and generally avoid moving the basemap. It's not a major problem because it's only when that one button is selected in fixed objects. if you're in splines or any other flyout it's not an issue. However, it becomes a major problem if you have done hours of work after the basemap has been accidentally moved.
 
Last edited:
My advice is to start small. Maybe even in a area that you like, but not for your first "official" route. You will gain experience, have trials and errors and will gather tips and tricks along the way. After you've practiced a few months and feel that you know your way around Trainz and Surveyor, then you can attack your first "official" route and really do it justice. At least that's how I'm approaching my projects.

That's kinda my take on what I'm doing too. I've done a couple scratch routes that I got a feel for laying track, roads, etc... Right now my first proto route is a tiny shortline near my hometown, just started on it. Once I get more comfortable and figure some more things out (I'm having a really hard time figuring out how to figure out what gradient the track should be in some areas - it doesn't appear that there's any perfect way to get the terrain and path data into the route, there will always be some margin of error that makes you pull your hair out) I may restart the same route from scratch again in the hopes that I can make it better and have fun with it (I've been thinking about "relaying" the abandoned north-end of the line to make it more "useful".), I hope to eventually graduate to doing a good portion of the former NYC Water Level Route (CSX Chicago Line - starting with the Rochester Subdivision and working my way out) unless someone beats me to it by then, but that's one of the routes I've been hoping to see pop up as usable content and never see, so I figure I may have to do it myself...

Remember to keep that LMB pressed until the end point of the line is correctly positioned, otherwise you will lose it.
<snip>
screen grabs, using the PrintScreen key.
You can regrab the ends of the GE ruler to move it, in fact you actually have to let go of the mouse to get the ruler to adjust, otherwise you just drag the map around (unless this is an option I changed when I installed Earth a few years ago and forgot about - but its how I've gotten used to it so if I am in fact wrong about this, I apologize). When re-grabbing the end of the ruler to adjust it make sure you have the "finger" to grab it... The Crosshairs WILL reset the ruler.

Additionally, I see everyone say to hit the Print Screen key when getting images from GE... Edit -> Copy Image (or Ctrl+Alt+C) will copy the image as displayed in GE, without having to crop out toolbars, other windows, or having the compass/zoom emblazened repeatedly on your baseboards.
 
Last edited:
Used to be a custom overlay for GE where you could set any grid size, of course I managed to delete it some time ago, over a year at least when removing GE off one PC and installing it on the other one, not been able to find it since so was reduced to using the path tool.

You can however if you use Microdem creae an overlay of a DEM on Google Earth which is handy.
 
Last edited:
Is there a way to create a moveable grid square in GE that is the size of a Trainz baseboard, that can be moved and locked on a section of terrain? My idea is to use it to outline an area the size of a baseboard, zoom in to fill the screen and then print a screen shot to use to lay track. I have no idea how to take images from one media (i.e. GE, Trainz, internet) and capture them to import into another media. I'm trying to figure out a way do do things in a way that I can understand. DEMs and some of these other methods seem rather complicated. I don't need to be EXACT, I just want it to look CLOSE.
Any suggestions?

Thanks.
 
~snip You can regrab the ends of the GE ruler to move it, in fact you actually have to let go of the mouse to get the ruler to adjust, otherwise you just drag the map around (unless this is an option I changed when I installed Earth a few years ago and forgot about - but its how I've gotten used to it so if I am in fact wrong about this, I apologize). When re-grabbing the end of the ruler to adjust it make sure you have the "finger" to grab it... The Crosshairs WILL reset the ruler.~snip~

Thanks for that. I’d never noticed that option before today, so that’s one easier part learned tonight!

I've just tried it and found that the tiny square end of the drawn line has to be well within the box, near to the central target box cross hairs, before changing to the hand with the pointed finger, but change it does! I also noticed that you can use the mouse wheel to zoom whilst the cursor is in crosshair rather than finger mode.

What you can’t do, though, is use the cursor to grab and move the landscape (that’s where I used to come unstuck). Trying to move the landscape with the crosshairs simply removes the already drawn line, and starts a new one. The landscape can be moved with the grab hand cursor, but that option seems to be excluded when the ruler tool is in use. When using the ruler I can only access the cross-hair and pointed finger cursors.

~snip~Additionally, I see everyone say to hit the Print Screen key when getting images from GE... Edit -> Copy Image (or Ctrl+Alt+C) will copy the image as displayed in GE, without having to crop out toolbars, other windows, or having the compass/zoom emblazened repeatedly on your baseboards.
Thanks. Another good tip.

I’ve always painstakingly removed as much toolbar etc. clutter prior to PrintScreen, usually forgetting how to put them back. I know what I’ll be doing in future.


Used to be a custom overlay for GE where you could set any grid size, of course I managed to delete it some time ago, over a year at least when removing GE off one PC and installing it on the other one, not been able to find it since so was reduced to using the path tool.~snip~
Is there a way to create a moveable grid square in GE that is the size of a Trainz baseboard, that can be moved and locked on a section of terrain? ~snip~

These seem to be discussing similar requirements. If anyone knows how to overlay a moveable readymade 1km square grid on GE I’m sure there would be a great deal of interest.
 
What you can’t do, though, is use the cursor to grab and move the landscape (that’s where I used to come unstuck). Trying to move the landscape with the crosshairs simply removes the already drawn line, and starts a new one. The landscape can be moved with the grab hand cursor, but that option seems to be excluded when the ruler tool is in use. When using the ruler I can only access the cross-hair and pointed finger cursors.
Not to drag too far off topic here, but that is odd behavior, I just tested again to make sure I wasn't crazy... As long as you move the mouse while you have the LMB pressed it should preserve your line and drag the map properly, but it can be tricky if you accidentally click without moving, even if you hold down for a while... (I even moved the ground while the ruler was only single ended without issue...) Strange, maybe there's a setting I changed a while back? But hey, at least the other trick should help speed things up for you.
 
A DEM will give you accurate heights and terrain ... but will complicate your track locations, into a complete gradient nightmare.
Well, not quite, not for US routes, not when using the excellent USGS NED 1/3 arc sec DEMs. I have shown many other examples in the past.

This is original DEM-based terrain, Columbia River, Oregon shore, not textured and untouched by Surveyor. The track is coarse vector data, also untouched by Surveyor. DEM that detailed isn't very good for fictitious routes, though, but you can use less detailed 1 arc sec DEM instead and cuttings and embankments will not stick out so prominently.


(You still have to place the bridges yourself.)

The nightmare suggested above will start indeed once you try to combine DEM-based terrain with any of the manual methods for aerial images. The lack of geo coordinates in this approach will make it a very cumbersome task adjusting aerial image base-maps to the the proper position in terrain.
 
Last edited:
Not to drag too far off topic here, but that is odd behavior, I just tested again to make sure I wasn't crazy... As long as you move the mouse while you have the LMB pressed it should preserve your line and drag the map properly, but it can be tricky if you accidentally click without moving, even if you hold down for a while... (I even moved the ground while the ruler was only single ended without issue...) Strange, maybe there's a setting I changed a while back? But hey, at least the other trick should help speed things up for you.

I think we are both right.

After some more trials I’ve found that it depends whether or not you have the Mouse Navigation box ticked in the Ruler dialog box.

It all comes good if I start drawing the line with the box unchecked. The line can then be temporarily left alone, and the box checked. The crosshair target cursor then becomes a grab hand cursor when LMB is used over the terrain to drag it around, or a pointed finger cursor when placed over the small square line ends to further adjust it.


GErulercursor_zpsecfded46.jpg~original


As an aside, why do these threads about basemaps always seem to end up being highjacked by discussions about the far more complex DEM functionality?

I think it just confuses those who want to get to grips with the basemap process. The OP, as I read it, is interested in getting that 1km square nicely into game.

If he can, then he may well develop a subsequent interest in DEM.

Put them off at this stage though, and they won’t even get to completing the relatively "easy" basemap brain bender.
 
Last edited:
One last word about GE; since I am not interested in EXACTNESS in duplicating routes, I have developed a way to use the line drawing capability of GE do draw squares on the areas I am interested by using the "R" key to keep the map oriented properly and using the line tool drop down box as a straight edge to draw vertical and horizontal lines on the map. You can let go of the line, move the dropdown box around and then "grab" either end of the line again (with the pointer finger) and move it around to get it parallel to the box. I was able to draw squares (approx. 2366 ft. on a side) the size of a Trainz baseboard. They are not all EXACTLY 2366ft square, but are close enough to use to gauge where track and assets need to be. Only problem is you have to "save" every line you draw. I started out naming the lines uniquely so I could identify a box if I needed to, but after awhile I just used the same thing over and over again. I am satisfied with the results, so it is good enough for me !
 
As I said in a previous thread, a piece of sheet glass, or a trash picked coffee table glass top, mounted in front of your PC screen ... you can draw and trace a route, or a 1km x 1km box, right on the glass with a Sharpie magic marker or dry erase marker ... and transfer the tracings directly into Trainz.

Fortunately I trash picked a piece of 18" x 20" golden brown smoked glass coffee table top, and it doubles as a screen darkening filter, and a sketching glass, duct taped in front of my PC screen.

Using the MS Snipping tool (a tool built into your PC Tools) you can snip a square box image, matching the sketchings on you PC coffee table glass protection screen.

BTW: I usually use the Ruler/Metric/Path to draw a 1km x 1km four sided box (totaling 4km, ... 1km on each side of the box).
 
Last edited:
This all sounds interesting. I have Train Sim 2 for Trainz on Mac and I too am new to all of this. How do I get Google Earth onto Trainz to begin with? What are the step by step procedures and what Apps do I need. I want to do a CN route going from Stony Plain AB Canada to Jasper AB Canada and I don't want to just guess and wing it.
 
Back
Top