Warehouse Buildings with angled walls

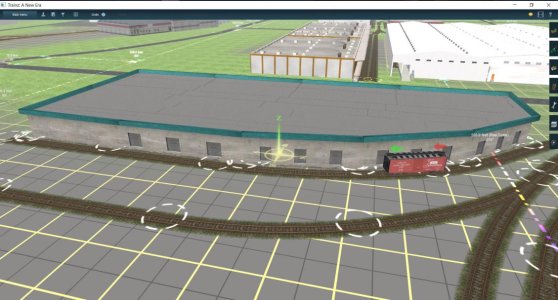
Weevil’s <kuid2:9000:27101:1> Industrial A01 thru <kuid2:9000:27610:1> Industrial F10, would be a good place to start as far as look. These assets are a good representation of contemporary industrial park architecture, both tilt-wall and metal sheath construction. If we had wall sections and roof splines to match these, one could create most anything imaginable.

Norm brings up a good point – the wall sections need an extended foundation and they need to be height adjustable. It would be helpful if we could get Weevil to add extended foundations to his assets as well.

Here are some photos of several tilt-wall buildings.

David


attachment.php

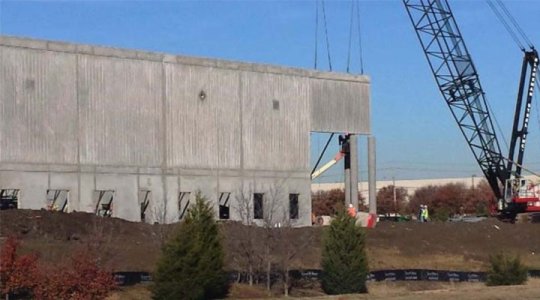
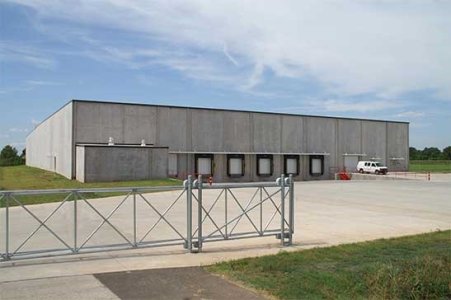
Tilt-wall construction – in the raw as cast. Some building are left in this state. Others are painted.

attachment.php

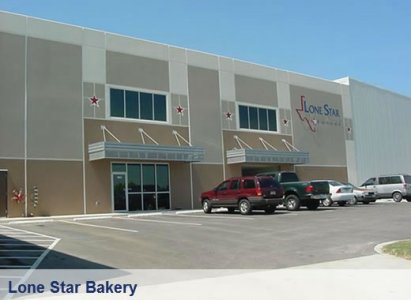
Tilt-walls painted. Portico over doorway should be an extra that is added where needed.

attachment.php

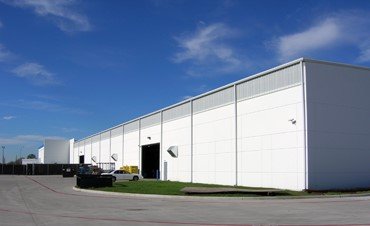
Tilt-wall construction – smooth walls at front, back part of building has vertical ribs.

attachment.php

Tilt-wall construction – exposed aggregate for exterior decoration

attachment.php

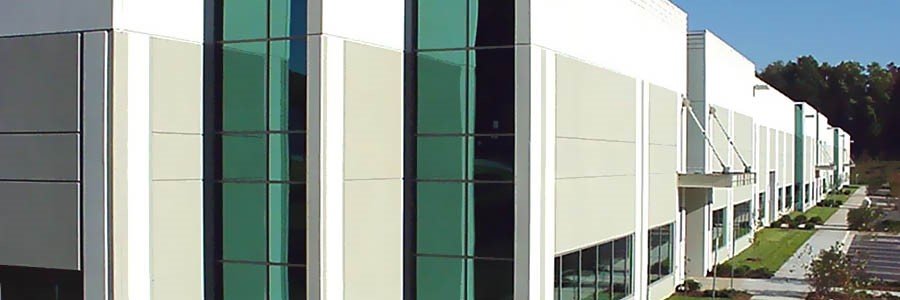
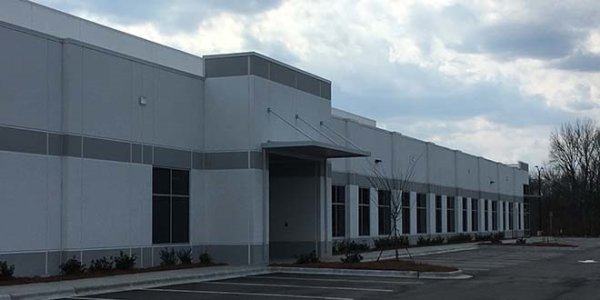
Tilt-wall construction – some with windows on two floors, some with no windows. Note - 2 windows per floor per panel. Could have windows on only one floor.


attachment.php

Tilt-wall construction – two windows per panel, ground floor only.

attachment.php

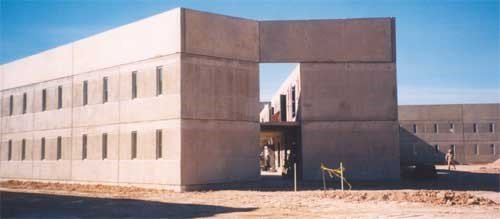
Tilt-wall construction – no windows, no paint.


attachment.php

Tilt-wall construction – porticos over entry doors

attachment.php

Tilt-wall construction – no windows, painted white with grey trim at top.

attachment.php

Tilt-wall construction – low roof with windows & portico for office space, higher building in back.
 

Attachments

  • tilt-wall 1.jpg
    tilt-wall 1.jpg
    64 KB · Views: 114
  • tilt-wall 2.jpg
    tilt-wall 2.jpg
    50 KB · Views: 113
  • tilt-wall 3.jpg
    tilt-wall 3.jpg
    93.8 KB · Views: 114
  • tilt-wall 4.jpg
    tilt-wall 4.jpg
    79.7 KB · Views: 114
  • tilt-wall 5.jpg
    tilt-wall 5.jpg
    20.5 KB · Views: 114
  • tilt-wall 6.jpg
    tilt-wall 6.jpg
    89.2 KB · Views: 114
  • tilt-wall 7.jpg
    tilt-wall 7.jpg
    37.5 KB · Views: 114
  • tilt-wall 8.jpg
    tilt-wall 8.jpg
    34.8 KB · Views: 114
  • tilt-wall 9.jpg
    tilt-wall 9.jpg
    16.3 KB · Views: 114
  • tilt-wall 10.jpg
    tilt-wall 10.jpg
    36.4 KB · Views: 114
NormP:

I agree - dig holes come with too much baggage.

The does mean walls need the height-adjust line in the config file. I'd suggest -5,5 (meters). More then that and parts of the building with either would be underground or flying high.

Dap:

Ah Ha! Now I see what you mean by tilt-wall construction (prefabricated panels lifted into position).

Everyone:
We need to decide on a set of working parameters. I suggest:
1. Wall thickness. All 1 ft.
2. Wall width. 20 ft except for a few shorter blank walls for fill-ins and error correction on odd shaped buildings.
3. Wall height. 25 and 40 ft.
4. Wall textures. 2 different concrete or stucco.
5. Wall trim. 2 different concrete or stucco that contrast nicely with those in 4 above.
6. Window colors. 2 different to contrast with those in 4 and 5 above. Black and white perhaps?
7. Doors. Whatever colors you want. Some using those in 6 above - others not.
8. Roofs. 2 different colors. Concrete and asphalt perhaps?
9. Floors . 2 different concrete. Light and dark perhaps?

Considerations:
1. Nightmode. This is a potential problem. Windows in fixed wall can have it. Windows in spline walls can not. If we opt for nightmode (and these are modern buildings with at least two possibly three work shifts) then splines should not have windows.
2. Perhaps floors and roofs need not be included with walls. Instead they could consist of splines of varying width and repeat distance. Trainzers could also make their own if they don't like our choice of textures.
3. Some sort of naming convention. It won't do any harm if parts by two different authors have the same name since the kuid would be different but it might be a little confusing.

Come on Guys - we need to firm this up and generate a finalized a set of working parameters so we can get to work. It ain't gonna make itself.

Ben
 
Last edited:
Ben,

I agree with your summary. If I had skills with Blender or other such software, I'd jump in with both feet. About the only thing I can do is create solid models in the following formats - .stl, .step and .parasolid. Let me know if this would be of help.

David
 
Gadzooks - I have no idea what those formats are.

Perhaps the naming convention something like this:
1. Wall Short Light 1, Wall Short Light 2, etc.. Means its a 25 ft tall light textured wall by that content creator.
2. Wall Tall Dark 1, Wall Tall Dark 2, etc.. Means is a 40 ft tall dark textured wall by that content creator.
3. Trim Short Light 1, Trim Short Light 2, etc.. Means its a light textured trim for a 25 ft tall wall.
4. Trim Tall Dark 1. Trim Tall Dark 2, etc.. Means its a dark textured trim for a 40 ft tall wall.
5. Floor Light 1 Size. Floor Light 2 Size. Means its a light textured floor section X by X ft in size.
6. Floor Dark 1 Size. Floor Dark 2 Size. Means its a dark textured floor section X by X ft.
7. Same as 5 but for roofs.
8. Same as 6 but for roofs.
9. Did I miss anything?

Considerations:
1. Splines should use the same naming convention but add "Spline" to the end of the name.
2. None need indicate in the name if they have a door or window as that can be seen in the screenshot and/or description.
3. Ditto the color of the widows and/or doors.

Comments? Ideas? Suggestions?

Lets get this show on the road before someone dumps another big project on me (I already have 2 not counting this, lol).

Ben
 
Hi Dave:

Pretty slick.

Questions:
1. Why did you include some roof as part of the wall splines?
2. Why did the cap spline change color half way down the long wall?
3. How did you handle the very sharp angle at that one corner (working with square spline parts on a wall corner at an angle more then 90 degrees)?

Think I said this earlier but I see no reason why the kit can not and should not include both fixed and spline parts. Mix-n-match guys so when done you can say "I did it my way", lol.

Ben
 
Ben.

Your suggestion for Naming walls/roofs ETC covers everything we would need for scratch building !
Any spline walls that have no windows or doors could perhaps be "Bendy" ? depending on section length, suitable for the curved walls ?

Two of my Tram depots used in "Bris Tramway Route" were "scratch" Built with assets available , they came out OK !
I just used the same method I used on my HO Gauge Model Layout under the house.

Norm.
 
G'day All (especially "Bendorsey" and "Daveswow"),

I have been following this thread from its inception and I have to admit that the concept and the discussed methods of execution are "admirable". I haven't 'poked' my nose in up until this point simply because I haven't seen anything to which I could add any input worth merit. However, I do have one suggestion that seems to have been completely overlooked, thus far. Has anyone considered kind "buildable"? This type of asset was 'devised' to accommodate exactly the structure 'design' under discussion...

Jerker {:)}
 
Hi Dave:

Pretty slick.

Questions:
1. Why did you include some roof as part of the wall splines?
2. Why did the cap spline change color half way down the long wall?
3. How did you handle the very sharp angle at that one corner (working with square spline parts on a wall corner at an angle more then 90 degrees)?

Think I said this earlier but I see no reason why the kit can not and should not include both fixed and spline parts. Mix-n-match guys so when done you can say "I did it my way", lol.

Ben


Hi Ben ol' pardner!

Answer to your questions:

1. I included a bit of the roof on the edge spline to help with "filling in" the roof as a whole. I thought it would make it easier to make corners. Without it, it seemed to me it would be hard to place the roof right up next to the edge spline without including a bit to the edge.
2. The color changed because I was in a hurry when I made my textures and didn't fix the transition area ends to match up correctly.
3. The sharp corner was handled with the angled area on the edge splines... another reason a left a bit of roof on the edge spline.

Hope this answers your questions.

Dave
 
Some great ideas and collaboration here guys. Can I also strongly suggest that you keep LODs in mind when designing anything like this. It can make everything perform 10x better with good LODs.
 
NormP:

No reason spline walls without doors or windows couldn't have the bendy tag but there would be very few of them compared to walls with doors, windows, vents, exhaust fans, etc.. Whatever makes things work better is fine with me. I have a rather extensive library of reusable pieces, parts, and sub-assemblies so I don't have to re-invent the wheel with each new project. I can easily come up with a few dozen designs already made.

Jerker:

Kind Buildable is fine with me (like I said - whatever works best). Any discussion gents?

Dave:

OK - I understand. That was sort of my original idea to include 20 ft deep roof parts with each wall but after thinking about it a bit I decided that was a bit much. 1 or 2 ft on the other hand might be a good idea. The only disadvantage is roof texture is then fixed to each wall section. If walls had no included roof it would give more roof texture versatility. Its also one of the reasons I chose 1 ft thick walls. A roof could go into the wall a little bit without poking out the front. I think we need further discussion of should walls have any included roof or not. I'd vote for not but there are considerations in both directions.

Tony:

I'd think a lot of parts would be below the 300 poly limit if made correctly by keeping designs fairly simple (these are supposed to be modern warehouses) and deleting unseen faces so would those need LOD at all?
Some would of course - particularly anything with curved parts (windows and doors with round tops). Considering wall size (20 ft wide by 25 or 40 ft tall by 1 ft thick) perhaps just 2 levels?
At the LOD switchover point perhaps the real window or door could be replaced by a plane textured with the window or door frame texture. That would reduce it by a heap. Wouldn't be able to see through it of course and nightmode would no longer work either but at that distance it probably doesn't matter.
In some respects all these parts will act like planes. Once a building is constructed you will only see the walls from one side. The 1 ft thickness just gives "depth" where windows and doors are included. since they can be recessed into the walls a bit.

Everyone:

We need to decide on which textures we will use. Texture commonality between content creators is a must (do you really want to put your purple wall section next to my pink loading dock section, lol).:hehe:

Hum - that brings a question to mind. Do we want to include loading docks as part of wall sections or make them as separate spline items? Actually 3 possibilities come to mind: As part of the wall, as a separate fixed item, as a spline. For versatility lets do all three. Whatcha think?

Which generates another question. Door height above ground level. Not people doors (some could be of course) rather large industrial doors. I'd suggest 3 ft as that seems to be what most loading platforms are for both trucks and trains. Door where trucks or trains enter the building would be the exception. Any suggestions otherwise?

Like I said guys - we need to decide on a set of standards.

Ben
 
Last edited:
My only thought about this is that you can't group things together and move them all at once like you can in Blender. So if you had completed a building and then wanted to move it, it would be a problem. Unless Kind "Buildable" addresses this? I've never tried it.
Mick
 
Ben,

My vote for wall textures is the exposed aggregate is a must. Second is plain concrete. May I suggest that we encourage reskinning so users can create their own look. This approach will make many more options available and this group will not have to do all the work. I can envision changing the color of Dave's sample roof edge for example.

attachment.php


The problem I have with splines is the door spacing on this wall. The prototype has six doors spaced 40ft apart so that a string of 40ft boxcars fits with each car aligned to a door. I think we still need wall panels 1 ft thick as Ben has suggested. Also, working with wall splines, it would be nice if the different wall splines like the "with" and "without" doors would connect. No sure if it is possible, but it would be a big help in constructing the building.

Thanks to everyone that is helping with this project. We've got some cool stuff here.

David
 

Attachments

  • Spline warehouse 1.jpg
    Spline warehouse 1.jpg
    98.3 KB · Views: 122
Some great ideas and collaboration here guys. Can I also strongly suggest that you keep LODs in mind when designing anything like this. It can make everything perform 10x better with good LODs.


The poly count is as follows:

Roof 2 polys
Wall no doors 2 polys
Roof edge spline 24 polys
Wall with Overhead doors 50 polys


Cheers,

Dave
 
Mick:

Whoa - now that's a thought that had not even remotely crossed my mind. I suspect the answer is no - it can not be moved as a unit no matter what "kind" its made as since all the parts are completely separate items with their own kuid, config file, and so on. Plus splines aren't moved in the same manner as non-splines. This might be one of the disadvantages of making warehouses in this manner. Perhaps this needs a bit more thought. comments gents?

Dap:

Yes - a "rough" wall texture and a smooth one in different colors. Rough concrete dark colored - smooth concrete or stucco light colored.
Trim should be separate. Splines for the tops but fixed parts for verticals. By being separate from the walls folks can make their own if desired (and hopefully share with everybody).

I see no reason wall splines can not be made in other repeat distances. I chose 20 ft off the top of my pointy head but for ones with RR access doors 40 ft would be far better. 20 ft would be ok from trucks I'd think. Whatever works best guys. Not everything needs to be chiseled in stone.

Different kinds of track can snap attach to each other so why wouldn't these wall splines do the same? Last time I made a right angle in a fence using splines I had to remember to hold the shift key down to prevent them from snap attaching. We might have to do that as well (at corners).

Splines can be made to snap attached to fixed parts but its been so long since I made anything like that I forget how. I think (and this is from the foggy recesses of my feeble mind) the fixed part has to have track (invisible in this case) as part of it so the spline has something to snap attach to. It certainly would make getting spline and non-spline parts aligned easier and more accurately. I don't think there is a way of getting non-spline parts to snap attach to each other (but I won't be in the lest bit upset if someone sez I'm wrong).

Dave:

I assume you are making things from as many planes as possible and using textures for windows and doors?
A great poly-saver but doesn't it lack resolution when you get really close?

Everyone:

When we decide on the exact textures perhaps we should also decide on a naming convention for them. We don't need 6 different names for the exact same texture used by 6 different authors.
Perhaps something like:
WH wall dark, WH wall light, WH trim dark, WH trim light, WH roof dark, WH roof light, WH window light, WH window dark, and so on. That way all authors know which is which and can make items with matching textures.

Some of the auxiliary items (things that go on the roof or get butted up against blank walls) might be higher poly. A wooden water tank on the roof is not likely to be under 300 polys (but you would only have one per building). Ditto mufflers, animated exhaust fans, and so on. The basic building might be fairly plain but the scene could be fleshed out with details to make it quite detailed.

Ben
 
Last edited:
Dave:

I assume you are making things from as many planes as possible and using textures for windows and doors?
A great poly-saver but doesn't it lack resolution when you get really close?Ben

What has polys have to do with Resolution? An object with very few polys can look very good close up if the textures are high res.


Last edited:
Dave:

Absolutely nothing - what I was referring to was some of those "background" buildings which are not much more then a texture for the entire building applied to a rectangular solid. Look great at a distance and crank the poly count down to close to nothing for a very large structure but every time I've zoomed in on one the details got quite blurred. Considering the size of these parts that won't happen. Sorry for the misunderstanding.

Jordon:

Brick would certainly look good but these are supposed to be modern warehouses built from pre-fab wall sections. You also might have brick size differences due to different UVW values between different authors. If someone wants to make brick textured components fine as long as the brick "pattern" can be kept the same part to part.

An alternative might be to just make small brick auxiliary structures that butt up against solid walls. Lotta nice contrast there and avoids the potential mismatch in brick size. Just a thought.

Here's a wild idea - make a completely separate kit using brick parts (and you can be in charge of it).:hehe: On a more serious note bricks aren't a bad idea - lets just not make this kit so large as to be over-whelming in its complexity.

Ben
 
Dave:

Absolutely nothing - what I was referring to was some of those "background" buildings which are not much more then a texture for the entire building applied to a rectangular solid. Look great at a distance and crank the poly count down to close to nothing for a very large structure but every time I've zoomed in on one the details got quite blurred.
Ben

Yeah, and I can't STAND those crappy crappy buildings. Every time I see someone use one of those in the Screenshots threads, I cringe!!!! And some people will use them and then take close-up shots!! Even worse!
 
Back
Top