Making terrian rise

I'm trying to create a route that starts at the ocean then rises slowly up into the mountains, in the end a few hundred meters tall. But I want all the baseboards I'm using to slowly increase in height, so not a mountain appears, but the whole landscape goes up. How would I do this?
 
A simple technique that I use is to lay a single spline segment of a track across the full length baseboard next to (10m away from) one edge. Set the spline height at one end to the starting height (say 10m) and the spline height at the other end to the finishing height (say 80m - that give a rise of 70m in 720m or about 10% gradient (originally typed in error as 1% gradient).

1. Use the Smooth Spline Height tool to raise the ground to the track.
2. Move the higher end of the track 30m.
3. Use the Smooth Spline Height tool to raise the ground to the track.
4. Move the lower end of the track 30m.

... repeat steps 1 to 4 until the other edge of the baseboard has been reached.

Yes, it is slow but it can be very therapeutic (it all depends on how stressful your job/life is). You can introduce variations such as mid point spline points at heights that would differ slightly from the ruling gradient.
 
Last edited:
I did this, and the results are pretty good, although its time consuming. After going from 20m to 70 metres, my track grades were 6.4 or something similar. What exactly are these point grades, and when does it become unclimbable for a train?
 
Opinions will vary with the technology being used on the track.

6.4% would be way too steep for railways without assistance devices such as a "rack and pinion" or cable tows.

Most railway systems would have 2.5% (1 in 40) as their maximum grade. Most modern systems would have about 1% (1 in 100) as their preferred maximum grade.

If had a grade of 6.4% to climb I would be looking at considerably extending the track length over the same rise. Using a series of "S" bends, even building a "spiral" or loop to reduce the average gradient. Even tunneling would be a worthwhile option if there was no other way around.
 
This might help

Do you have the Displacement Map function in your Trainz version?

If so, you can lay a slope over your baseboard, (or over several baseboards). In TRS2004 it is in the Advanced section of the 
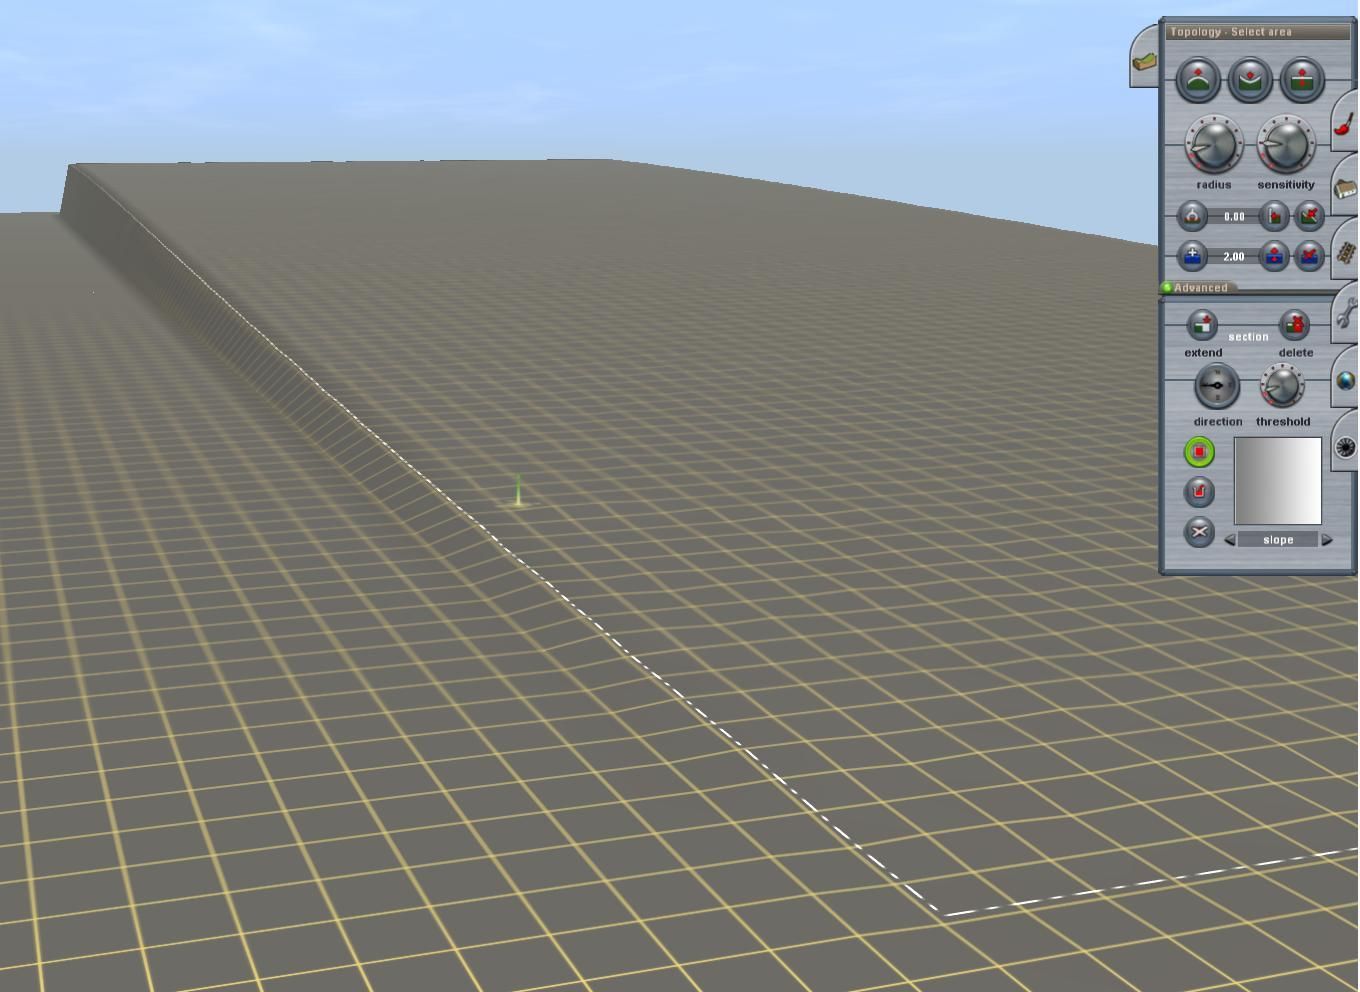
Topology flyout. Below is a screenshot of an example section I’ve just laid over two baseboards, although it can be laid over a much bigger area.

If you look at the bottom section of the flyout it shows the greyscale image I chose to get the slope. There are other choices (e.g. valley, hill, volcano), or you can make your own (difficult!).

The other buttons (from top to bottom) allow you to Select area you wish to cover, fill area with your choice, or cancel selection.

The first dial, Direction, allows you to select one of four orientations (N, S, E, and W only).

The second dial, Threshold, sets the height of the terrain when the displacement is applied. With the slope option this will affect the angle of the slope. The higher the pointer is set on the dial, the higher the top edge of the slope will be. It therefore follows that longer areas will produce shallower angles.

With your route you would still have a lot of work to do to shape your terrain, but this option might provide a starter shape over your baseboards.


slope_zpsgjnjm0am.jpg~original
 
Opinions will vary with the technology being used on the track.

6.4% would be way too steep for railways without assistance devices such as a "rack and pinion" or cable tows.

Most railway systems would have 2.5% (1 in 40) as their maximum grade. Most modern systems would have about 1% (1 in 100) as their preferred maximum grade.

If had a grade of 6.4% to climb I would be looking at considerably extending the track length over the same rise. Using a series of "S" bends, even building a "spiral" or loop to reduce the average gradient. Even tunneling would be a worthwhile option if there was no other way around.

But in your post above, you said going up 70 metres over one baseboard would be a 1% grade. When I went up 60 metres (10 metres less than you) over one baseboard it said my track grade was 6.4. No percentage sign, just 6.4. If going up 70 metres was 1%, then going up 60 metres must be less than 1%. That's why I'm wondering what the 6.4 gradient in the game means.
 
I oftentimes wondered what it would be like to make a route starting at -3000m and having a 1.75% grade ... how many miles of looping track it would take to go all the way up to +3000m
 
It all depends on the ruling grade you want for your track making the 6000m climb (or descent). For a given grade, the length of the track will be the same regardless of whether or not it is straight, curved or looping. What will differ is the physical (straight line) distance between the two end points of the track.

For example, if the track was a complete perfect circle, then the two end points would be in the same place but with one 6,000m above the other. The length of the track (or circumference of the circle) for a constant grade of 1.75% would be 342.9km.
 
Last edited:
... that gives a rise of 70m in 720m or about 1% gradient

Sorry, maths again, that is about a 10% grade (9.72%) not 1%.

A rise of 7m across the width (or length) of a baseboard would give you about a 1% grade.
 
That's why I'm wondering what the 6.4 gradient in the game means.

I never use the track gradient tools in surveyor - I have never understood them. I prefer to use the ruler and the height tools (track spline points) to calculate and set the gradient (despite my obvious earlier problem with the maths).

I do use the gradient information provided by the map as a check on the final result. There I interpret the figures as percentages, so 6.4 I would read as a grade of 6.4% and way too steep for anything.
 
In TRS2006 the gradient tool works great, and my max is @ 1.75% ... you type in a numeral, and apply a gradient, and keep on applying a typed in gradient numeral to the next 2 sections of track ... buy after every 3 gradients, keep stepping backward, to check that the previous 2 gradients have not changed all by themselves (which they do all the time).
 
I never use the track gradient tools in surveyor - I have never understood them. I prefer to use the ruler and the height tools (track spline points) to calculate and set the gradient (despite my obvious earlier problem with the maths).

I do use the gradient information provided by the map as a check on the final result. There I interpret the figures as percentages, so 6.4 I would read as a grade of 6.4% and way too steep for anything.

I do it the same way. It's a lot easier than typing in the gradient and having the track segments "tip" out of direction which is what cascaderailroad is referring to.

John
 
A gradient is like a bendable Hot Wheels car track ... the bottom segment, and top segment, gradients are like rubber, and bows up, and down ... the bottom gradient segment sinks into the baseboard, and is concave ... and the top gradient segment bows down, and is convex ... just like on a rollercoaster
 
Last edited:
Back
Top