Install the app
How to install the app on iOS
Follow along with the video below to see how to install our site as a web app on your home screen.
Note: This feature may not be available in some browsers.
You are using an out of date browser. It may not display this or other websites correctly.
You should upgrade or use an alternative browser.
You should upgrade or use an alternative browser.
Applying TurfFX and Clutter via area fill is a real pain!
- Thread starter MSGSapper
- Start date

Bob, Those settings are good.
One other suggestion. If you want thicker turf you may want to try increasing the values of the Expansion-constant, expansion-multiplier, and number-of-seeds multiplier to 0.4 or 0.5. These changes, if made, will automatically apply to all the grass you have already placed that one effect layer. Also another tweak that was discussed on these forums which have proved helpful to me is to use the values 0.1 0.3 1 1 for the width scale far settings. It seems to make the grass look better in the distance. Try it and see if you like the effect.
One caveat in all this. There is a limit to the number of layers you can have in any given route. The number of layers is greatly reduced if all your layers use the value 1.25m in the Turf Density. So use it sparingly. At most I find that I only need 3 or 4 different layers. I end up using the values of 2.5m, and 10m for the grass further from the track in the other layers.
Thanks for the additional information and tips - which are very useful! Unfortunately as a result I have scrapped everything I have done over the last week and have started again from scratch with putting down the TurfFX layers based on what I have learned here. Just made my Monday.

TurfFX has a lot of settings, and what each does and the resulting impact on the grass isn't always very clear. I am used to the "Topology" tab and have used it for years, but not for doing anything like this which has been rather confusing to me. Your tips, and some of the other posts have helped make this a lot clearer to me. It is still a pain to put down all that TurfFX grass though, especially with no "undo" feature available.
I guess the questions for me at this point revolve around how much TurfFX grass should I use and just how far out from the track should I go without causing too much performance hits? The grass looks very realistic but I am concerned with it's possible effect on performance for those who use my routes.
Bob
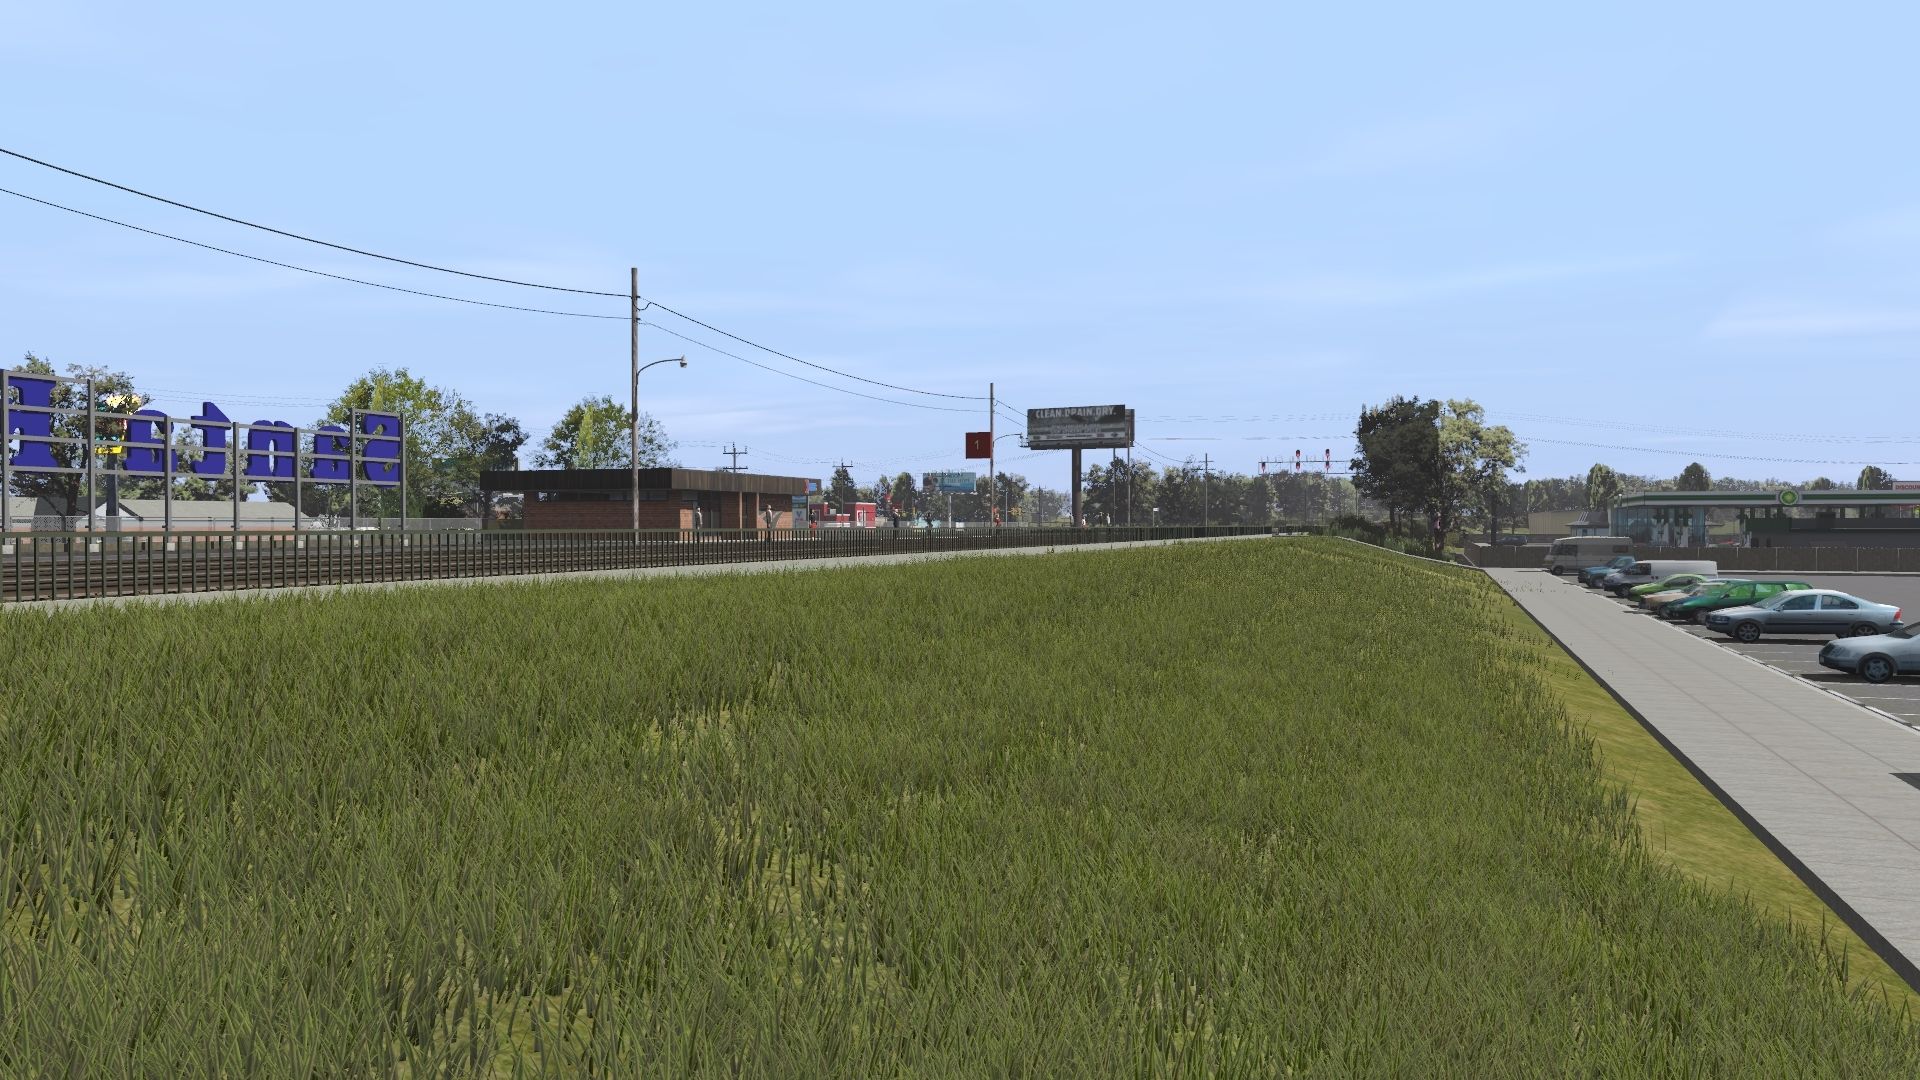
I tried some of the settings that Paul Bert mentioned to come up with some realistic fairly tall grass similar what you see in pastures and untended areas and came up with this:
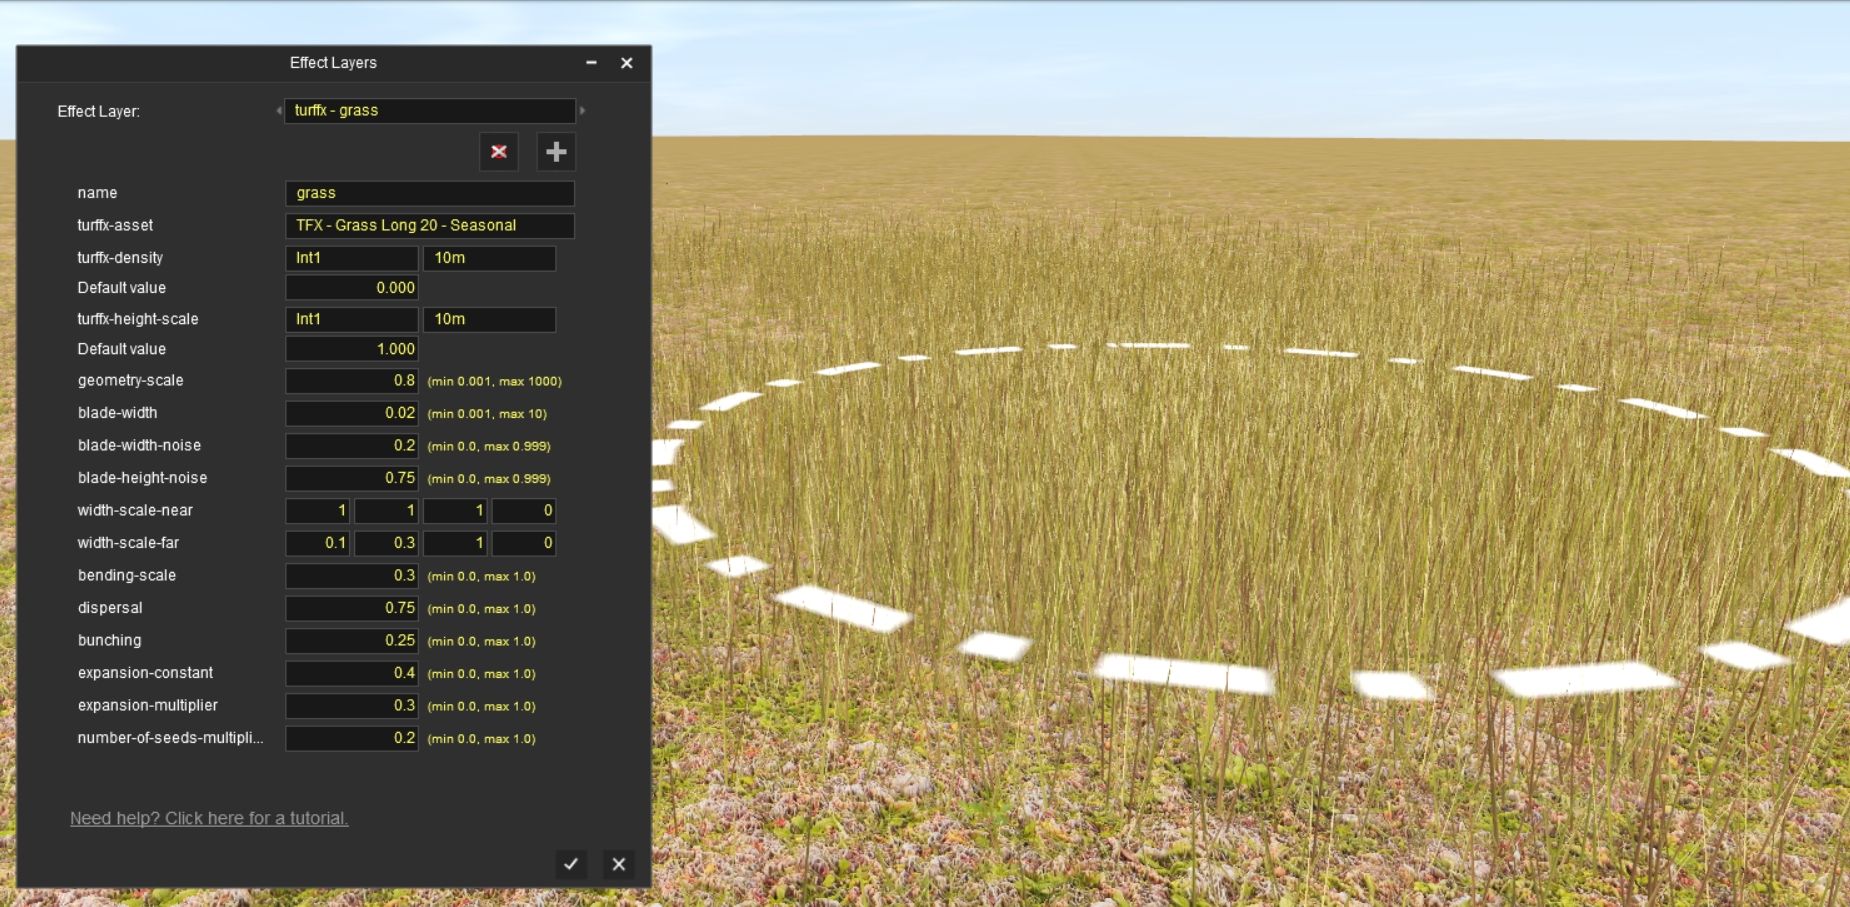
What I see around me here in the Ozarks is very similar to what is shown in this screenshot, although right now it's a lot greener. Because my routes are meant to be truly seasonal I stay more to grass that is less green so it can fit in several seasons without looking out of place.
Bob
What I see around me here in the Ozarks is very similar to what is shown in this screenshot, although right now it's a lot greener. Because my routes are meant to be truly seasonal I stay more to grass that is less green so it can fit in several seasons without looking out of place.
Bob
The geeky nature of the interface was a subject in the beta-testing. We were told in not-so-nice terms that this is what it is! Hopefully N3V here will come to their senses and build us a better interface someday.
With that said, yes it definitely needs work. The lack of undo and other niceties make working with this nice addition quite difficult and at times overpowering. When I did my single route with this new special-effect, the lower-terrain tool became my best friend as I undid as much as I put down the new grass.
As far as how much grass to put down, I found that if I put down grass only as far as it is visible, that works pretty well. I went out about 50-60 meters from the tracks at the most as I mostly covered up areas that were once covered with splines. After placing the new grass, I deleted the splines. Part of what drove me to this maximum coverage was not just performance and also included visibility. Grass blades by their nature are pretty thin and tend to become more of a texture in the distance even in real life. After 50 or 60 meters out in-game, the grass became sporadically placed tiny, ant-sized, single grass blades, and not what we would expect. With that in mind, I went back and redid a lot of previous covered areas and retextured the terrain with similar colors. It wasn't worth wasting the extra CPU and GPU power on something that wasn't seen anyway.
As far as how much grass to put down, I found that if I put down grass only as far as it is visible, that works pretty well. I went out about 50-60 meters from the tracks at the most as I mostly covered up areas that were once covered with splines. After placing the new grass, I deleted the splines. Part of what drove me to this maximum coverage was not just performance and also included visibility. Grass blades by their nature are pretty thin and tend to become more of a texture in the distance even in real life. After 50 or 60 meters out in-game, the grass became sporadically placed tiny, ant-sized, single grass blades, and not what we would expect. With that in mind, I went back and redid a lot of previous covered areas and retextured the terrain with similar colors. It wasn't worth wasting the extra CPU and GPU power on something that wasn't seen anyway.
Thank you for your reply! Based on your 50 meter (164 feet) recommendation I decided to see what this would equate to on the radius setting. Here is how it worked out:
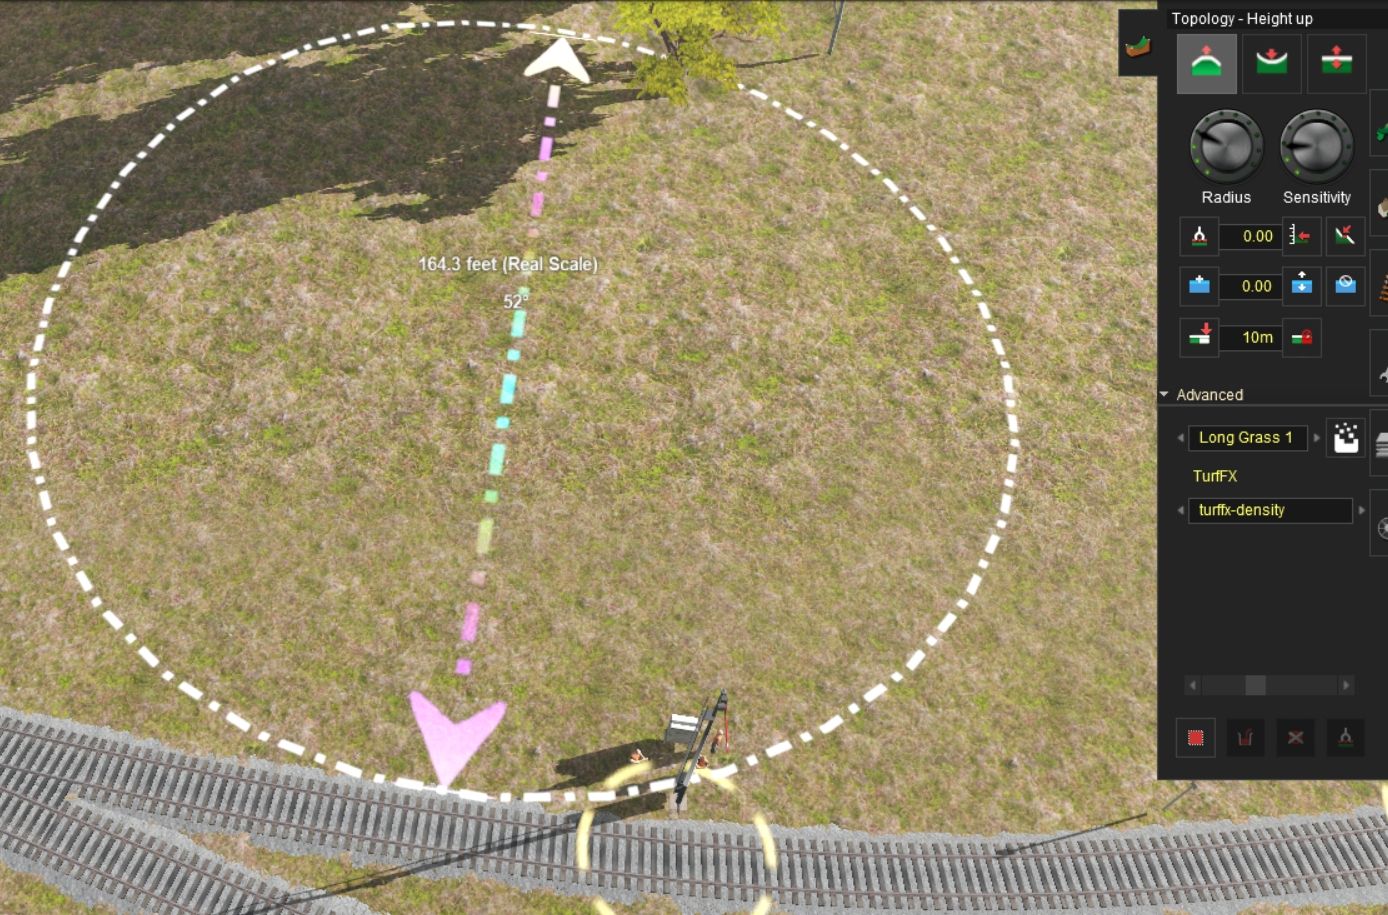
Basically you set the radius on 4 to achieve a circle that is 50 meters in diameter. The sensitivity setting is something I am still playing however. I want to be able to place grass only within the circle, and nowhere else, and with just with one click. Recommendations on settings?
Bob
Regarding performance, I have gotten bolder in placing TurfFX further away from the track within reason. As John points out in the post above after a certain distant they add nothing. If there are hillsides close the tracks I usually cover them with the grass. As I have become more aggressive in adding the TurfFX I have not noticed any significant change in frame rates in running routes. Neil Smiths UMR2019 uses more of this grass than any other route I know of and I have not noticed any adverse effects in performance.
If you want to really test the performance issue load your route up with TurfFX and run some frame rate bench marks. Then make a copy of the route and in this copy delete the layers, which will wipe out all the grass and then rerun the frame rate bench marks. I have done this and am satisfied that my routes are little affected by the grass layers. I am sure this also depends on the graphics card you are using.
If you want to really test the performance issue load your route up with TurfFX and run some frame rate bench marks. Then make a copy of the route and in this copy delete the layers, which will wipe out all the grass and then rerun the frame rate bench marks. I have done this and am satisfied that my routes are little affected by the grass layers. I am sure this also depends on the graphics card you are using.
Bob,
The sensitivity dial is difficult for me to control as well. It appears to affect the fill-rate of the grass as it does with the height raising and lowering speed. I too have a difficult time controlling how the grass fills in areas, and that I think is due to how the grass and objects are objects placed on the nodes and end up filling in the triangles just like the textures do.
At one point during my grassing, I found that if I was about one square's worth away from the tracks I had great luck, then in another area I had grass overflowing on to the tracks and had to move further away so there's no set answer to that.
I find zooming out so the cursor is about a quarter or nickle in size helps with the texturing. I do, however, drop down and check the area afterwards to ensure I didn't cover where I didn't want to.
I disagree. In the paint tab you can PAINT as you go with real time varying of the direction, scaling, radius and and as a bonus, you can hit undo[B/]. Your abilities in the topology tab are much more limited and very inflexible. Basically it must be a square or rectangle and can only go with the grid direction and that's it. Here are some examples:
In this image the rectangle can only be this small which limits it usefulness for tight spaces. Also it must go with the grid which means I am going to have grass on my rail.
If a route is designed strictly to go along with the linear grid or if you are starting from scratch with no track or structures applied, it's not too bad. The problem comes with retro-fitting TurfFX or Clutter to pre-TRS19 routes as I am doing, especially with realistic terrain that does not necessarily follow the grid and has track with curves as all mine do. I have 14 such routes, most of which have many base boards.
BTW I did look at using the "Height Up" functionality and it is clunky at best.
While I love the new TurfFX and Clutter effects, and the realism they bring to a route, I am beginning to wonder if the tedium and trouble is really worth it. It would be far easier to just build new routes from scratch and forget about updating the old ones.
Bob
One thing I really miss that worked in TRS2006, is the ability to paint a line of texture. In other words, in TRS2006, you didn't have to expand the paint box to a rectangle--- you could just drag the dashed line (without expanding it) across a space and it would paint a narrow line of texture. It hasn't worked thusly since TRS2006.
Last edited:
Ran UMR2019 and it runs the same as the earlier routes without TurfFX.
The only performance problem was the dreadful Auran Speedtrees. Replaced them with rmm's and mcquirel's and the route ran a whole lot better.

Since then have experimented with TurfFX
Before

After

Neat Stuff
Harold
The only performance problem was the dreadful Auran Speedtrees. Replaced them with rmm's and mcquirel's and the route ran a whole lot better.
Since then have experimented with TurfFX
Before
After
Neat Stuff
Harold
Bob,
The sensitivity dial is difficult for me to control as well. It appears to affect the fill-rate of the grass as it does with the height raising and lowering speed. I too have a difficult time controlling how the grass fills in areas, and that I think is due to how the grass and objects are objects placed on the nodes and end up filling in the triangles just like the textures do.
At one point during my grassing, I found that if I was about one square's worth away from the tracks I had great luck, then in another area I had grass overflowing on to the tracks and had to move further away so there's no set answer to that.
I find zooming out so the cursor is about a quarter or nickle in size helps with the texturing. I do, however, drop down and check the area afterwards to ensure I didn't cover where I didn't want to.
One of the problems I am experiencing with this is that the longer you hold the click button down the more grass appears. I assume "sensitivity" is controlling this? Fractions of a second seem to make a big difference in grass quantity so it is hard to get a uniform result when you are applying the TurfFX grass. The grass spread often gets on the track or other areas you don't want it because of this. It would be nice to just click once and get the same amount of grass each time and limit the spread to just within the diameter of the circle. I guess I'll just have to experiment with this further, although I expect there will be no perfect result and I will have to do a lot of cleanup. As I said earlier, doing this is very tedious and a major pain at times!
Bob
OK, here are the results of my experiment. In this below image I set a standoff distance of 25 feet (7.62 meters) from the track ballast bed with all the settings you see:
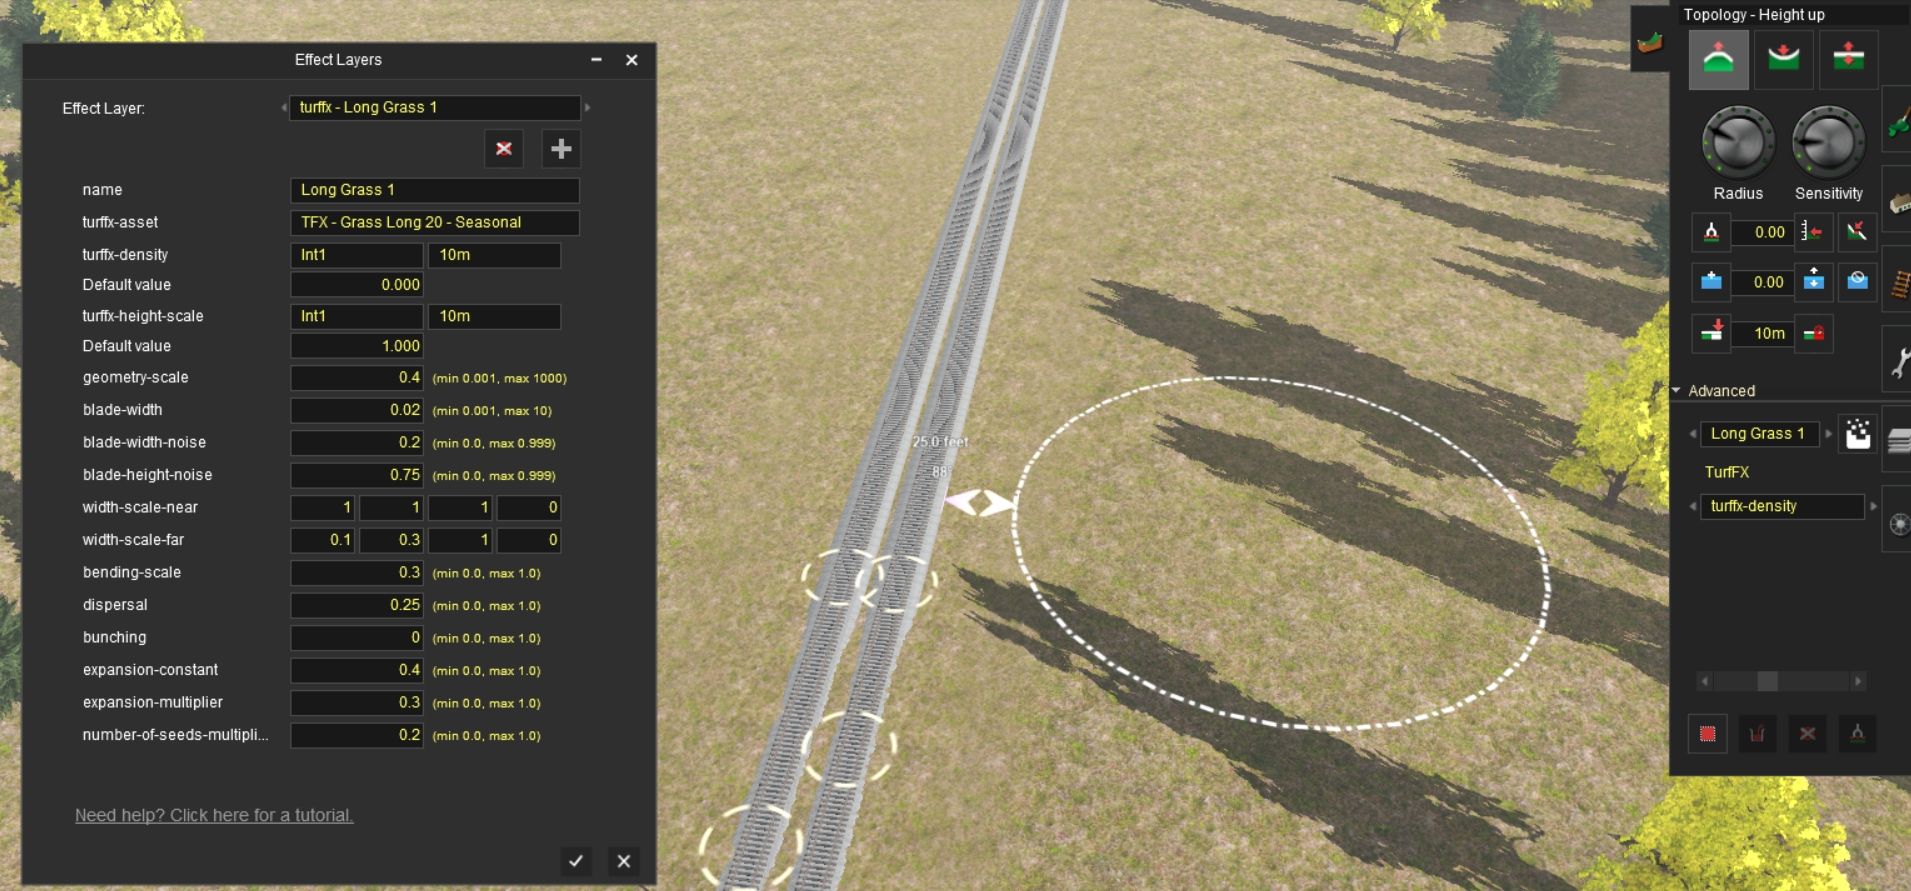
In this close up image of the same area you can see that none of the high grass is intruding on the ballast or track area:
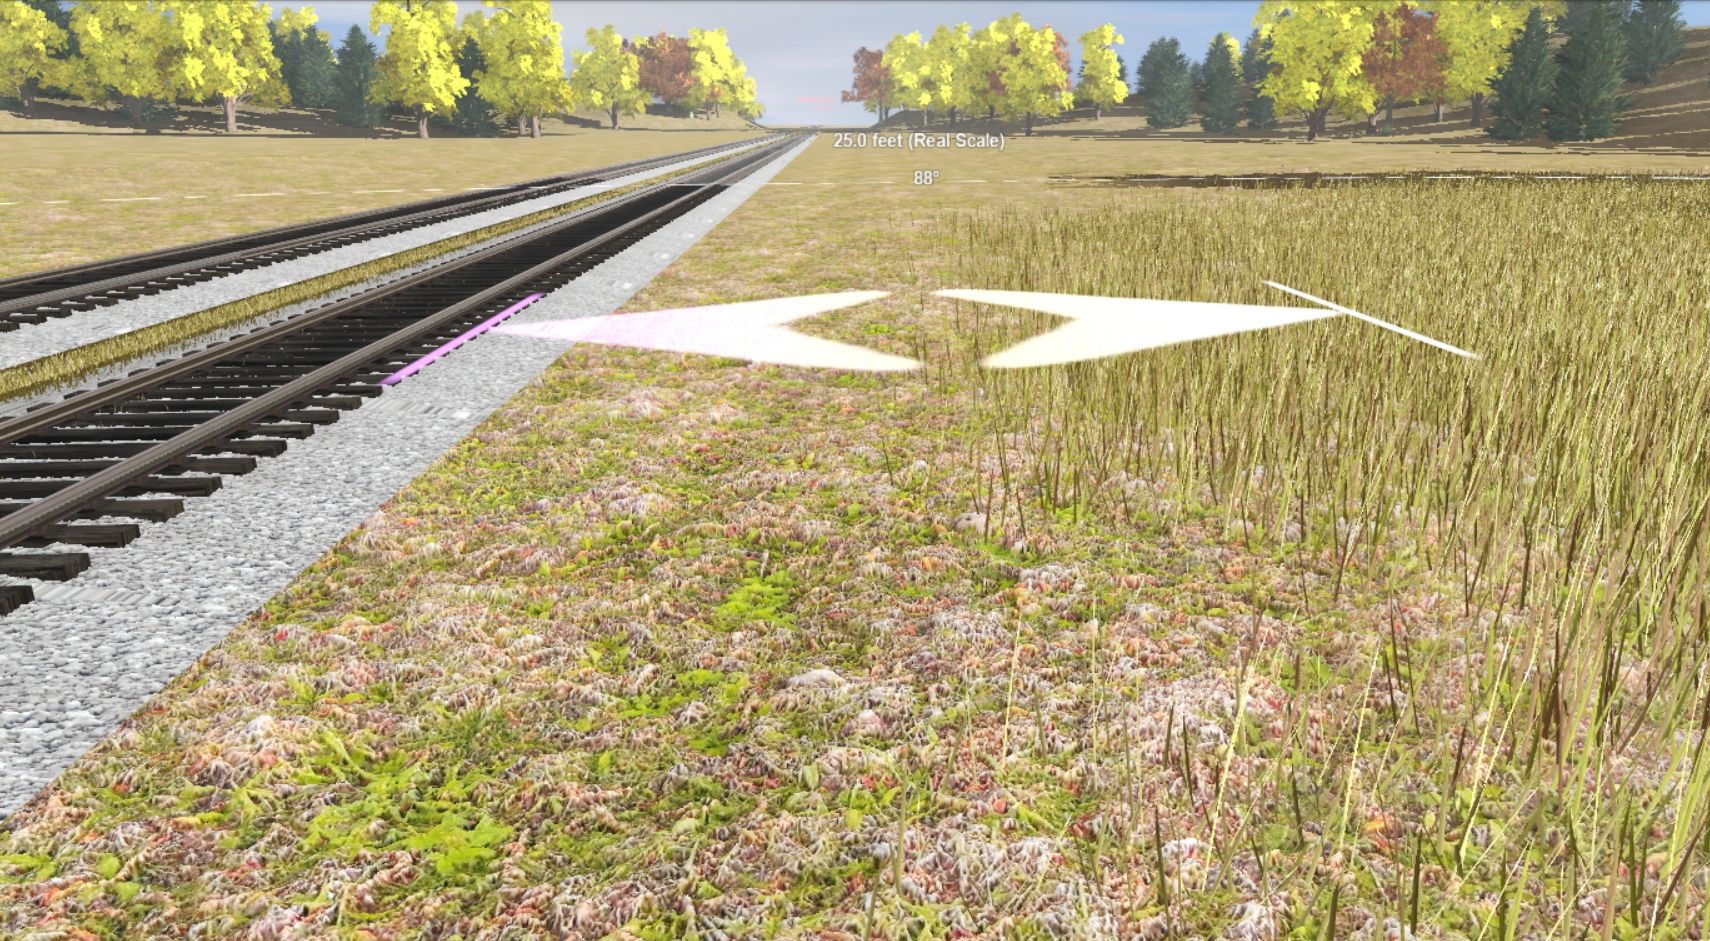
You might be able to get a bit closer but this seems to work, at least it did for me.
Bob
In this close up image of the same area you can see that none of the high grass is intruding on the ballast or track area:
You might be able to get a bit closer but this seems to work, at least it did for me.
Bob
I came to this thread to join the "complainers club", but I stumbled upon Paul_Bert and MSGSapper's advice, and came up with some pretty nice grass myself. I'm beginning to understand better how this works and how to use it, but I still feel the interface is clunky, confusing, and unintuitive. Hopefully in an update we'll get sliders and be able to see our changes live.
Matt
Matt
Here is a N3V Wiki link on the subject of TurfFX and some very good YouTube videos to go with it. It also provides explanations for a number of the settings:
http://online.ts2009.com/mediaWiki/index.php/TurfFX_Effect_Layer
Bob
http://online.ts2009.com/mediaWiki/index.php/TurfFX_Effect_Layer
Bob
I am surprised that N3V did not direct us to this info source. Is N3V promoting the feature or downplaying it/
I forget where but they did...... as at the bottom of the page it says - This page has been accessed 8,432 times.
Also there is more at the Content Creation site https://contentcreation.trainzsimulator.com/category/painting/
Think that was in the Content Creation area and or a Newsletter.
Last edited:
As I have been applying TurfFX grass to my CC&LR 1950s route I have been further experimenting for the quickest way to do it. In earlier examples I was using a two pass system doing one side of the track and then the other. This has been rather slow however. I decided to try a single pass application with a radius topology tab radius setting of 7-1/2 which equates, as you see below in the image, to a 100 meter (328 feet) diameter application paint circle:
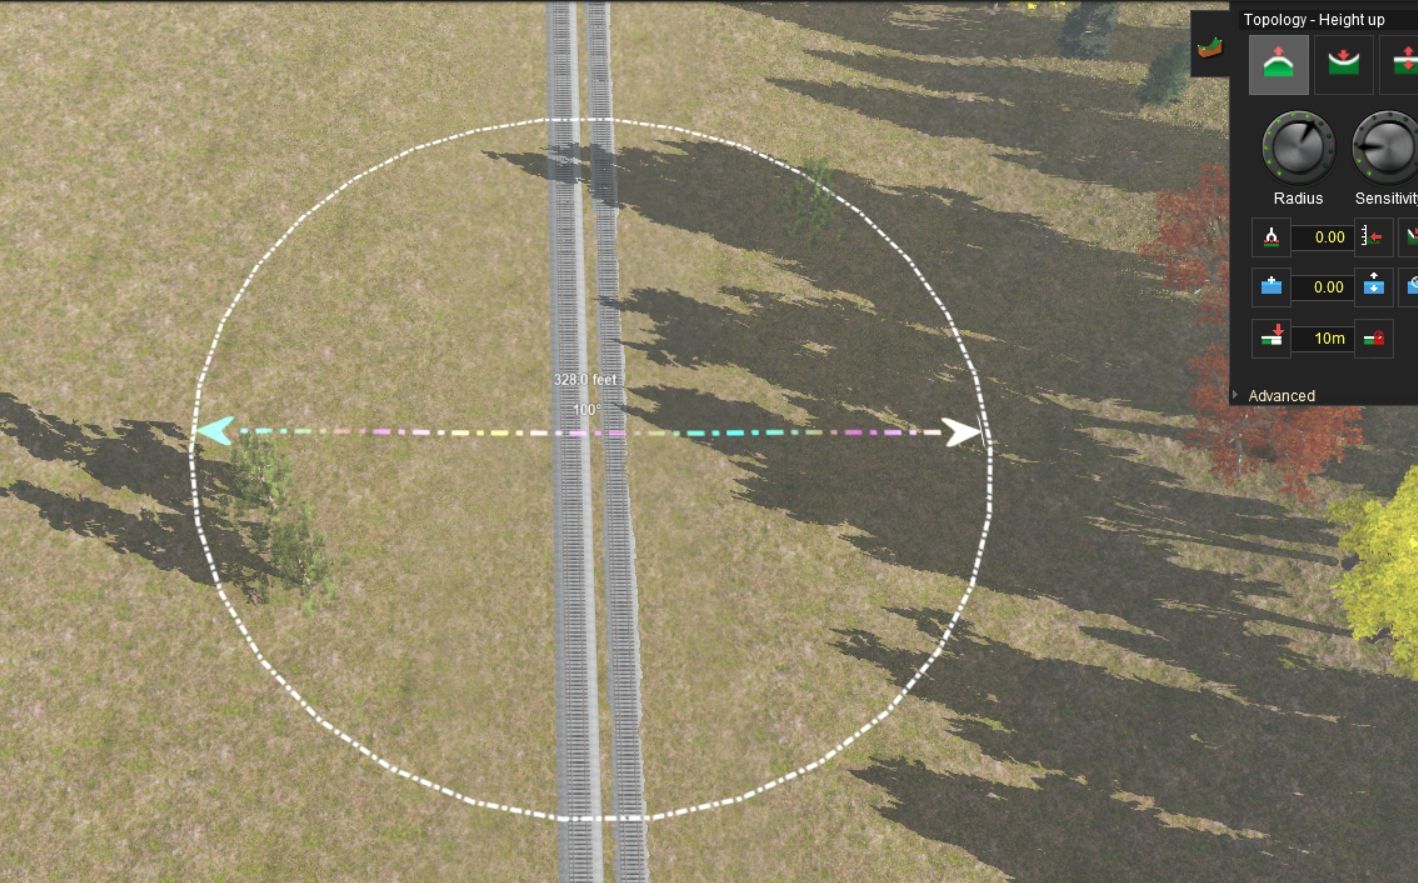
Doing it this way means that you will be able to apply the grass much faster although later you will have to come back and remove the grass from the track itself using a very small diameter radius "height down" circle. This is still faster then having to do two passes as you can just follow the track to remove the grass on it.
Bob
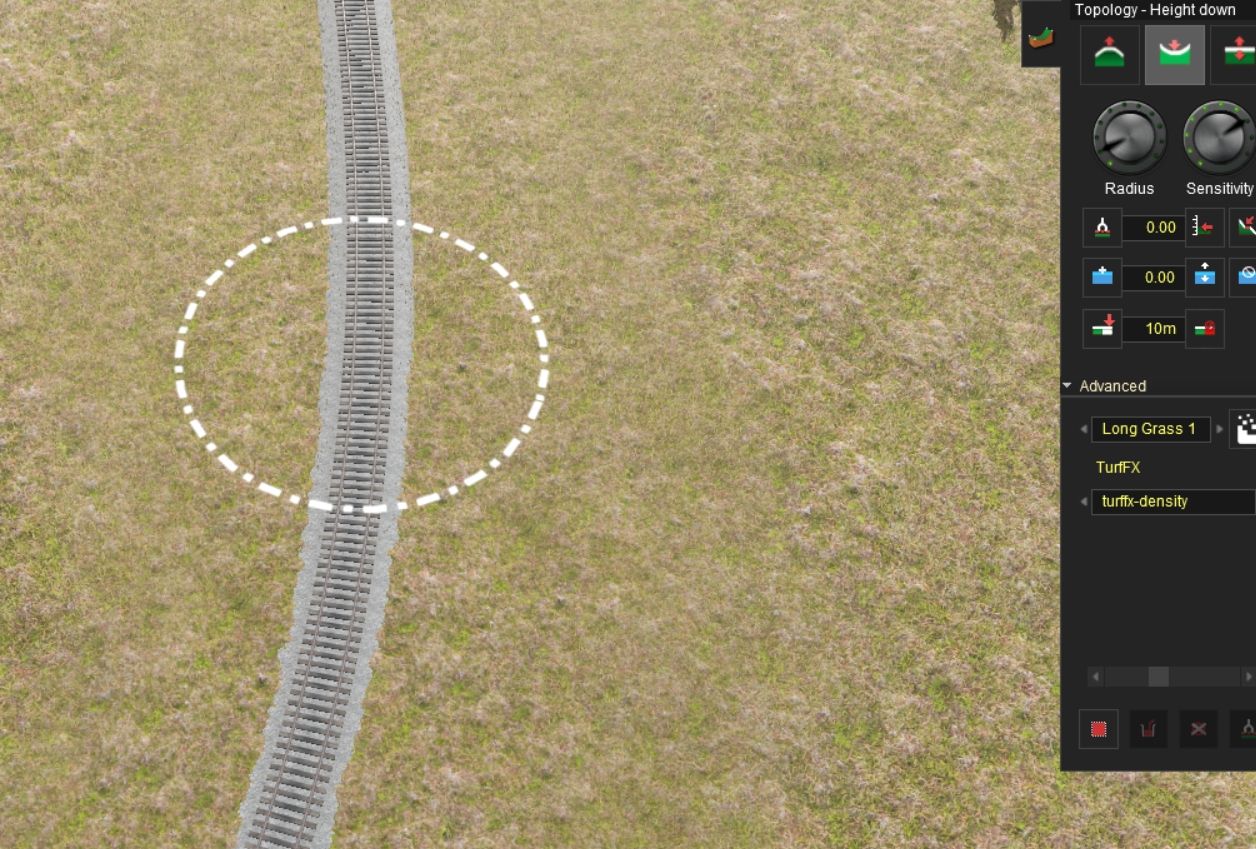
I know some folks will ask so if you apply the grass with a topology "height-up" radius of 7-1/2 or 8 you can then remove the grass from the track with a "height-down" radius circle of 2.
Just center the removal circle of the track as shown below:
Here is what the removal result looks like afterward from ground level:
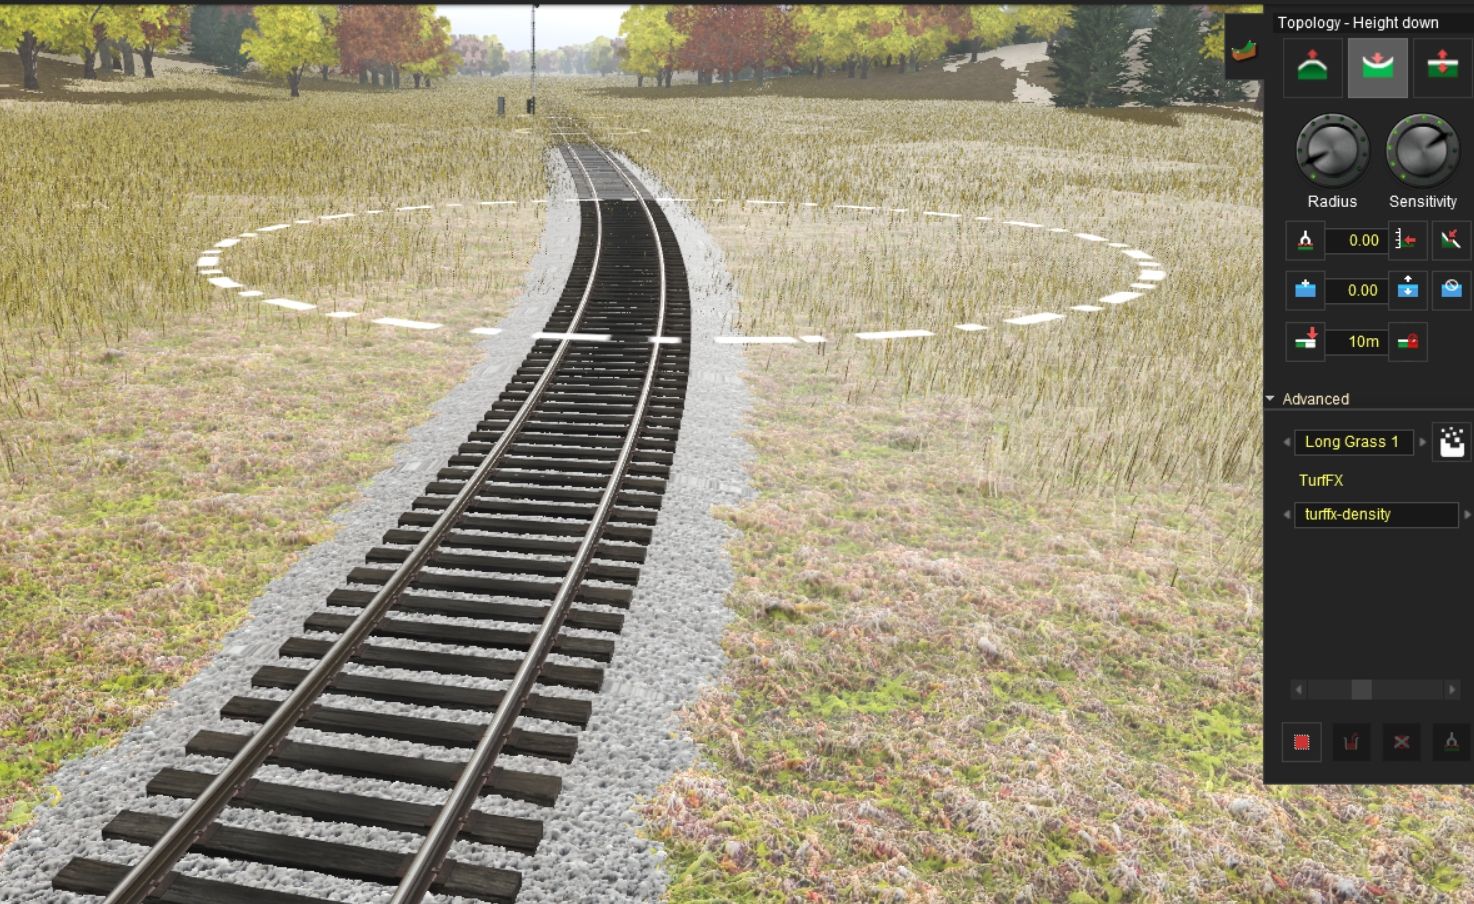
Bob
Just center the removal circle of the track as shown below:
Here is what the removal result looks like afterward from ground level:
Bob
Similar threads
- Replies
- 1
- Views
- 823
- Replies
- 0
- Views
- 351
- Replies
- 12
- Views
- 3K
- Replies
- 94
- Views
- 12K