Tips and Tricks-Surveyor

~snip~ my comments were directed to the claim that this method would "set an exact grade over multiple curve section of track". It won't.

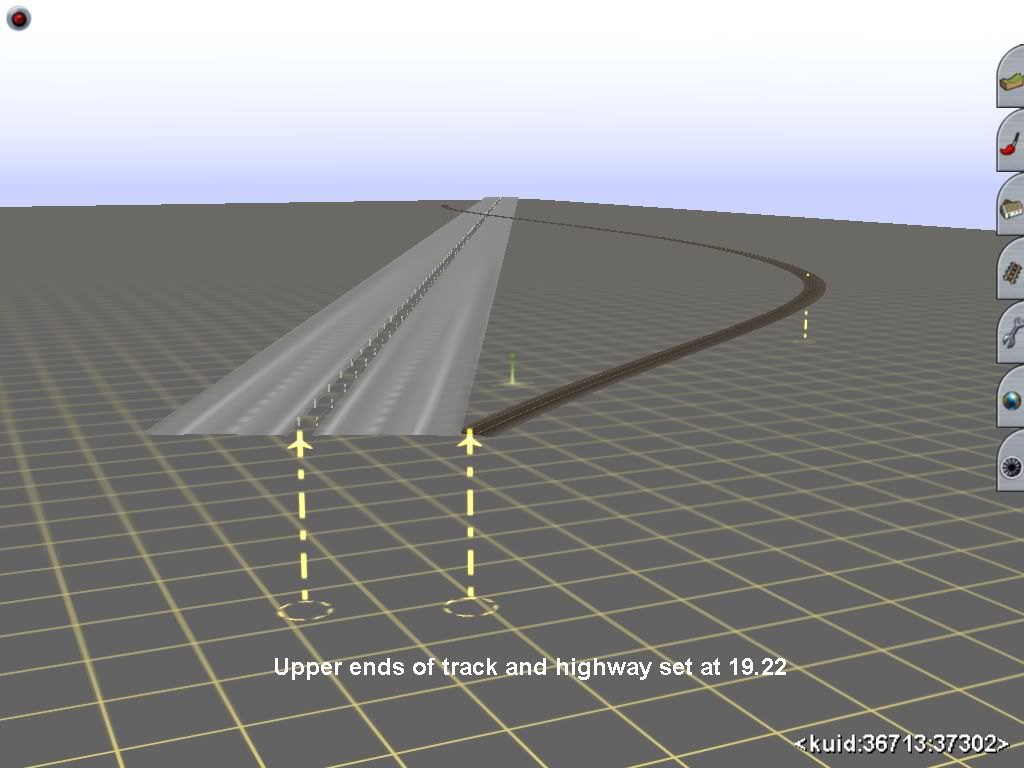
It will define a high point and a low point, but the % grade between each spline point will vary...

Andy :)


Hi Andy,

Yes, you are quite right. The OPs statement is clearly flawed. It’s mathematically impossible as soon as the section of track is increased by “stretching”!

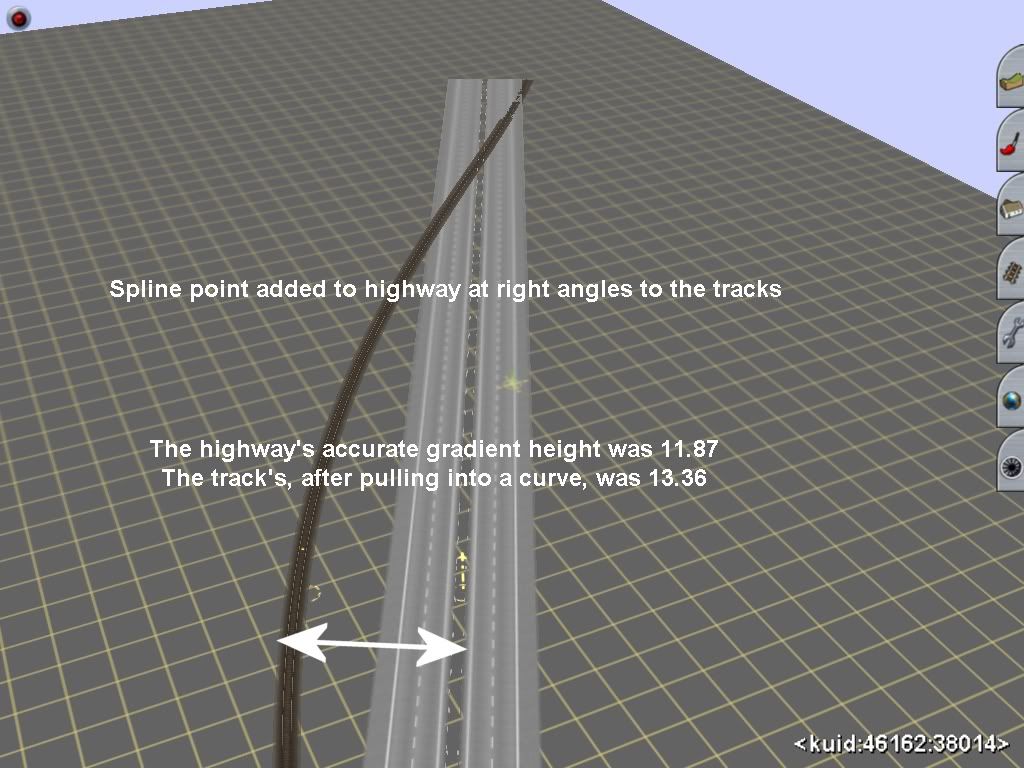
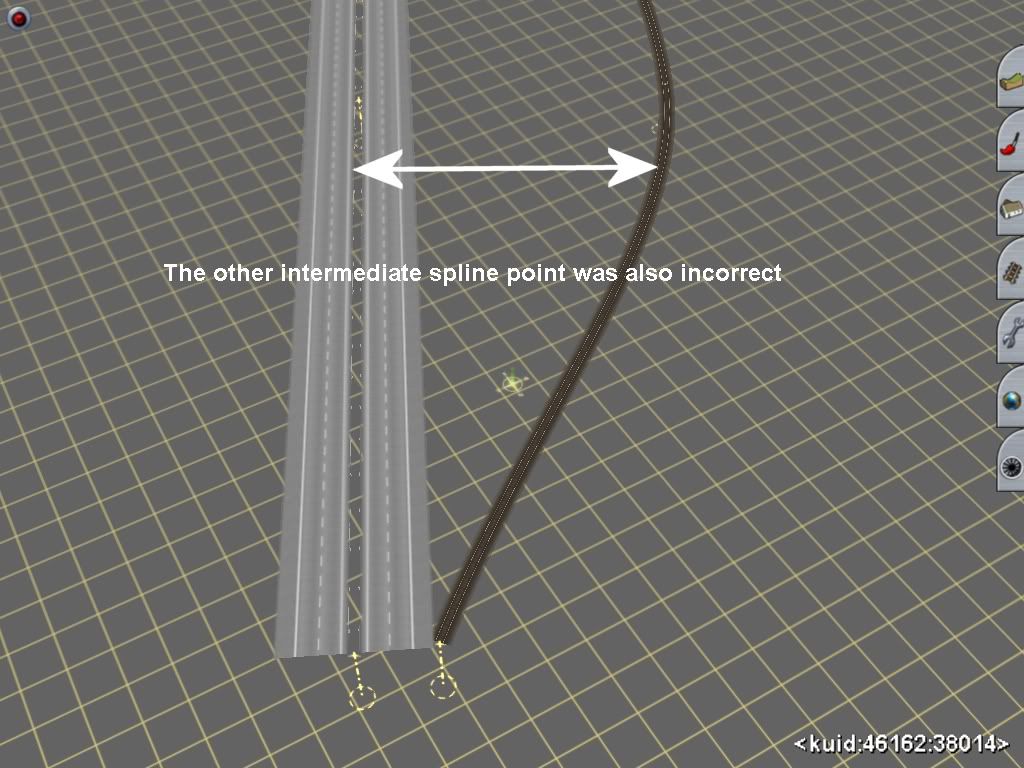
In fact, you can actually measure it, and clearly see the difference, if you use the ‘get gradient’ tool at the start/finish point of each spline point of the stretched out curves as in (3). Not one of the splines match - all of the inclines/descents have different numeric values.

It’s an interesting discussion though. I’ve not really thought about it before.


Cheers
Casper
:)
 
This is a strange discussion. Can't we just lay the track like we want it (curvy and nice), and use the gradient-tool on each spline point? The result (in my case, at least) is a curvy track climbing at exactly the same grade all the time (or I can vary the grade for each spline point). I don't see the need for any "tecnique" to do this. Or am I misunderstanding something?
 
Or am I misunderstanding something?

Nope, that's how I'd do it. I didn't come back with an alternative approach in my first reply because I was sure I was misunderstanding something :)

To apply a uniform grade to any length of track simply apply say 1% all the way along, if it finishes up too low go back at maybe 1.5. Too high? A third pass at 1.25 should fix it. I guarantee the whole procedure is twice as fast as manipulating one track over another and without too much mucking about you can hit the exact final height you are looking for with a perfect grade...

Andy :)
 
Last edited:
If I want to lay a length of track with several curves in it and make the track a constant gradient I lay a highway from end to end of the track with the same heights at either end. The next thing to do is trace all the track spline points back to the highway and at right angles to it and insert spline points on the highway where they meet and they will give you readings for the track spline points.
 
As Dermmy says, "Unless the distances between the spline points in (2) are identical to the distances between the same spline points in (3) then the grade will vary."

Unquote - If they aren't, then the constant gradient will be incorrect and no amount of guesswork, raising and lowering spline points, will make it correct.

My advice is to lay a length of track with the lower and upper ends in the required position.

Set the upper and lower ends of the gradient - In this case 8.75 and 19.22.

Lay a length of highway, from the start of the track to the end and set the lower and upper ends of the highway to that of the track - 8.75 and 19.22

Insert intermediate spline points in the track. Here I have inserted two.

Pull the intermediate spline points to the required position.

At right angles to the track's spline points, add spline points to the highway and these will give you an accurate reading to set the track's.

However accurate the tracks gradient might have looked, it wasn't. The lower intermediate spline point read 13.36 when it should actually have been 11.87

The higher intermediate spline point read 17.50 when it should actually have been 17.39

I've applied this method over several baseboards, it's not so difficult.

EDIT - I doubt that it was hardly ever possible for any railway company to lay a curved track at a constant gradient,. The varying strata would make it impossible financially. You wouldn't dig through metres of rock to maintain accuracy, and by that I mean in length as well as height.

Applyingagradient.jpg


Applyingagradient0.jpg


Applyingagradient2.jpg


Applyingagradient1.jpg
 
Last edited:
I confess I've never taken much interest in gradients except for my zig zag route and, after watching this thread, I thought I might return to it and make it a bit more realistic.

I also became interested in the gradient measure in Trainz and discovered that there is no information on the tool in the Trainz doco. I'm more familiar with gradient terms such as "1 in 10" or "1 in 5" so I laid a straight section of track exactly 10 squares long and then raise one of the vertices 1 unit. The gradient tool said the gradient was +1.00 or -1.00 depending on which side of the track you are. I then raised it 2 units and the reading became 2 (i.e. 2 in 10 or 1 in 5).

So my question is:

What is a reasonable maximum gradient for a route? OK, I realise factors like tractive effort and load come into play but railroad planners must have a general rule.


Paul
 
Hi Paul,


I would say no more than 2% in general cases. It depends on the terrain, the power and the trackage especially. If it's curved, it's harder on the engines. If it's a general straightway with no crossovers in a high speed area to begin with, you can get away with a bit more for a short duration. The TGV in France is a good example of this (because the train [which isn't too heavy - compared to freight] is already travelling at high speeds, they can get away with higher gradients in some places).

If you have a spur or what not, it makes it more complicated. Railroads were quite aware of the gradients when building, especially with regards to the power they had, the weather and all the other factors I mentioned above. I'm not a railroad worker, but my answer is based on logic, common sense and from things I've heard over the years.

Also keep in mind your traffic and the time the line was built (i.e. TGV France passenger type line, or an old commodities line built for cheap).

I would like to hear what others think about this as well.

:wave:

Gisa ^^
 
Sorry for the second post: I wanted to ask one of my own since the topic of gradients came up. I had a funny problem the other day.

I had 3 straight sections of track I was laying on a DEM. I was trying to match the track to the terrain and noticed that during one long stretch, the track cut into the terrain in the middle and then floated a bit above the ends. That's normal and I thought "no problem - I can just add some spline points where it cuts through the terrain and raise the track up and add some spline points to the part where it floats and lower it". This I did and it seemed to help except I noticed some odd behaviour. A picture is worth a thousand words:


Even though the gradients were the same and the heights of the spline points were the same, the middle track (track 2) seemed to arch like a rainbow, while tracks 1 and 3 sloped more like a hill. After scratching my head, checking the height, using the straighten track tool and more scratching my head, I thought to add an extra spline point (so 3 per height change) and that seemed to help.

My question is, to avoid that funny *rainbow* track behavior, should I always put three spline points (or two sections of level track) where gradients change?

:wave:

Gisa ^^
 
You get funny things with parallel tracks on grades, specially if there are curves and very specially at the top and bottom of grades where they transition into level track.

To take the second case first: On a real railway when level track starts to climb the change is gradual, not abrupt. Trainz track geometry replicates this change quite well. If you have one length of track at 0% and the next spline segment at 1% you do not get an abrupt change at the spline point, there is a gradually changing vertical curve in the track from 'flat' to 'rising'. The extent of this vertical curve is governed by several factors, among them the length of the spline segments and the relative extent of the grade change. Another factor is whether either spline segment is 'straightened'. Straightened track is straightened in both horizontal and vertical planes. If the first segment of a grade is 'straightened' then the 'level' segment leading into it must absorb the entire 'vertical curve' and will actually dip below the datum to accommodate it.

Point 2: On double track incorporating both curves and grades note that the two tracks cannot have the same grade if they are to rise by the same amount! The track on the outside of any curve covers a greater distance than the inner curve and therefore must use a lesser grade. To lay double track which climbs and curves first lay a single track using the 'Apply Grade' tool, but lay the second track by using 'Get Height' from every spline point on the first line and 'Apply Height' to matching spline points on the second track. This will give tracks of slightly different grades but identical elevation.

To avoid the 'one flat, one rainbow' effect that Gisa complains of on grades spline points on all parallel curved track must be radially aligned. Adjacent spline points on parallel track must be of identical elevation, ignore the slightly different grade. And avoid 'straightening' the first segment of a grade (not always possible)...

Phew.

Andy :)
 
Last edited:
Excellent answer Andy! I noticed the rainbow track would *drop* a bit if I hit the straighten track tool (even though the track was already straight. This explains quite a bit. I know in real life that double/triple/etc...tracks running parallel to each other might be at differing heights or gradients but for what I'm doing, I'm trying to apply the KISS principle (and I'm not talking about the band). Further, the smooth spline tool will have visual results that aren't appealing with clusters or differently graded/different height tracks.

In my case above, the spline points were all of the same height and the gradients the same (or off by .1 place at most). The third spline point seemed to help (and by factoring in your first explanation I think that's why it did that).

Anyhow, thank you for the quick and detailed answer. Auran should hire you to explain or write things. :)

BTW, your EK3 route is looking better and better with each shot you post. Keep up the great work!

:wave:

Gisa ^^
 
.(snip)Straightened track is straightened in both horizontal and vertical planes. (snip)
Phew.

Andy :)

That was interesting. I didn't know about the straightening occurring in the vertical plane though it makes sense. Ditto the issues of multiple tracks, gradients and curves.

Phew indeed! Track laying is hard work. No wonder I have weird stuff happen when I decide to rearrange tracks because they didn't look right.

I've often wondered whether it makes sense to lay track after doing all the mountain/earth moving. After all that is what would happen in the real world. Perhaps it is better to design and lay track first. Lock it in place and then build the scenery around it.

Paul:confused:
 
An excelent description Andy, I aggree whole heartedly.

pcas1986, try laying a track accross a gully then use the straightening tool.

It seems lots of route builders don't know how to use the straightening tool, as I have seen some weird tracks on routes I have dowloaded. Perhaps Dermmy's explanation should be made a sticky in the surveyors, operators & engineer's forum for a while.

Cheers,
Bill69.
 
Gradient math

I'm reworking an old route in very hilly terrain and would like to get the gradients right this time.

Would someone be kind enough to explain how to convert normal gradient nomenclature (eg 1 in 72) to however Trainz does it?

Also, if I have a starting vertex height of X and an end vertex height of Y, how to put the correct gradient into Trainz?

I'm really bad with maths, always have been, so please make it simple!:wave:

Thanks,
Mick Berg.

Look here

http://www.trainman.id.au/grade.htm

After looking here tho I can't remember if trainz uses degrees or % (I was sure trainz used %) as I thourght 1 in 40 was less than 2.5%

:)

Andy
 
Last edited:
Getting Started

When I started Trainz, (2007) I was so happy but I didn't know all of the things that you could do. But then when I discovered that I could move around I freaked! O_o :3
 
Ahhhhh ... Grasshopper ... When you can snatch this pebble from the hand, you will know it is time ... we will teach you all the things you want to know.
 
Stopping A train

When in DCC mode you can stop a train quicker by moving the speed control close to top dead center but not on it when the train slows down to around 5 mph then click on the stop button.
 
When using BNSF50's grade crossings, do not use built in roads. If you do, the road will probably float over. I recommend BNSF50 or Maddy25 for roads.;)

Also, if you try to end a spline near another spline point or the edge of the route, your spline will not be inserted
 
Last edited:
Back
Top