Install the app
How to install the app on iOS
Follow along with the video below to see how to install our site as a web app on your home screen.
Note: This feature may not be available in some browsers.
You are using an out of date browser. It may not display this or other websites correctly.
You should upgrade or use an alternative browser.
You should upgrade or use an alternative browser.
Tips and Tricks-Surveyor
- Thread starter titaniclover
- Start date
For UK stations, aligning platform to the track can be quite easy if you use ‘hydraulic buffer - kuid:116296:16080’ as a guide. Position two buffers – one at the spline point at each end of any straight track…
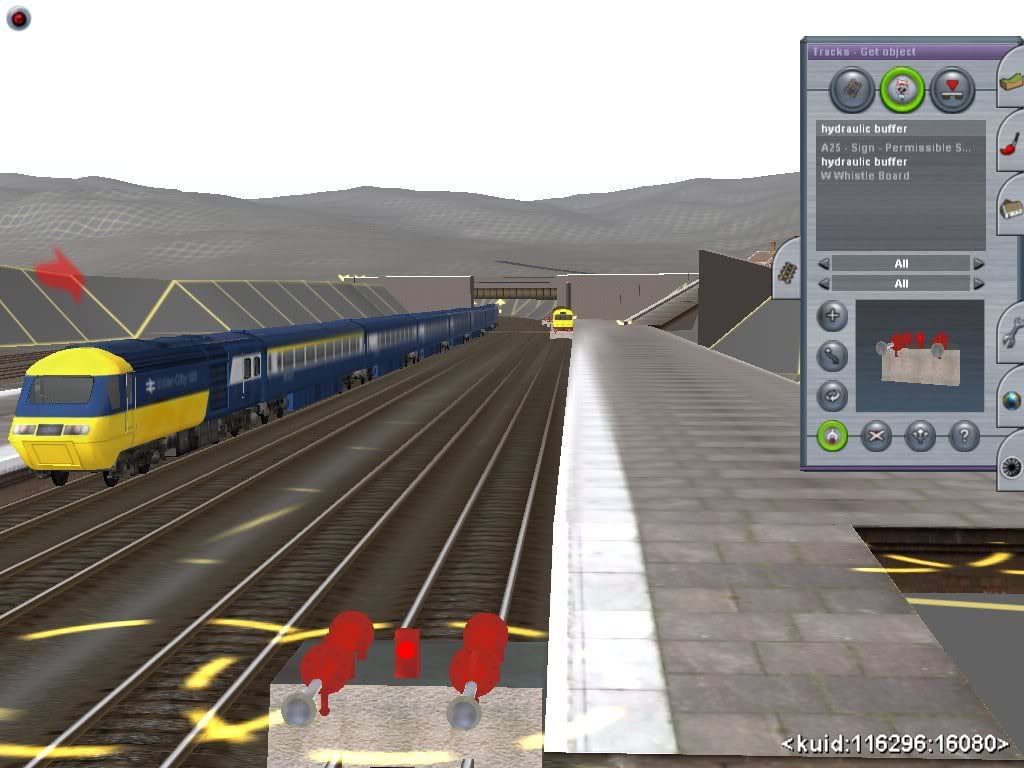
…and multiple buffers around the curved sections. Butt the platform up to the edge of the buffers…
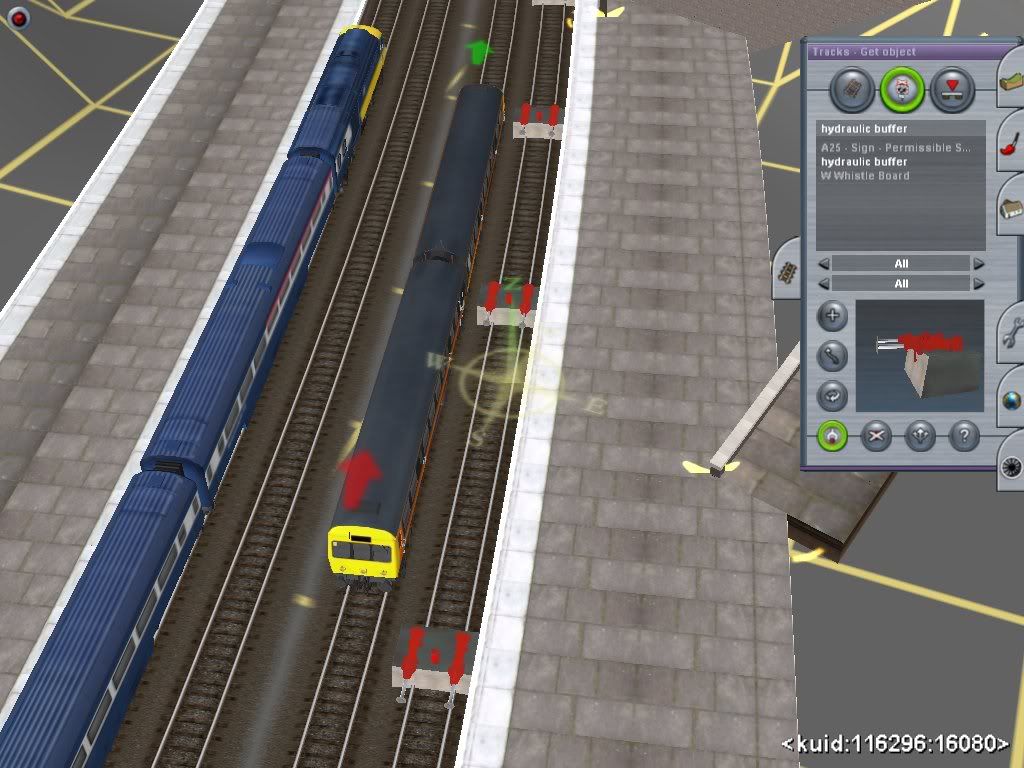
…which then leaves adequate clearance between train and platform.
…and multiple buffers around the curved sections. Butt the platform up to the edge of the buffers…
…which then leaves adequate clearance between train and platform.
Ever created something and wished you’d taken a few screenshots and done a write–up about it. No problem! Make sure you’ve saved the map and then take several screenshots of what you’ve created as you take it apart. Do the write–up and show the screenshots in reverse order. That we it looks like you’re putting something together. Just don’t do a ‘Save’ again when you close the map.
Odd-Shaped Platform Tip
Here's an easy, although rather cheap and cheerful, way to make an island platform with one curved side and one straight side, which is quite common. Use two of the "MS Platform" back to back, overlap them to get the width you want, and insert spline points on the curved side to get the curve. You can straighten the middle section of the curved side with the "straighten" tool from the Track popout. (yes, it does work!) To get the sloped ends, insert spline points, tilt the ends of the platform to ground level, and then break the spline to get a sharp tilt.
Not perfect, but beats making a complete platform in gmax, and it's adjustable in Surveyor.
Mick Berg.
If it's a fictional route I'm doing, I always lay the track first, but make sure it isn't a straight track by adding plenty of curves.
There is always a reason to have a curve in a railway, as it's more expensive than laying straight track, so on your layout you need to show a reason for doing this - a hill, hollow, water, houses, mines, forestry, factories and so on. Some ruthless railway builders ploughed through houses and such, but you can take a more sympathetic approach.
I would make sure not to lay any track at zero level. I would add a few gradients so that track can go over track and roads and water. Get some tunnels built and raise the land over them to suit. Rivers came first so get a river dug out. Roads came second and usually followed the rivers. Same with the railways. They can intertwine many times in the course of a route.
This would work well for freeform routes too; (in chronological order)
> Terrain
> Track and/or spline heights
> Increase all elevated spline points by 0.2
> Smooth splines
> Decrease the same spline points by 0.2
> Objects, roads, rivers etc
> Texture
> Natural vegetation
The reason behind the raising and lowering of 0.2 is because "smooth spline height" actually lowers the ground 0.2m more than the trackbed. You should get the idea.
Cheerio,
Nicholas.
I"ve had to lay out a few small forests on my "Real Life" route so most of these have been learned the hard way - I have had to delete my original efforts! 1) When laying out large numbers of trees always use the "Randomly rotate new objects" function in Surveyor options AND vary the height of the trees by using the Height button.2) When laying out Tree Splines , don"t lay them in straight lines - lay short stretches in criss cross lines so as to make them look less uniform.3)Always paint the forest floor a darker colour (e.g. Ger Forest) than the surrounding area. 4) For good measure use a sound file such as "Crows".
To add on; if your track is going through very thick jungle, it's more than sufficient for one 'layer' of trees beyond the tracks. For extra measure, a second layer can hide the gaps between the trees in the first layer. Use a ground texture like "ger forest" at maximum scale to enhance the effect.
PS. Remember to use clusters like "Tree Group 3" to save yourself alot of effort and a couple of fps.
Cheerio,
Nicholas.
FlyingScottmond
Rural Haul layout-1%
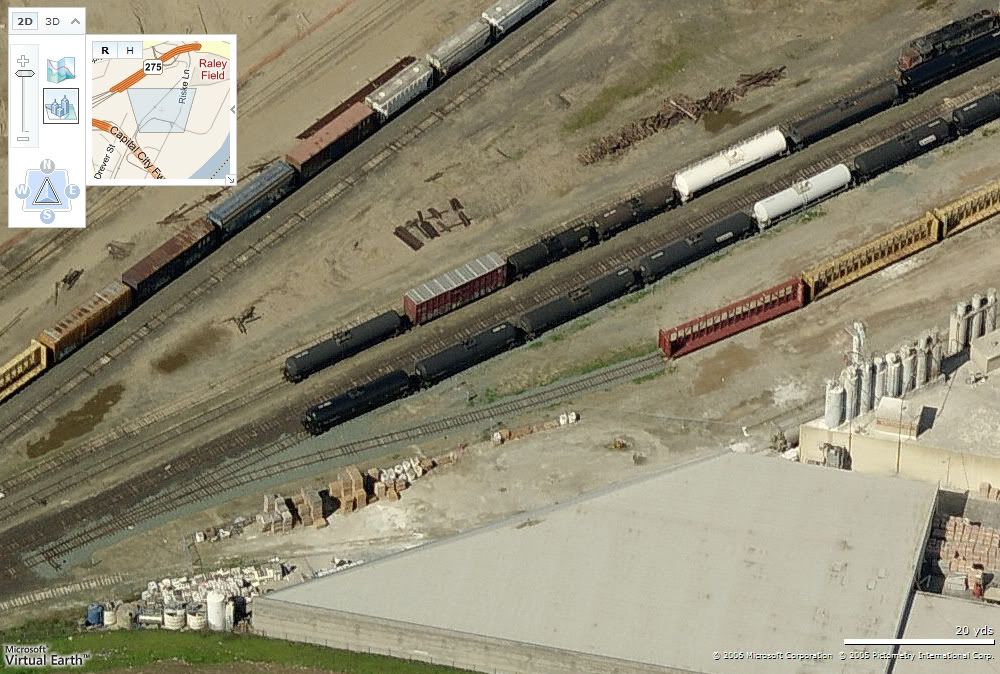
Microsoft's Virtual Earth is sometimes a good alternative to Google Earth. In some places, its imagery is sharper and brighter than Google's and there is the added advantage of being able to see some locations (I'm assuming most are in the US) in bird's-eye view. It's good for visualising a situation in a way that you can't in Google Earth.
A disadvantage, though, is that in the overhead view, (as far as I'm aware) you can't get the coordinate of a location like you can in Google Earth.
A bird's eye view of an industrial area in West Sacramento, California:
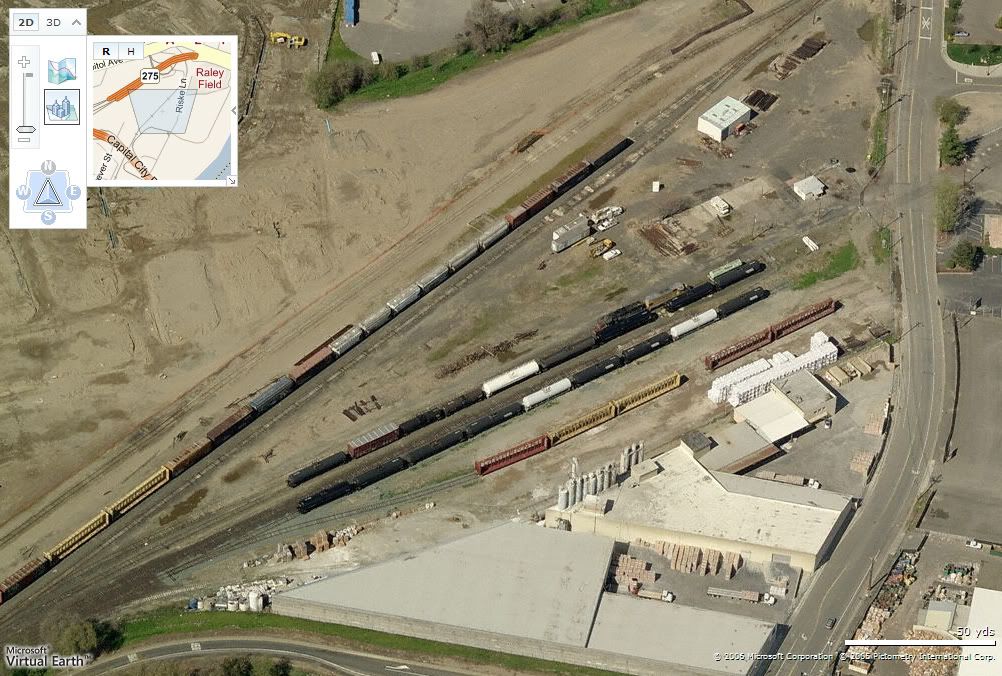
...and this zooms in to:
Its easy for microsoft to take pictures from satelites considering Bill Gates has enough money for a mission to Mars.....twice
FlyingScottmond
Rural Haul layout-1%
Trick for the Future
Start making proto types for the Extremely possible Multiplayer trainz
Start making proto types for the Extremely possible Multiplayer trainz
Wauw! Nice thread.
I've been making small and simple routes for a loooooong time, to try and learn some of the basics. After getting TS 2009 I finally decided to do a real route, and for once I tried looking through this forum, and came around this thread. After reading page 1 and 2, I had to read all of it (page 25 (370 posts)). It really gave me so much more knowledge on this, and actually helped me overcome many problems I would have gotten into, if it hadn't been for this thread. Keep up the very good work. I will come back here a lot in the future.
My tip: Read this thread!
Well done psindlev!
I can't remember if this has been mentioned in this forum.
Track has a direction. You can check that out by dropping a loco onto it and see if the green arrow is pointing in the correct direction. If not, then the track has been laid incorrectly. No problem, add a spline point and delete it, that reverses direction. You may need to make adjustments to signals, points/switches etc after this correction.
This works for all splines.
Re-read the Manual
Here's one that comes from experience. Re-read the manuals occasionally, even the most basic ones. I had forgotten all about Alt-O, which only shows the spline points for the things you are currently working on, ie tracks or splines. It makes it much easier to find the right spline points in acrowded area. And, likewise, but in gMax, I'd forgotten about F2 which shows your selected polys in bright red. Very useful.
Mick Berg.
I just saw this rather old post and find it interesting but I can't see the picture. Could you repost it with the picture available please?Just sharing this:
I use the steam effects to disguise portals within tunnels. This way, even when looking down you can't see the trains appearing and disappearing. A little unprototypical perhaps, but it adds a nice air to it. Perhaps if someone did a black smoke version this would look better.

BidMod
Thanks,
Mick Berg.
cascaderailroad
New member
Creating Terrain with Track & Smooth Spline Tool
Creating Terrain With Track & Smooth Spline tool
Ever have one of these problems ? A topography that is higher or lower than a DEM or route.

Just meticulously, lay dozens and dozens of temporary non-joining track segments, by holding down on the "Shift Key" (until the segment of road or track spline is finished being laid), starting at the top of a mountain farther back, and ending at the valley floor or right on the mainline. The "Shift" key keeps track from joining like magnets and prevents junctions. Then "SAVE"...always save...as an hours worth of work can vanish in a flash if your video driver quits unexpectedly ! Then go back and hit each and every track segment with the "Smooth Spline" tool. And if you placed your track far back enough it should match fairly accurately. Note: Using a really fat 4 lane road spline also works great as a terrain leveling tool.

Then "SAVE" remember to save ! Then go back and delete each and every of the temporary track segments.
Creating Terrain With Track & Smooth Spline tool
Ever have one of these problems ? A topography that is higher or lower than a DEM or route.
Just meticulously, lay dozens and dozens of temporary non-joining track segments, by holding down on the "Shift Key" (until the segment of road or track spline is finished being laid), starting at the top of a mountain farther back, and ending at the valley floor or right on the mainline. The "Shift" key keeps track from joining like magnets and prevents junctions. Then "SAVE"...always save...as an hours worth of work can vanish in a flash if your video driver quits unexpectedly ! Then go back and hit each and every track segment with the "Smooth Spline" tool. And if you placed your track far back enough it should match fairly accurately. Note: Using a really fat 4 lane road spline also works great as a terrain leveling tool.
Then "SAVE" remember to save ! Then go back and delete each and every of the temporary track segments.
Last edited:
jadebullet
might be back?
A good way to make pretty realistic Eastern US mountains, (nice round tops) is to use the method that I use. It can be time consuming, but it produces a very nice result, with a nice realistic top, and different steepness on the sides.
1) Take your raise height tool, and set the sensitivity to about 1/4, and the radius to around 1/2 (feel free to adjust as you see fit.)
2) Using the raise height tool, trace the outline of the entire mountain. Don't raise the height too much, you want a nice gentle slope. Once you are done, you should have an ameba shaped ring of raised terrain.
3)Repeat step 2, but slightly more inwards, so that you continue the slope.
4)Continue to slowly close the ring until you get to the center. You should now have a nice looking mountain.
5) use the plateu tool, on the lowest sensitivity, to smooth any particularly jagged parts. you want to be gentle when doing this step, so just use nice gentle strokes on the part you want to smooth, until it looks relatively smooth. Don't worry if it isn't perfect.
6)Texture the mountain. Paint particularly steep parts in a cliff texture for added realism.
7)add a few rocks if you want. Then cover the mountain in trees. This will continue to add to the "smoothness" the Appalachian mountains. The mountains in real life aren't particularly smooth either, the trees just add to the illusion of smoothness.
9)Enjoy. Remember, the width of the origninal ring, will determine the height, as will the steepness of your slopes as you are making it. You can make small foothills, up to large Appalachian mountains with this technique.
cascaderailroad
New member
Using Track to Carve Baseboard Topography
Here I use track to carve, or in this case...raise topography to build hills and mountains. Using the holding down on the shift key method of laying track, so as to prevent them from clicking together like magnets. I laid five concentric circles of track, three grids apart from each other. I also laid five curved segments in the background. Next I applied a track height of 5 to the bottom, 10 to the next layer, 15 to the next, 20 to the next, and finally 25 to the upper layer.

Start hitting each track progressively with the "Smooth Spline" tool, starting at the bottom and working my way upwards towards the top of the hillside.

Then finish it off by deleting the track segments...and then apply the proper textures.
Note the cliff backdrop in the extreme background was laid at a height of 400. Forget the decimal points, just use the whole numbers you wish track to be elevated to.
Wide road splines also work great, and much better. The wider the spline, the more area it will displace when hitting the "Smooth Spline" tool.
Here I use track to carve, or in this case...raise topography to build hills and mountains. Using the holding down on the shift key method of laying track, so as to prevent them from clicking together like magnets. I laid five concentric circles of track, three grids apart from each other. I also laid five curved segments in the background. Next I applied a track height of 5 to the bottom, 10 to the next layer, 15 to the next, 20 to the next, and finally 25 to the upper layer.
Start hitting each track progressively with the "Smooth Spline" tool, starting at the bottom and working my way upwards towards the top of the hillside.
Then finish it off by deleting the track segments...and then apply the proper textures.
Note the cliff backdrop in the extreme background was laid at a height of 400. Forget the decimal points, just use the whole numbers you wish track to be elevated to.
Wide road splines also work great, and much better. The wider the spline, the more area it will displace when hitting the "Smooth Spline" tool.
Last edited:
There a tip to keep the trains from derailing when you by pass a switch, make sure the track is straighen out and then try to make the junction, just make it as straight and long as possible so when it runs over the swtich it won't derail. (Tip: If a train derails, its often the way how the track was layed and set up. Also the type of train you use may make a big difference).
Similar threads
- Replies
- 10
- Views
- 2K
- Replies
- 9
- Views
- 485
- Replies
- 12
- Views
- 5K
- Replies
- 5
- Views
- 2K
- Replies
- 2
- Views
- 865