Tips and Tricks-Surveyor

Hi martinvick . Yes, I have found though that I battle sometimes when breaking up pre-programmed loads in a session that the couplers are locked and will not relaese or couple again when different loco's are coupled to different trucks, and I still am not sure how to use the coupler lock and unlock feature in the train physics when in surveyor - whether I lock them or unlock them they sometimes won't work.
 
if you got a dual screen and run trainz in windowe mode when creating topology i got a trick to make it fast.
Make a height of your choice then hit the plateu button now move your cursor over the height and hold your left mousebutton then drag your cursor over to the other screen and release mousebutton then move your cursor back to trainz and then your trainz make the mountains wherever your cursor are heading. Sorry for my spelling, hehe. To stop it just hit the mousebutton again.:)
it maybe work on 1 monitor in windowed mode to.
 
The surveyor mode is one of the things I love about Trainz. It sets it apart from all other Rail Sims in my opinion. I have yet to find another one that gives you the freedom to build and design your railway like Trainz does.:)
 
Shift Key lets Spline Points Stick on Textured Terrain!

I just discovered something really useful, and I wish I had known about it years ago!

Sometimes when you try to lay a new spline over terrain that has been textured, it will not stick.

If you hold down the Shift key when you click to set the spline point, it will stick. Fantastic!

Mick Berg.
 
I don't bother with Trainz very often, but it occurred to me that some of the UK crowd might be interested in the following. There is a FREE mapping system called Where's the path, which has onscreen grid references that show wherever the mouse pointer falls (bottom right). It is also split into two maps, the ordinary mapping system and the satellite mapping system. This can be changed to view various other maps, such as terrain. Very handy for prototypical routes -

Wheresthepath.jpg


http://wtp2.appspot.com/wheresthepath.htm

There is a large collection of UK photographs of the railway on geograph.org.uk

Some photographers, such as Ben Brooksbank, have posted old photographs of stations that no longer exist and those that exist, as they were years ago -

You will probably need to register, but it is worth it.

http://www.geograph.org.uk/gridref/TF3244?user=44502

http://www.geograph.org.uk/profile/44502

See my signature, as well.
 
Last edited:
Useful tip there Dave, looks like the Skeggy line was re-ballasted when that photo was taken!
Just tried it this evening, got a message about restricted usage, and it was now using out-of-copyright 1940s OS maps, actually even more useful!
 
Hello David

Yes, in times of heavy usage the map does change. I think the normal map is restricted to a certain number, be it large, of views.

A lot of the track has been replaced with new and old flat-bottomed rail and crossings gates have been replaced with barriers. Sleepers are mainly steel laid with the NTC, though concrete and wooden sleepers have also been used.

You might like to wade through these before and after shots of mine - http://www.geograph.org.uk/search.php?i=37589590

http://www.geograph.org.uk/search.php?i=37589844

The links will probably overlap at some point.
 
Last edited:
Please, dont ask where you get this or that here. Please contact the Tip/Trick poster by PM to solve your issues or problems/questions. It makes this thread a bit neater and easier to find the Tip/Trick you really want. Also, no comments on stupid stuff!! This is an information thread not a "Hi, whats the weather in your area today?" thread. All off-topic posts like this will be deleted.
 
Hope its the right place to ask my question.
I have seen in another route that the irrigation system sprays a mist - looks cool. In my route the irrigation gives no mist. Did I do anything wrong or are there something that should be switched on?

Kind regards

Niels
 
Here are my guesses Niels. Either there is another asset of the same design with water coming out, or it was "kitbashed" and the water effect (which is a separate KUID) was added around the irrigation system. Hope this helps.
 
Thanks a lot. It certainly helped. After your push I found an asset "T1 mist effect" and all is ok.

Thanks for you help

Niels
 
Please, dont ask where you get this or that here. Please contact the Tip/Trick poster by PM to solve your issues or problems/questions. It makes this thread a bit neater and easier to find the Tip/Trick you really want. Also, no comments on stupid stuff!! This is an information thread not a "Hi, whats the weather in your area today?" thread. All off-topic posts like this will be deleted.

I should advise you that like me you are not a moderator. In fact, it is sometimes better for people to ask questions on the thread so we can all learn from the answer given.

Shane
 
Thanks a lot. It certainly helped. After your push I found an asset "T1 mist effect" and all is ok.

Thanks for you help

Niels

:) Glad I could help. I'll add something to all the great posts here. There is a great site:

http://trains.0catch.com/tutorial.html

Which in many ways, is still relevant for those using the latest versions of trainz. For those wondering how to get their tracks to be straight or curved properly, tutorial # 1 is very worthwhile.
 
I should advise you that like me you are not a moderator. In fact, it is sometimes better for people to ask questions on the thread so we can all learn from the answer given.

Shane

You both have a point, but I wouldn't expect anyone to display freeware in the payware thread, nor American screenshots in the Australian screenshots thread. There is a place for everything and I wouldn't come here to ask questions and I wouldn't add tips and tricks in a questions and answers thread. I you look back through this thread it's been hijacked enough already. There was a certain person who made it his mission in life to disrupt it with his abuse and we don't want to encourage him back. It's so easy to start a thread with a question and more likely to be looked at because of that. Regards, Dave
 
Last edited:
You both have a point, but I wouldn't expect anyone to display freeware in the payware thread, nor American screenshots in the Australian screenshots thread. There is a place for everything and I wouldn't come here to ask questions and I wouldn't add tips and tricks in a questions and answers thread. I you look back through this thread it's been hijacked enough already. There was a certain person who made it his mission in life to disrupt it with his abuse and we don't want to encourage him back. It's so easy to start a thread with a question and more likely to looked at because of that. Regards, Dave

I see your point, but only N3V or an actual moderator can do anything about it, not an unregistered user.

Shane
 
My guide to inserting a cross-over from one curved track to another.

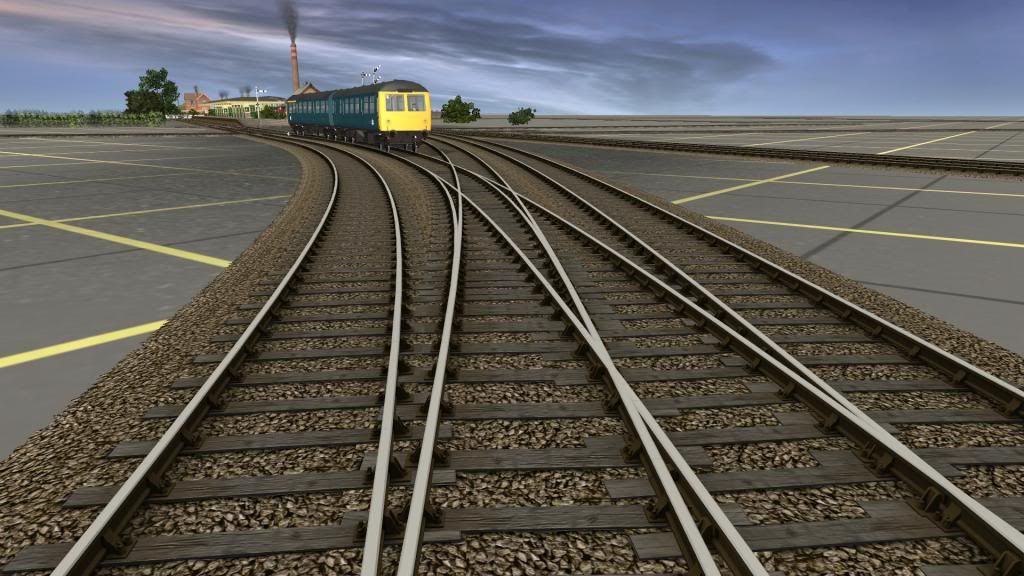
Here you can see a cross-over from one curved track to another (see below for method). Adding a cross-over to curved track is a little frustrating to say the least and one which I used to avoid, or make a pig's ear out of. I've used large images to explain the method, so that's got that point out of the way. Read on.

20130403_09_zps6a26ff22.jpg


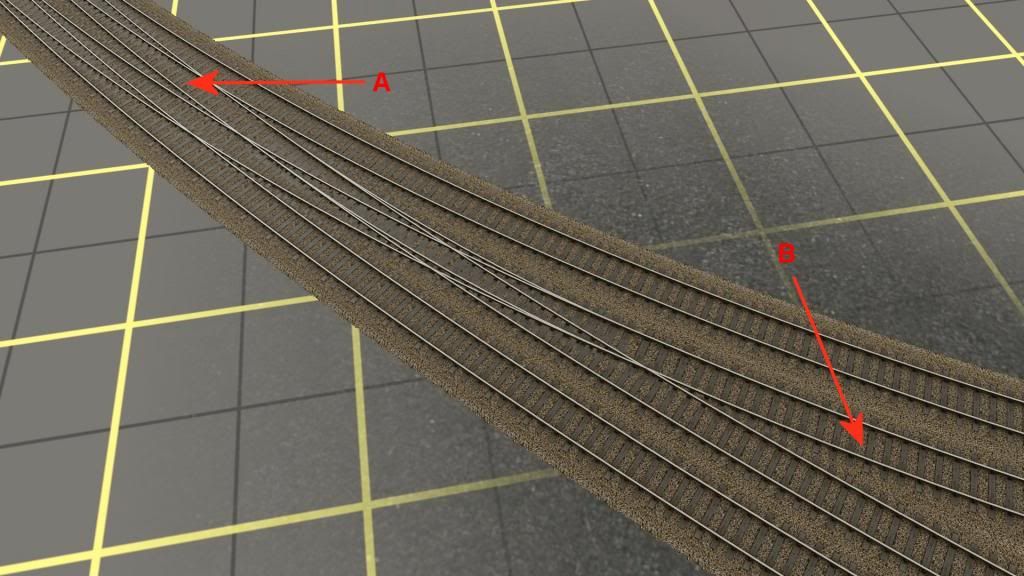
Rail A, the avoiding line, has to get to rail B. NOTE - I've added the cross-over for clarity. No need for a before and after shot, there's one below.

20130403_01_zps6a6d38e7.jpg


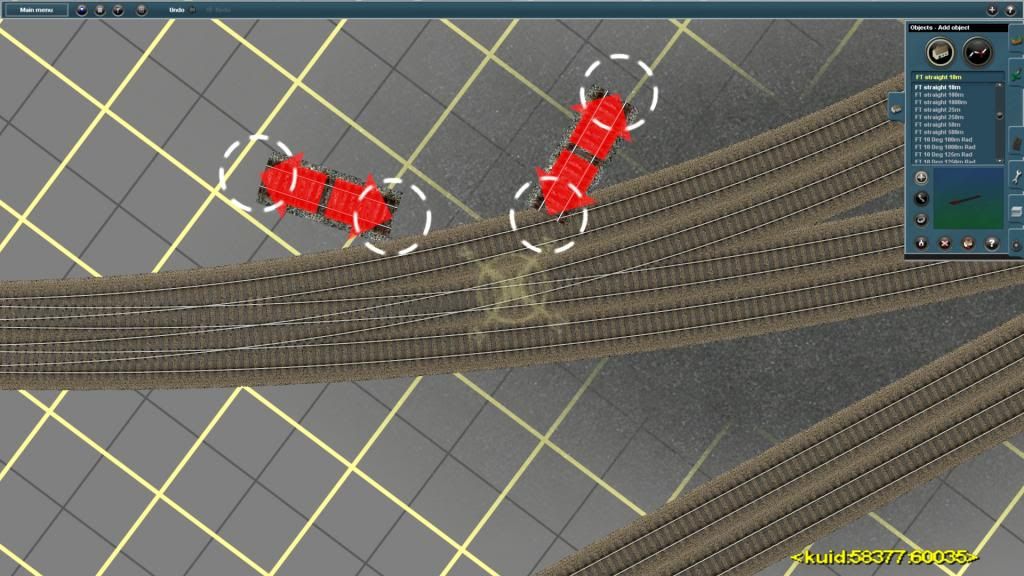
The cross-over is going in here

20130403_02_zpsa37d1d1c.jpg


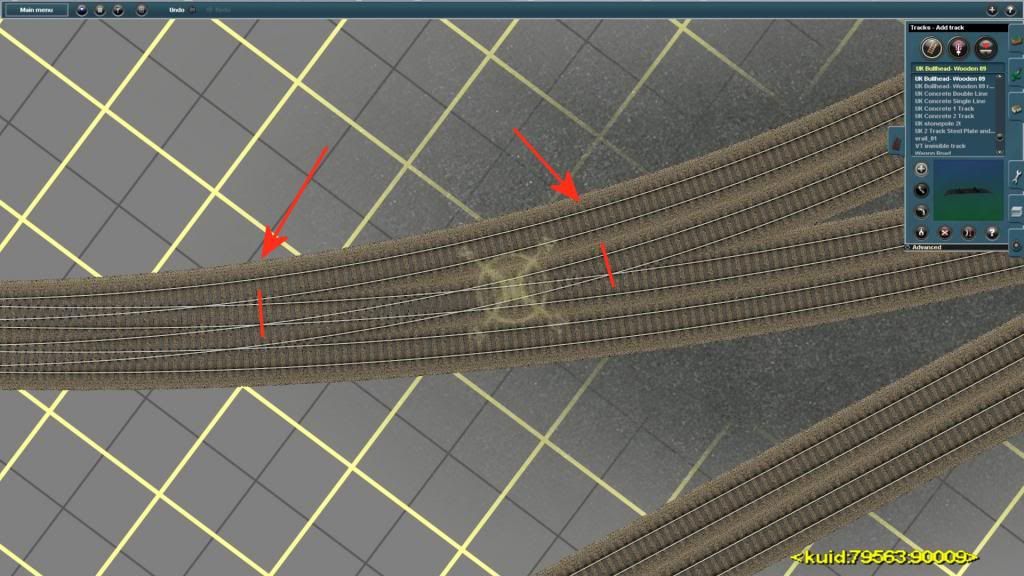
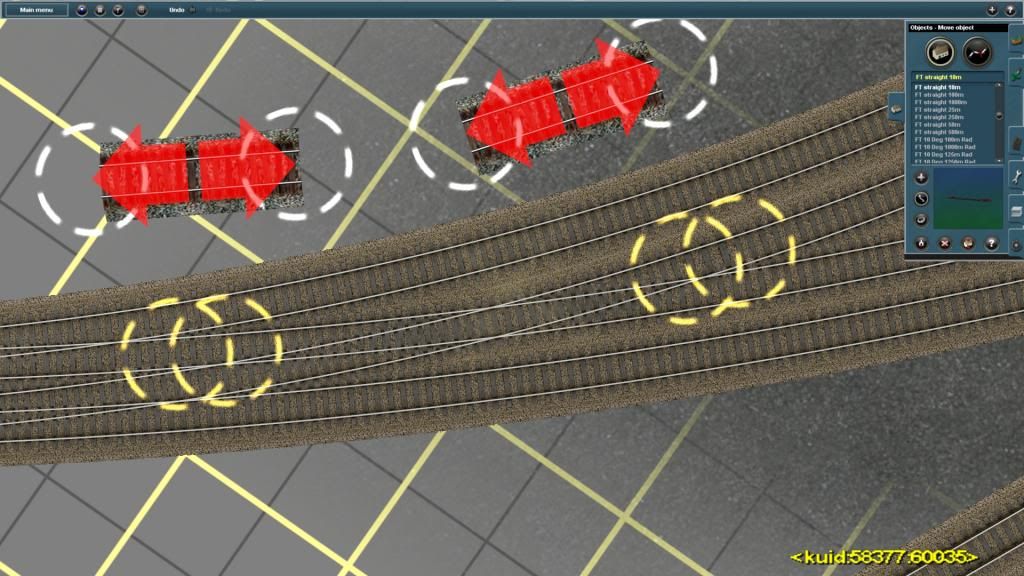
I selected two small sections of Fixed Track to use as a guide. You can choose whatever suits you

20130403_03_zps11302f19.jpg


I laid a section of Fixed Track over each point where the cross-over will connect and lined it up perfectly over the curve so that the same amount of track beneath showed through at both ends.

20130403_04_zpsddffbef6.jpg


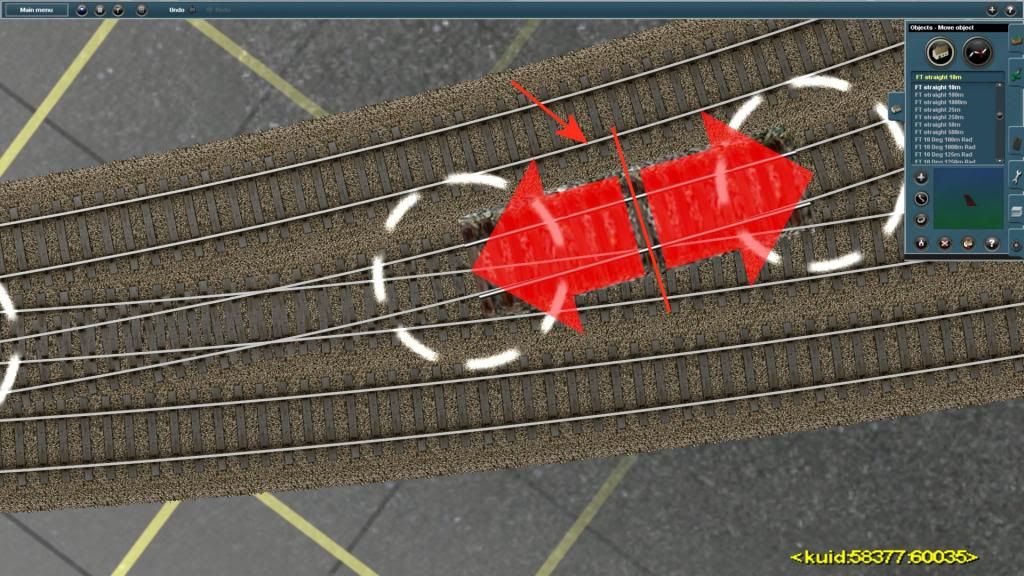
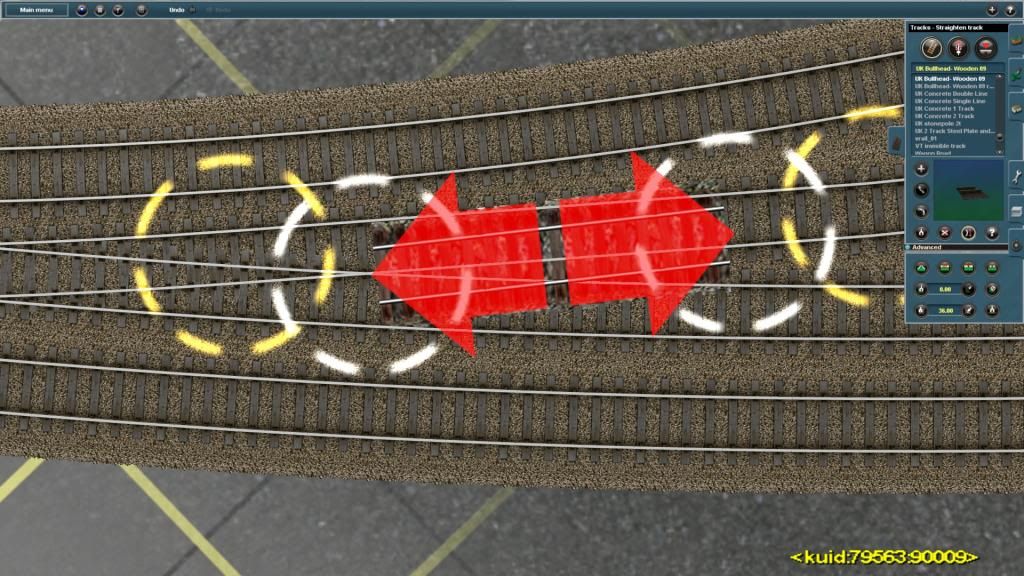
I then added two extra spline points to the curved track, outside of the Fixed Track. After doing that I applied the Track Straightening tool to the middle section of the curved track (the bit between the two spline points. Obviously I had to do that twice.

20130403_05_zps0bada566.jpg


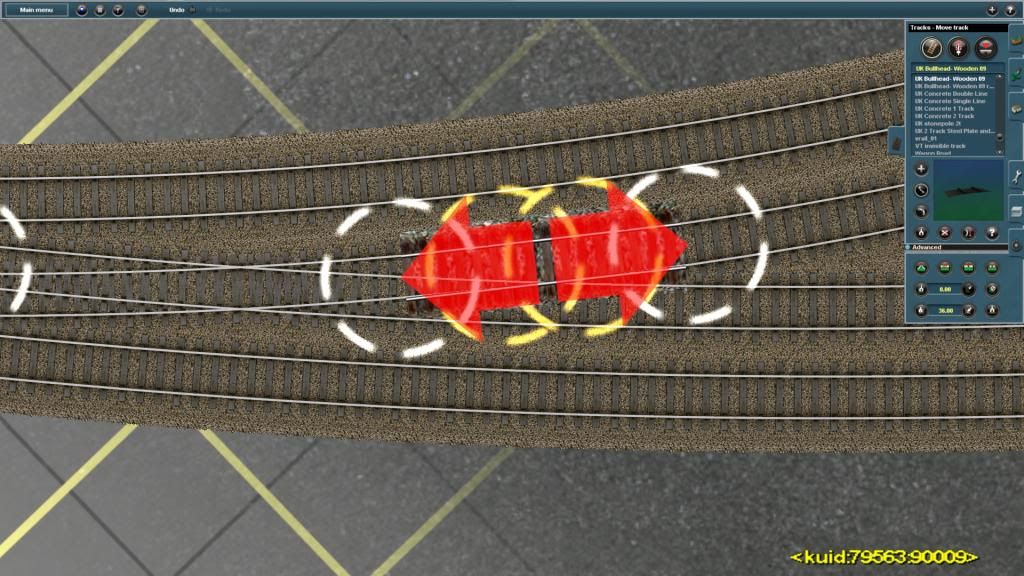
Now carefully move these spline points closer together, about the same as you see in the screenshot, and do that in both places

20130403_06_zps0fd00b50.jpg


Once you've done both points, remove both pieces of Fixed Track/guide out of the way

20130403_07_zps49b72d44.jpg


Connect both inner spline points together. You might need to add Invisible levers, as I have done. Otherwise they could stick out of the track

OK, that's it. Go and try it out on spare board. Regards, Dave
 
Last edited:
Coolbananas, im sure that will help a few guys out escafeld, i need to use fixed track more often... :)

how'd you go with the junction levers? ive found doing that sort of thing with two curves coming off a junction can confuse the direction of the lever
 
Wow, Dave, I'm glad I don't have to deal with the likes of that! It sure is some fine looking track work!

Cheers....Rick
 
On all curved junctions just place a spline point before the split of the track and use straighten tool on that small section. The lever wont get confused as the crossover will be straight on entry. You dont need the straight bit after the junction as it has no effect on the actual junction.
 
Back
Top