justinroth
Well-known member
I've been contemplating making some procedural track. I'm wondering why there isn't much out there? Is there a problem with it that I'm missing or what?
Follow along with the video below to see how to install our site as a web app on your home screen.
Note: This feature may not be available in some browsers.
May I make some recommendations?
Track by SAM if you don't mind the screw bolts instead of the spikes. There's a ton here with various kinds of ballast ranging from the brown-green to grey and brown. There's also grassy, rusty, old and new varieties as well as ruined.
Track by trainboi1. This is really well made SG and narrow gauge track that works well, meaning it doesn't kink up funny and the ties are the wider ones not the thinner spaced UK and Australian equivalents. These form decent junctions and can be mix and matched with the usual caveat of points being rusty but the rest of the track not in switches.
With so many of them to choose from, ranging from 70 lb. up to 136 lb. track, I'll say look on the DLS it's easier than listing them out.
Zec Murphy just made some really, really nice BG and SG track. This is of the lighter Australian version, but his track is so well made it'll work all over especially for our lighter lines. Look under his id S301 and his track is found on the DLS.
Hope this helps. These are only a few of the latest content creators producing really nice track.
Don't forget Pencil42 if you're looking for procedural track that's appropriate for shortlines or branchlines in the first half of the 20th century.


Don't dispair at least if it's for a route you won't be distributing. One good thing about procedural track is that it is made up of a number of pieces that you can play with. The following pic shows the result of cloning and changing just a couple of config tag values and the original broad gauge now matches with standard gauge track - and looks pretty good. In this case the gauges differed by only 3 3/8" so an easy fix - only track guage, check gauge and lateral offsets for rails and chairs have to be changed. My one complaint if used on US routes is the checkrails use different profile but it's hard to see....
I finally found a whole bunch by ILIOSIN (TSW PTS) the ballast matches perfectly and even though it is PBR it doesn't produce the odd shadow and "ripping" effect where the mesh meets a non-PBR texture but come to find out they are a slightly wider gauge than what I need for U.S. trackage. I was totally bummed.
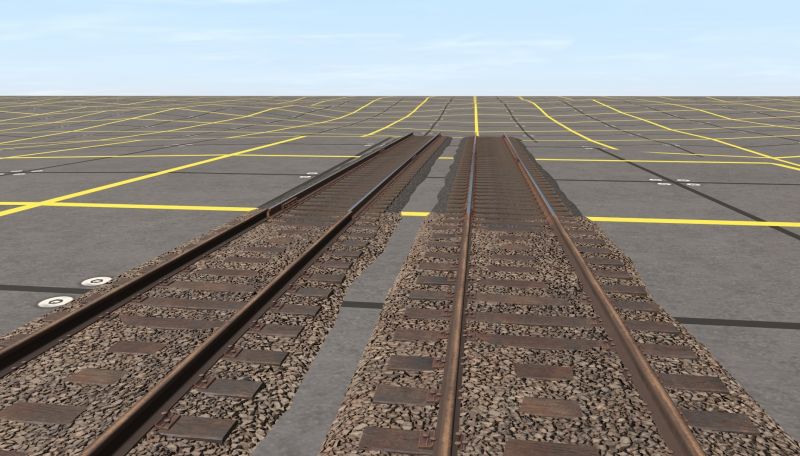
Don't dispair at least if it's for a route you won't be distributing. One good thing about procedural track is that it is made up of a number of pieces that you can play with. The following pic shows the result of cloning and changing just a couple of config tag values and the original broad gauge now matches with standard gauge track - and looks pretty good. In this case the gauges differed by only 3 3/8" so an easy fix - only track guage, check gauge and lateral offsets for rails and chairs have to be changed. My one complaint if used on US routes is the checkrails use different profile but it's hard to see.
License says "Public sharing this content or its modifications is prohibited without permission by the authors", so contact authors ILIOS, Nemo if you envision any use beyond your own route.
Bob Pearson
No, it's changing the lateral-offset tags in the attached-splines container. Plus the track-gauge and check-gauge tags have to be changed.You're able to change position of the rail? That's awesome! Did you do it with position x,y,z in the config?
track-gauge                             1.52
check-gauge                             1.485

attached-splines
{
  rail_left
  {
    lateral-offset                      -0.813
    ...
  }

  rail_right
  {
    lateral-offset                      0.813
    ...
  }

  chairs_left
  {
    lateral-offset                      -0.813
    ...
  }

  chairs_right
  {
    lateral-offset                      0.813
    ...
  }
}track-gauge 1.436
check-gauge 1.401
attached-splines
{
rail_left
{
lateral-offset -0.76
...
}
rail_right
{
lateral-offset 0.76
...
}
chairs_left
{
lateral-offset -0.76
...
}
chairs_right
{
lateral-offset 0.76
...
}
}No, it's changing the lateral-offset tags in the attached-splines container. Plus the track-gauge and check-gauge tags have to be changed.
Track-gauge is standard definition - inside face of rail head to inside face of rail head on the running rails. That's 56.5 inches for standard gauge.
Check-gauge per N3V is the distance between the inside face of one running rail, and the outside face of the check rail positioned next to the other running rail. In other words the track gauge minus the clearance distance between the inside face of the running rail and the outside face of the adjacent check rail.
The input is in meters and N3V use 1.436m and 1.395m respectively for their std gauge track. The clearance width they used is just the difference between the two so 0.041 m. For the mods though I used the clearance I calculated from the track I modified (in above pic) which is 0.035m. As I noted the profile used for the check rail in that track doesn't appear to be the same as the running rail. I think the assumption that the same profile is used for both is built into N3V's definition. But that value is strictly visual in Trainz and if you think it's too close you can be adjust it to suit.
The width of the rail head you have to get from the right/left rail assets actually modeled for this track. They're referenced in the attached-spline container and the width's provided as the "rail-width" tag value in the right/left-rail asset config.txt.
The lateral offsets for rails and chairs is from centerline of track to the local origin of the asset so it's just one half the sum of the track gauge and the width of 1 rail head. I get the width of the rail used from rail-width tag in it's config file which is 0.0836m. So lateral offset is (1.436+0.0836)/2 = 0.7600m. Use +0.76 offset on the right side and -0.76 on the left. This assumes the track is centered about the mesh origin and the rails and chairs are also symmetrical about their local origins which is probably true for the vast majority of the track out there.
Here's before and after numbers:
original:
No change to sleepers - they stay on the centerline.Code:track-gauge 1.52 check-gauge 1.485 attached-splines { rail_left { lateral-offset -0.813 ... } rail_right { lateral-offset 0.813 ... } chairs_left { lateral-offset -0.813 ... } chairs_right { lateral-offset 0.813 ... } }
modified:
Good luck and read the license on all you clone and modify to verify it's at least permitted for personal use. For non personal use you must get permission from the author(s) if it's not explicitly given in the license.Code:track-gauge 1.436 check-gauge 1.401 attached-splines { rail_left { lateral-offset -0.76 ... } rail_right { lateral-offset 0.76 ... } chairs_left { lateral-offset -0.76 ... } chairs_right { lateral-offset 0.76 ... } }
Bob Pearson
I was just wondering about instances where I have invisible track at a junction with pro track. The spline is flashing white and red, does this matter?
The flashing indicates that the junction isn't formed perfectly usually due to the radius being too tight. What I have found is this also occurs if you use invisible track plus the procedural track, or the older non-procedural track with procedural track. If the junction is still flashing, it'll work okay, but won't have the point formed. For the procedural track, you want to fix that, but with the other you'll never get the points so it's nothing to worry about. What you need to worry about, though is if you have a solid red spline point. This means the junction is completely malformed and won't work at all.