Install the app
How to install the app on iOS
Follow along with the video below to see how to install our site as a web app on your home screen.
Note: This feature may not be available in some browsers.
You are using an out of date browser. It may not display this or other websites correctly.
You should upgrade or use an alternative browser.
You should upgrade or use an alternative browser.
Eastland Rocket Progress
- Thread starter Kris94
- Start date
Worst day of my life.
It's probably the "Father" in me, but if you said that because of the recent responses to this thread, then you better "buckle up"! Life (as I know it) has the uncanny ability to just get worse and worse until you can hardly lift your head from the pillow. You can't let this get to you so much, stiff upper lip and all that!
You can examine your abilities and your talents however. Everyone has talent at something, but few have talents at many things. Perhaps you just aren't cut out to texture routes well. No big deal; there's still plenty of ways to make a contribution to Trainz. Do you think you are an analytical person? Do you do better with numbers and facts than art and literature? Do you find using Surveyor to be a pleasure, or at least a challenging pass time, or is it pure hell every time you use it? If it's the latter, then you may just be working in a medium you don't have a natural affinity for. That's not to say you can't succeed with it, just that it may be harder for you than for others.
Well I ain't quitting that's for sure!! I've come too far to stop now!! I'm not gonna be satisfied until I've mastered this route!! Even through hell and hot water I'm not quitting!! There's no quit in me and nothing and no one will stand in my way of this work of art!!
Well I will take my hat off to that.
For what it is worth here are my texture tips and let it be said that there are a whole lot of people here way way better at texturing than I am. I keep it simple, I work from a minimum palette and I copy paste way too much. In my opinion I build a pretty good route, but the ground textures are not their high point.
There is nothing wrong with copy paste provided what you are copying is worth pasting! To make it worth pasting try this. It's not how I texture now, but it is pretty much how I textured back when I was trying to get the basics right:
Select a group of three ground textures that are fairly similar in tone and preferably one with mostly dirt, one with mostly grass and one that is a bit lighter or a bit darker than the others. If it is an open field make the third texture lighter (highlight). If it is a wooded area make the third texture darker (shadow).
Setting the brush size is important. Minimum size is useless, but the brush gets very big very fast. You want it bigger than minimum, but as close to minimum as you can. Confused? You want it as small as you can get it, but it mustn't be minimum.
Scale is also imprtant. For most textures most of the time about 1/4 of the way up seems to work.
Now select the mostly-dirt texture and apply it sparingly across an area about 10 squares by 10 squares. You want to be able to see some grid through it. When you apply don't hold the mouse button down and blast the texture all over. Place the cursor, tap the mouse gently, tap the '[' key, move the cursor and repeat till the area is lightly covered. When you move the brush DON'T move it right next to where it was, go over the other side of the square somewhere. You want to be lightly applying a base coat all over the 10 x 10 square keeping the application points as random as possible.
When you are done some of the grid is obscured, some shows through boldly, and some shows through not so clear.
Now do the same with the mostly-grass texture, hitting mostly the lightly-covered areas from step1.
Now choose the highlight/shadow texture and just very lightly hit any areas that are still slightly transparent. Over a 10 x 10 square there should only be a tiny handful of spots.
Zoom back. It should look pretty good, at the very least it should look better than what you are getting now. It won't look perfect. Do it again. It should look better. Do it again.....
As your technique improves you will get better at picking exactly where to dab the highlight and shadow textures. They are what makes the biggest difference to how it all looks. But the only way to get it to look good is practice...
Andy
")
Last edited:
So where you say "When you move the cursor DON'T move it right next to where it was, go over the other side of the square somewhere." As in don't overlap the original dabs when copying and pasting? Would the textures I'm using right now be a good idea or should I choose from the other two sets? The rest I'm not sure about I'm a little confused because you have few paragraphs and info is clobbered and wording also has me a little confused but I should be able to figure that part out.
I have edited my original post to try to make the steps clearer.
Copy/Paste? My method is to help you create a 10 square by 10 square textured area that looks good. That's nowhere near big enough to copy paste, if you do the results will look like the route has been rubber stamped.
Just work at getting a 10 x 10 area that you can honestly sit back and say 'Got it!', then extend that technique over a larger and larger area still using the brush.
Copy/paste is a quick and efficient way to fill background boards, but never use it trackside, it will look 'orrible...
Last edited:
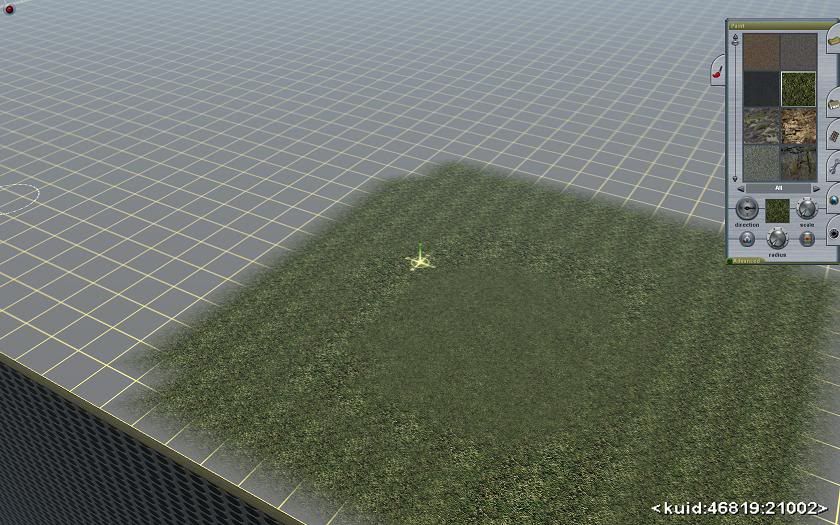
Try this - this is literally a two minute exercise with the first three textures that came to hand. It's not supposed to look real good, it's purpose is to illustrate the 'three step' method I used to learn texturing. They also illustrate the sort of brush size I get best results with. Step 1 was rushed, it could be a bit more random:
Step 1:
Step 2
Step 3
Don't copy/paste trackside because pasting loses most of the subtlety and blending and becomes very hard-edged. You want trackside looking the best you can, In the background you are balancing distant visual quality against speed. I go for speed, plenty folks go for quality all the way to the edge.
When you've done one area move on to the next. I think you are trying to do too much too fast. Going absolutely flat out and pasting the background I can do a trackside 'board' in about an hour. If I'm averaging a couple of miles a week on a big route I'm happy....
Last edited:


I did. I think the secondary texture is screwing it up. This is frustrating. Not a whole lot of textures to choose from. Can't you send me some of your textures from TS2010 and 12 because I've downloaded a ton of textures and almost all have carpet, tiles, and checkerboard genes in them. I can even send you a list when I get up tomorrow morning before I head out to school.
Based on this screenshot you posted we can conclude that you did not. In this screenshot it clearly shows that Radius is not set to minimum:I did.
Or you are mistaking "Scale" and "Radius". Hmmmm, I think I see where Kris might have misunderstand the rest of you; this mixup.
But whatever it is, I think we can safely assume it is you who is doing something wrong and that it aint the for you available textures, since MezzoPrezzo can do it and has only TS2004 textures. In other words: You do not need 2010 or 12 textures.
mezzoprezzo
Content appreciator
Kris,
The other posibility which we cannot see on any dial in your screenshot, but might be contributing to the visible patterning effect, is your use of the [ or ] key. Those keys both do the same thing, except they make the rotation go in opposite directions. Either way they should still blur the texture.
Are you holding one of them down the whole time you are painting? If not, you must do so.
Those keys don’t start/stop the effect. They only work whilst they are being held down.
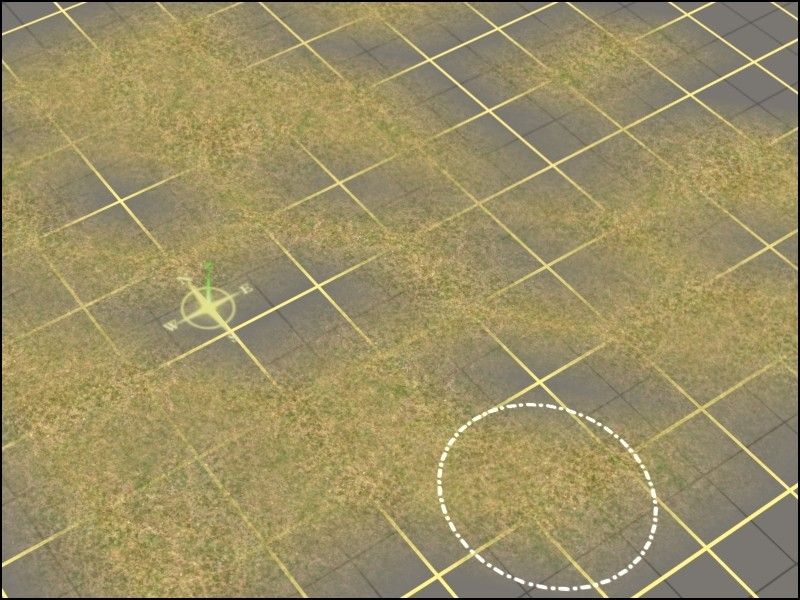
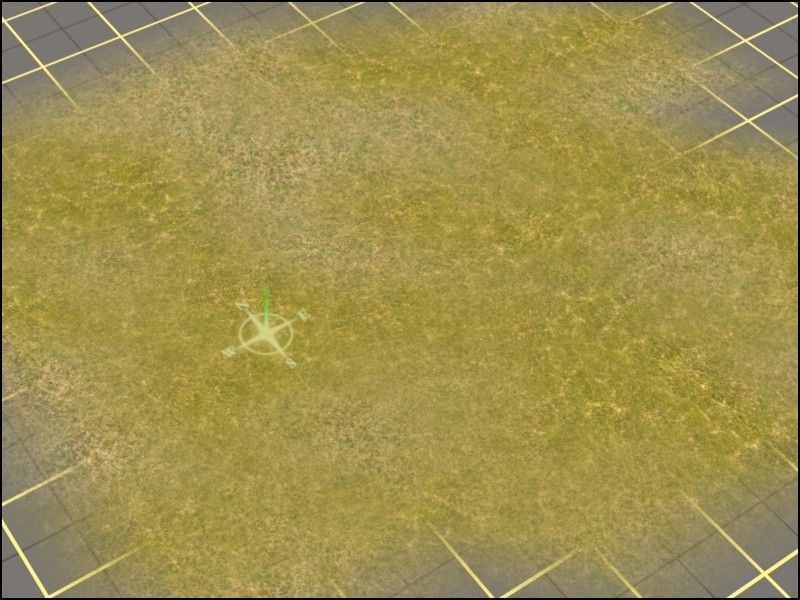
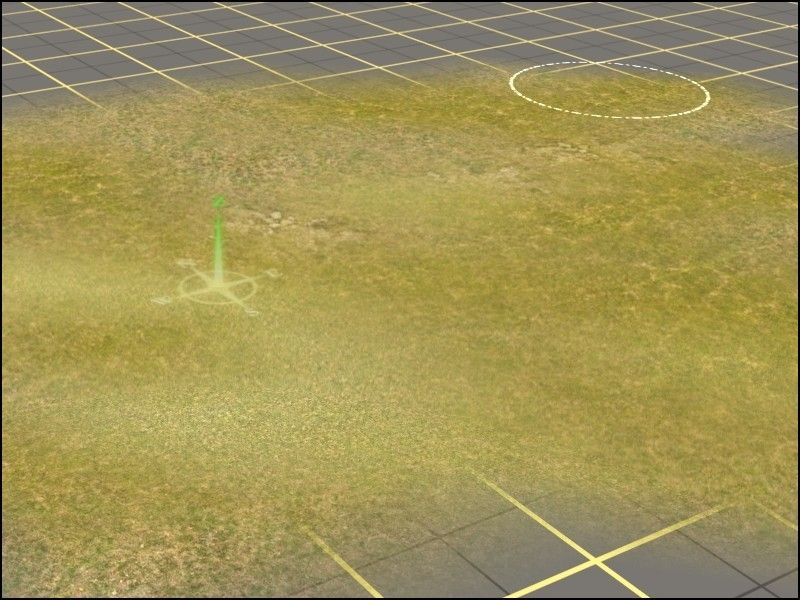
Here a very simple grass texture with both radius and scale set to minimum. I've painted a chunk of grass over a largish number of 10 metre squares without spinning. Then I've sprayed the middle bit with the [ key held down the whole time. I also held it for a second or two before applying the texture because the spin can take a moment to get up to speed.
If it doesn't look blurred enough in patches, and this can sometimes happen, just go over it again
The other posibility which we cannot see on any dial in your screenshot, but might be contributing to the visible patterning effect, is your use of the [ or ] key. Those keys both do the same thing, except they make the rotation go in opposite directions. Either way they should still blur the texture.
Are you holding one of them down the whole time you are painting? If not, you must do so.
Those keys don’t start/stop the effect. They only work whilst they are being held down.
Here a very simple grass texture with both radius and scale set to minimum. I've painted a chunk of grass over a largish number of 10 metre squares without spinning. Then I've sprayed the middle bit with the [ key held down the whole time. I also held it for a second or two before applying the texture because the spin can take a moment to get up to speed.
If it doesn't look blurred enough in patches, and this can sometimes happen, just go over it again

Similar threads
- Replies
- 20
- Views
- 3K
- Replies
- 7
- Views
- 259