Attempting Some Route Building

overkill650

New member
First off, Hello. Sorry, ive been away for a while, but im now attempting to build some routes. All the routes i make are fictional, because I believe thats how i can get good, then ill make bigger, real routes.

Any advice is greatly appreciated. NOTE: Ive given up on downloading content because of soooo many missing dependencies, so im working with what ts2010 came with.

Ive been playing around with 3 different routes:

1. A 5X5 baseboard layout that is essentially a big loop. I've completed the industrial area of the layout. I tried making some spur lines tha went through yards, alleyways, streets, etc. And i still cant figure the pics in post thing, so ill just post the links to each pic. sorry guys. Please just bare with me. im usally ok with computers but this im just bad at.

http://www.imagehosting.com/photo/overkill650-20111003-0000?context=user

http://www.imagehosting.com/photo/overkill650-20111004-0001?context=user

http://www.imagehosting.com/photo/overkill650-20111004-0005?context=user

http://www.imagehosting.com/photo/overkill650-20111004-0006?context=user

2. Next is a 1X1 baseboard layout. I tried to make a small layout to seem like a little model railroad on a table. This layout has one loop of track around the edge, one that cuts through the middle, and a river that starts in a resevoir and ends in a small lake. still a WiP.

http://www.imagehosting.com/photo/overkill650-20111020-0000?context=user

http://www.imagehosting.com/photo/overkill650-20111021-0001?context=user

3. The Last route is something I started today. i decided I wanted to make a LIRR type layout, but would be much samller than real life. Just to practice. although its coming out pretty good. I started with the Fresh pond yard in queens and layed track eastward for about 2mi. not much but, im taking my time, getting a feel for it.

http://www.imagehosting.com/photo/overkill650-20111022-0000?context=user

http://www.imagehosting.com/photo/overkill650-20111022-0002?context=user

http://www.imagehosting.com/photo/overkill650-20111022-0003?context=user

http://www.imagehosting.com/photo/overkill650-20111022-0004?context=user

http://www.imagehosting.com/photo/overkill650-20111022-0005?context=user

http://www.imagehosting.com/photo/overkill650-20111022-0007?context=user

yeah so sorry for clicking the links, but any advice is appreciated. Thanks guys.
 
Last edited:
Welcome back Overkill. It looks like you are off to a good start. Fictional routes are the best way to cut your teeth to learn surveyor and the basics of track laying - and best of all, no-one can criticise you for lack of reality.

Real routes are much more of a challenge and you will find yourself spending a lot more time tweaking track alignments, gradients, curves and junctions to eliminate the bad track laying habits that are a disadvantage of learning layout construction with fictional routes.

Peter Ware
 
Thanks pware. And yeah I believe I need to get used to all aspects of fantasy route building before I can move on to legit route building.

i wish i could change some aspects of the game to make it easier, like when you change terrain, I wish i could raise/lower terrain by grid, not intersections of the grid. Also, when painting textures oin the grid, you should be able to freepaint, not be aligned with the grid.

is there a way to change these two, or not?
 
is there a way to change these two, or not?

Quite simply no to both.

Trainz has always stored heights by the grid intersections. This significantly reduces the memory requirement (and speeds up processing) but has, amongst its disadvantages, the impossibility of vertical cliffs (except for those created as scenery objects). At least Trainz 2009 introduced the smaller 5m grids.

Peter Ware
 
I believe I need to get used to all aspects of fantasy route building before I can move on to legit route building.

Well, from my perspective, all route building is legit, but some routes are more believable than others. In my view, the way to get believability is to remember that in real world railroading, first, there is always a reason why something is the way it is, even if the reason is no longer evident, and second, that few, if any, railroads were ever built just to build a reason. They had a specific purpose in mind, to move people or goods from the point where they were, to some point that the builder thought they might need to be. Now, as it happens, the builders were sometimes wrong, in their predictions, and sometimes the goods or people moved from where they were originally. But for me, giving thought to why the railroad, even a fictional one, was built, and what factors influenced the building, is one of the first steps.

As to being restricted by the grids, there is a way around that, but it's somewhat advanced, and at this point, you'd be better off learning the tricks of building a route.
 
In Trainz 2009 you had the option of selecting the 5m grid when you first created the route or converting an existing 10m grid to 5m later (but not the reverse of 5m to 10m). This option has gone in TS12 and the 5m grid is now automatically used.

But, in checking just before I posted this reply, I just noticed that the 5m grid (the grey lines) are not used to provide the vertex heights (the yellow 10m grid still performs that function) but instead are used to increase the slope angle by anchoring the base of the slope. The terrain height tools do not seem to alter the heights of the grey grid intersections but they are dragged up/down when the yellow intersections are moved first.

I had not noticed this before. Perhaps I was too used to the limitations of the old 10m grid.

Peter Ware
 
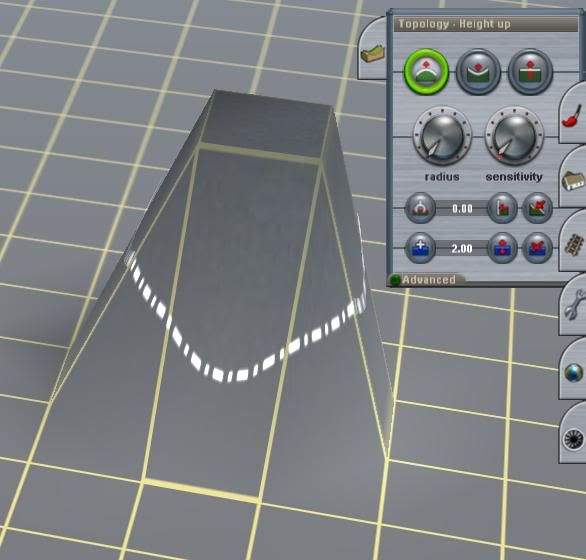
You can raise/lower a single 10m grid square provided the radius setting is on minimum.

Place the mouse cursor at the exact centre of the grid square, otherwise you will get pointed terrain.

However, it will affect the surrounding eight squares which will slope towards the edges of the selected square.

e722dd4d.jpg


The position at which you place the cursor will affect the way the terrain is deformed. If placed slightly off centre you won’t get the flat plateau effect shown above, you will get a sloping top face. It will be steeper the closer the cursor is to the edge of a grid line.


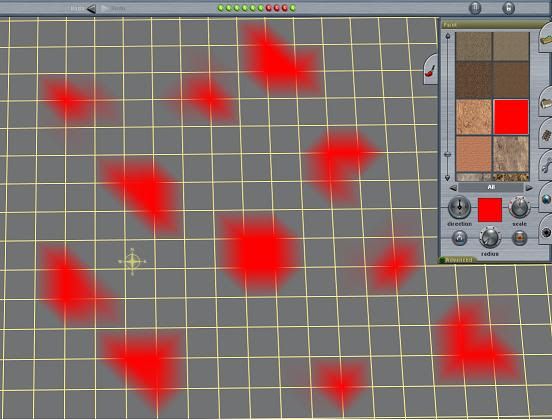
The cursor position has a similar effect when painting. With the radius set to minimum, and the cursor at the centre of the grid, you will get a full 10m fill of paint with some overspray into the surrounding eight squares. Spraying off centre will give some interesting variations with triangular, and a variety of zig zag shapes depending on which part of the grid square, or its lines, the cursor is placed.

All of the following splashes of red paint were made with single clicks of the mouse using a slightly different position on, or within, the grid lines.

These variations can be used very creatively when blending and rotating textures because they pretty well eliminate repetition, particularly when changing the texture scaling.

847e0bba.jpg


Good luck with the route building!

Cheers
Casper
 
ARGHHH!!!
This forum "ticking" me OFF!!!

I wrote a long and facinating response but it was lost when I was told I was NOT logged in, even though I WAS!!!

Note the number of "posts" on these three.
 
Last edited:
ARGHHH!!!
This forum "ticking" me OFF!!!

I wrote a long and facinating response but it was lost when I was told I was NOT logged in, even though I WAS!!!

There is a "time out" feature that you have obviously fallen foul of - if you are writing a "long and fascinating" post then the system thinks you have gone and logged off. The trick is to use Notepad or Notepad++ or some other text editor for the "long and rambling (opps - sorry, I meant fascinating)" post then save it for prosperity (obviously) and then paste it into the message box.
 
2010 CMP

As you will find out - 2010 is missing about half the things you need for building custom routes. I do not like CMP and probally never will. I found in game CMP - Downloads - are 98% trouble free. As they download - be in today and simply delete error and faulty and look for dependency before you try to use. Welcome Back.
 
PWare

This option has gone in TS12 and the 5m grid is now automatically used.

In build 48249 this is not the case. What one are you working with?

I think you have assumed that because the grid shows yellow and grey lines that a 5m grid is default. The default grid is still 10m and changing to a 5m grid has to be a deliberate action.

Edit. It does appear that it can be reversed, I just did so from 5m to !0m, but I expect there could be problems with anything placed on the 5m grid.

Peter
 
Last edited:
I wrote a long and facinating response but it was lost when I was told I was NOT logged in, even though I WAS!!!

After every few minutes do a preview. This will keep you logged in and you can see how you are getting on. It is also good for easier reading, checking what you have written.
 
I think you have assumed that because the grid shows yellow and grey lines that a 5m grid is default. The default grid is still 10m and changing to a 5m grid has to be a deliberate action.

You are correct. It defaults to the 10m grid with the 5m grid lines having the behaviour I described above. To change it to a 5m grid you must Right Mouse Click on the Add Ground button in the Topology tool, click on an empty area to add a new baseboard and then select the 5m grid from the drop down box. When this is done, the vertices at the intersections of the grey 5m grid lines can then be used to set the height of the ground.
 
thanks guys, the info helps.

also, Superfudd, whenever i type a long post, i will right click, select all, right click, and copy. then if it doesnt post, you will still have your huge post.
 
What I was trying to tell Overkill that starting small while learning is good. I also compared layouts to routes. Layouts are more fun. Then I aproved of using only/mostly built in content, except perhaps for a few items that would not be missed.
I backed up my theorums with facinating detail and examples.

;)
 
it takes forever, but worth it. i usually put headphones on and get crankin. makes me forget how long it takes.

like they say, how much time & effort you put into it you get out of it. (even if its straightening the same 200 ft of track for 30 min.).:eek:
 
its very hard to make stuff for trainz. well its hard for someone who isnt great with computers, like me. if u wanna mess with it, theres a program called Blender. its free, but it can take like 4 hours to make the base cab of an engine.

so you need lots of patience.

theres easier stuff to create, like trees, buildings, rocks, etc.

but wait till one of the others post, im not too knowlegedable with creating stuff as ive only had the game for 2 months.
 
Back
Top