Creating These Type Of Cliffs Near Track

Hi All,

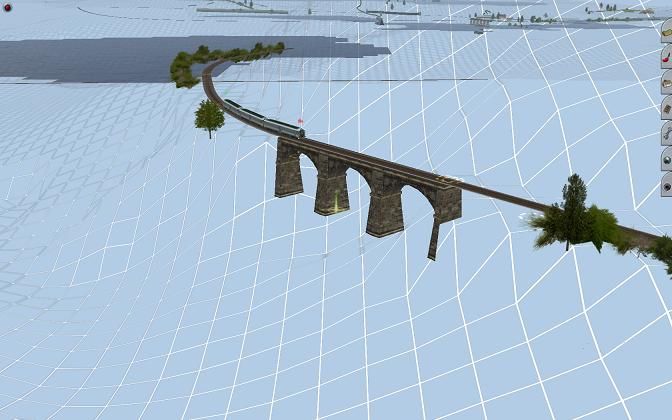
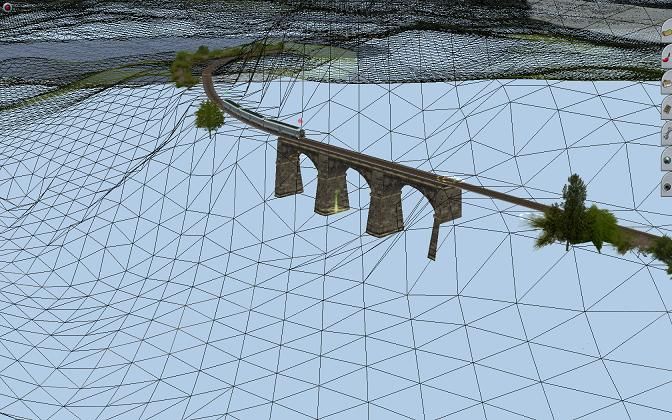
I am curious on how people create the terrain like this near the tracks as I have a few areas on the route that I am working on at the moment. Any help will be appreciated. Thanks in advance.

Eaglefan


Raise the land, paint them in that texture. Nothing more than that.

Edit the route you took the screenshots off and check the location to get the texture.
 
There's several ways at which one could get that look. First one is to lay track on the hillside, then use the smooth spline tool which will automatically fix the terrain to look like that or similar. You could also use the plateau tool and hand-create a cut similar to the one seen there. Generally, it is much harder to achieve perfection like that with the plateau tool, but it is possible if you're willing to put the time in. Then you just simply paint it in a texture of your choice.
 
Its worth Mentioning that the "Cut Kit" that Xcrossi posted? Those 7 are a fraction of the available types of land/rock/cuts. I downloaded most if not all of them. IIRC theres a total of something like 36 or more? The guy that made those really went to town, and they're outstanding models. The site they came from is definitely worth a look.

Falcus
 
Very painful it is trying to register on a site that has no built in English translator (I found the hidden translator at the bottom of the page)

I can not type in your language, and some items on the registration page are impossible to cut/copy/paste into Google Translate.

The type in anti-bot code box keeps kicking me out

I can not register
 
Last edited:
Not painful for me. If you want it you do it.
I'm on several EU, RU, HU, PZ forums.
I use Im Translator/Mozilla Firfox
Ill tell everyone I'am not the sharpest tack in the box.
No big deal.
 
I had no issues viewing the forums, but the sign-up was a bit frustrating due to the image you need to copy the nearly invisible letters and numbers from. Why put green text on a green background AND make some of the text about the size of ant footprints to boot! I ended up zooming my display to 400% to see the characters. It took me 6 tries to get it right, but now I'm in and found some nice antique trams. :D

John
 
OK, I downloaded ALL of the 57pc rail cut kit. Now, I got a question. Can I install all 57 cdp. into my content manager at the time and also when I have them installed. Where would I be able find these? Would they be under objects or tracks?
 
Yes, you can select all and commit at the same time.

They will be listed as spines.
Select 'Object Mode', then hit the 'Spine Mode' button.

-AL
 
Last edited:
They are listed as object splines. The (swedish) pdf file has a short explanation on the usage.
Here is a (quick and dirty Google) translation of the text lines:
-------------------------------------------------
Rock cuts

Earth Intersections can be done in Trainzs coarse grid, but
Rock cuts are hopeless. This tutorial might be
help how to put out the rock cuttings as Nisse and loans
tried to develop.

Types and designations:
All units Berg cutting XYZ where
X is V (V-cutting) or L (L-cutting)
Y is R (Straight crest) or B (Bågkrön)
Z is the texture and has 7 pieces (A to G) acc. picture below:

Withdrawal and adjustment:
Work varied in texture and wireframe mode
The pictures speak for themselves:

Map this intersection with so many vertex you want.
Raise and lower the ground all around.

Fine-tune and sculpt the ground.

The texture and dab on!

Add and color possible. water.

Adjust the height and ev. slope of the intersection by
to manipulera Vertex.

Place the desired track with two vertex more than the intersection
somewhere next.

Draw Vertex so that all but the two ends in
coincides with the cut's vertex.

Here approximately before the subtleties begins.

Now you can adjust the soil to the track, but be careful
for it is a rough tool.

Additional finesse needed safe before you are satisfied
---------------------------------------------------------------------------

Peter
 
Eaglefan, creating cliffs like the ones in the screenshots in the post that started this thread are not particularly hard, but to get best effect the modeler needs knowledge of exactly how the game engine treats terrain, and a lot of practice. The key to the knowledge is understanding that although there are no triangles visible in the baseboard, when a particular piece of terrain is rendered, all of the squares seeming to subdivide the baseboard are themselves subdivided into triangles, which are drawn according to a black-box formula I do not yet understand. If you have a particular square of a baseboard which has each of it's corners at a different elevation, there are two ways to divide the square into triangles, along either of the diagonals. Depending upon the exact elevations, moving one of the corners of the square can change which diagonal is used from one to the other.

Creating cliffs such as you show is simple. Place your track, and place the elevations, and then for each of the squares defining the cliff, move one or more of the corners of that square to get the game engine to render the pair of triangles that fit best. You don't have to move the corners very much. Sometimes moving one corner .01 unit up or down will change the diagonal used for rendering.

Best suggestion, is to lay track on a bare (untextured) baseboard, and experiment with the cliffs around curves of different degrees of curvature, and find out what works and what does not. Another thing that might be useful is to open the route you displayed the screenshots of in surveyor, move the view to where the screenshots were taken, and switch to wireframe view, and see how the original terrain creator manipulated the corners of the squares.

Another somewhat more advanced technique which I'm currently investigating is to use 3D modeling software to create cliffs and cuts as structures. That's the only way I know of in Trainz to get good representations of cuts and cliffs like those at <https://goo.gl/maps/rFZZt>

ns
 
Last edited:
Why put green text on a green background AND make some of the text about the size of ant footprints to boot! I ended up zooming my display to 400% to see the characters.

John, I noticed the same but found that you could refresh the image to get one that is more readable. No need for a magnifying glass.

Peter
 
~snip~ The key to the knowledge is understanding that although there are no triangles visible in the baseboard, when a particular piece of terrain is rendered, all of the squares seeming to subdivide the baseboard are themselves subdivided into triangles, which are drawn according to a black-box formula I do not yet understand. If you have a particular square of a baseboard which has each of it's corners at a different elevation, there are two ways to divide the square into triangles, along either of the diagonals. Depending upon the exact elevations, moving one of the corners of the square can change which diagonal is used from one to the other.

Creating cliffs such as you show is simple. Place your track, and place the elevations, and then for each of the squares defining the cliff, move one or more of the corners of that square to get the game engine to render the pair of triangles that fit best. You don't have to move the corners very much. Sometimes moving one corner .01 unit up or down will change the diagonal used for rendering. ~snip~
With TRS2004 you can see these triangles in Surveyor by selecting alternative view in wireframe mode. Alt+W (not Alt+A as stated pre-edit) toggles between the two alternatives.

The facility allows you to see which way the triangles are flipped. Careful control of the terrain tools allows you to flip the hypotenuse between the two possible positions across the 10m square diagonals. It also changes the way ground textures are presented which can be an advantage when creating believable close-up views of the landscape. Small amounts of movement, either at the intersections, or on the edges of the squares of interest, or adjacent ones, allows some interesting changes.

I think this facility should be brought back, although I suspect that the development of the 5 metre grid may well have something to do with why it was withdrawn. Perhaps it’s no longer possible to have this feature restored.


Wireframe view:

wireframenormal_zpsddb1d8c3.jpg~original


Alternative wireframe view:

wireframealternative_zps3caf5378.jpg~original
 
Last edited:
After downloading and installing the 57 piece package. It turned out that I was not that excited to use them on the route as I didn't like the look of them, So I decided to go the create my own terrain mode. However, I am at a stand still right now trying to figure out what I am doing wrong. There is a area that I am calling "The Canyon" on the route that I am creating right now. First, I do the terrain and then I lay the down the track and then I click the smooth the spline button. However, After I click the smooth the spline button on that certain track piece. The tracks that were laid down before get screwy by being bumpy. How can I keep the pieces of the previous track that I laid down flat without being bumpy while I smooth the piece of track that I am working on right now?
 
I have found so many cliffs on the DLS. These, and others, take some learning curve to get them to look right ... I have so many cliff splines that I haven't even learned how to use them correctly ... Basically, when you stretch them out, they suddenly click to a repeat image ... now just move it backward a tad, just until the second image disappears ... then lay another cliff spline onto that one, the same way ... and so on ... etc ... until you have covered, a curved, or straight track. You can mix and match cliff splines together, and even lower them into the ground, if they are too high.
 
I have found so many cliffs on the DLS. These, and others, take some learning curve to get them to look right ... I have so many cliff splines that I haven't even learned how to use them correctly ... Basically, when you stretch them out, they suddenly click to a repeat image ... now just move it backward a tad, just until the second image disappears ... then lay another cliff spline onto that one, the same way ... and so on ... etc ... until you have covered, a curved, or straight track. You can mix and match cliff splines together, and even lower them into the ground, if they are too high.

How do you lower them into the ground? The reason why I ask is, Because the 57 piece cliff thing that I downloaded and installed on the previous page is what I would like to do with them. In my opinion, I thought they were too high for my taste. However, That might change is if I knew how to lower them into the ground slightly.

On the second thought, I laid about 40 miles of track already and all of it was at level ground. Right now, There are about 6 pieces of track that aren't level. Is there any way I can create the terrain and then set the track at the level that it was through the first 40 miles that I laid down? I hope that makes sense.
 
Last edited:
Back
Top