Tips and Tricks-Surveyor

REPLACE OBJECT TOOL.
With reference to Spline "Paths,Footpaths and Sidewalks"
Be aware of their different Profiles; IE Height,Width and segment Length; also the spline attachment points; IE Centre,off Centre or Side.
You may also check for kerb on one or both sides.
Before making any bulk replacements compare the two you want to exchange; best done on a test board,may save you a heap of trouble,like having to readjust all of the Spline point heights (from one who has been been there done that).
Norm.
 
I'm now using TS12 and obviously some of my old TRS2004 routes open in TS12 with the default Auran track. The problem is that I can't change the track unless I'm trying to do it incorrectly.
 
Hi escafeld,

Track can be changed with the replace assets function in the drop down from main menu. Select the replace assets function, right click on the existing track then drag it from the track list to the asset to replace box. Next search for the track you want to use in the track list and drag it from the list to the replace with box. Note the new asset has to be draged from the list not the search box.

Cheers,
Bill69
 
In TS12 you can copy, paste and rotate everything -

7bm3.jpg


dqsw.jpg


When placing locos, coaches, etc., on the layout in close proximity you might not want them to couple-up. Hold down the shift key when placing them.
 
Hi everyone..

If you want to correctly space your signals from each other and are unsure of how far apart you have them, I recommend the 100m and 50m ruler (from the DLS) to roughly measure out your distances in metres. You can also add these rulers together to create longer metre measurements. For instance, if you want to measure out anything up to 1000m, all you need to do is snap 10 of the 100m rulers together.

This signal spacing guide fron Network Rail (UK rail organisation) will be helpful in getting your signals better spaced apart according to whatever maximum line speeds you are running...


Andy
 
UK Trainzers might like to know about this mapping site - http://www.bnhs.co.uk/focuson/grabagridref/html/ which offers you a grid overlaid on the map page and the satellite view, with which to accurately plot your route. If, like me, you are unable to get basemaps to work in TRS12, then this is ideal. Make sure you tick box both the 1km square and the 100mm squares. Once you enter the grid reference or the postcode you're off and running. Note - the green 100mm square can be moved along with the marker, for plotting, but the 1km square will stay where it is until you update the GRs. Wherever I'm working on my scale route I divide the base board in 1km and 100mm square with either fixed track or a snow cover track spline, which bends over the contours. That way you can move along your route at 100mm intervals and follow the map with the corresponding grid square. Simples (It's a British saying).
 
when you build a dam, make it twice as thick (by placing another one in front of it) to give you a better gap between the two water levels.
 
Hi there. I need to know a trick! I have a large number of items in my Surveyor Pick List, but several times I have lost the entire list, which means that I have to drag all the assets across again, and this is quite time consuming. I have searched my system (Win8:Trainz ts2010) to find where the pick lists are stored but cannot find out. Does anyone know where they are kept in Trainz. Would appreciate help.
 
Here's a useful tip that may help deal with AI trains not setting junctions after departing a station if the junction is a bit further away.

Some may know of the trigger radius tool (the one under the Advanced tab on the Track > Trackmarks tab in Surveyor). This tool can also be used on junctions and trackmarks as well.

To do this:
1.Click the track tool on the right-hand side (the track icon in the list of tabs)
2.Click the third icon across at the top of the resulting tab to open the Trackmarks part of it.
3.Click the Advanced option at the bottom of this part.
4.Set the box that is currently labelled at 20.00 and increase or decrease the value (note - this will involve trial and error, so experiment to find a suitable value).
5.Click the icon to the right of this entry box (should be labelled 'Apply Radius' or similar when you hover over it), then click the junction you wish to apply the new radius to.

Shane

P.S. To assist with setting the value, place a trackmark where the junction is and try the settings on the trackmark so you can see what the radius will look like. You can remove the trackmark afterwards if you wish.
 
Last edited:
If you are wanting to run long trains on your route and your locomotive seems to struggle to get up enough pulling power to haul the long line of coaches or wagons, simply hitch up another locomotive (identical to the one already at the head of the train), and this will hence give twice the pulling power than previously available. Now with two engines in tandem at the head of the train, both will be controlled by whichever engine you happen to be driving and you should hopefully see your train run better. Adding coaches together or wagons together will slowly increase the total pulling weight needed to move them.

Andy.
 
Holding down the [ or ] KB key will smear the textures.

Setting texture size to minimum seems in most cases to provide a less checkerboard texture.

Some textures are better than others, as some textures are unrealisticly blinding green or pixelated.

One of my favorites is Forest 1

I could reccomend many others ... but that would be better via a PM as thye list is lengthly.

I wanted to acknowledge this post because this is a hugely powerful tool when having to texture large areas. Whats its doing is rotating the texture brush 45 degrees each time you press the button when you holding the [ or ] key. If you hold it down it just keys rotating as you paint. Its provides for a much more random look to the textures which is great! Also the +/- keys change the size of the the brush.
 
Copy TS 2009 save files to TS 2010 engineers edition

Hi,


I got a question regarding my save game which i had on my TS2009, then i brought TS2010 engineers edition and i wanted to copy my old created world in the surveyor to the TS 2010 but i couldnt find it.
Can someone please help?

Kind Regards,

Simon
 
Overhead wire stanchions change angle

I installed my favorite TRS2004/2006 route into TS12. Now a small portion of different type stanchions have changed angle. I have tried to find a way of fixing this in Surveyor, but have not yet identified how to do this correctly.
I have looked at manuals and some of the helpful items in this blog. The lock picture appears to indicate editing the route is unlocked. I have taken a picture in wire frame mode and will try to attach it.
Any help will be appreciated.
14/5/16 I have now identified that the overhead wire stanchions/poles or whatever they are called, and have split into two parts, one part on the correct angle, the other faulty part lined up with the base board grid lines. Hope you experts out there can make something of that. Also could there be a hidden layer in this route? Two show in surveyor and both are unlocked.

Regards,

Lou Simonis

 
Last edited:
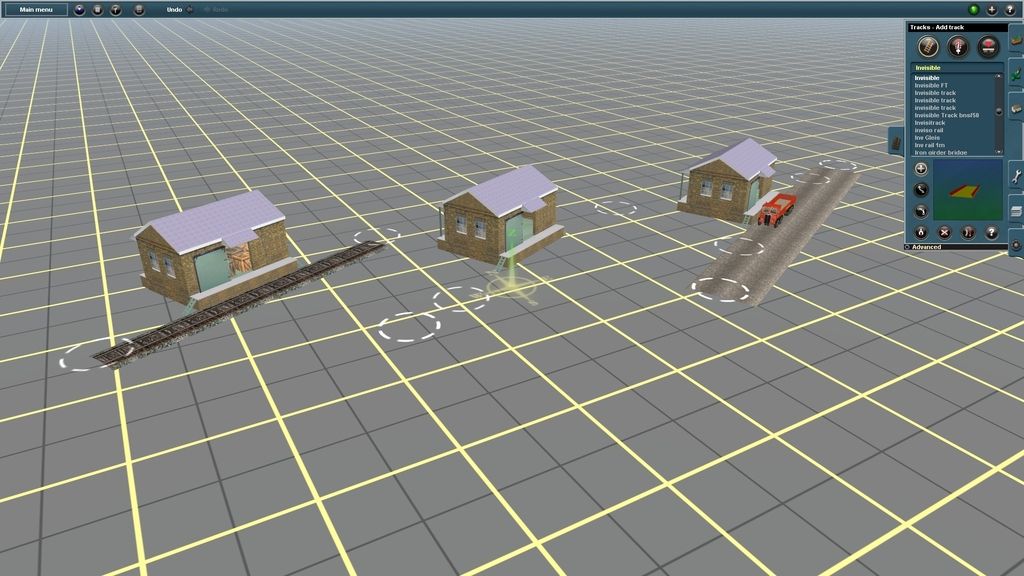
Some content has track attached, like this Goods Shed, which you may wish to use without. Just attach invisible rail to it at one end.

 
Last edited:
Good place to visit.

Some content has track attached, like this Goods Shed, which you may wish to use without. Just attach invisible rail to it at one end.

It is amazing what an occasional visit to this part of the forum can turn up.Thanks for the tip as it resolves one of my problems.

ALSO Just down loaded Driver-Col route To discover HIS method of creating realistic hedges. Sink your trees, perhaps already mentioned but worth a recall.:p

Thank you escafeld. helian43
 
1. Someone early in this thread mentioned Google Earth and Microsoft. For anyone working on a historic route, check out http://historicaerials.com. They have a huge number of aerial survey photos. How far back they go varies by location, but some (usually big cities) are as old as the late 1930s. Of course the resolution isn't great, but it isn't so low as to be useless, either. The newer the photo, the higher the resolution. They also have old USGS maps and a neat tool for superimposed one map over another.

2. I will usually run a weeds and/or grass spline from the JVC series on either side of the tracks. This makes the track look a lot more detailed. Shrub splines on embankments help a lot, too.

3. Look at some of the more detailed layouts on the DLS in Surveyor to see how others have done things. I've figured out a lot of things from analyzing how somebody else approached a particular situation.
 
Back
Top