Scenery – let’s get real!

mezzoprezzo

Content appreciator
I’ve had a few comments and PM’s regarding the techniques I’ve used to create some of my scenery in Surveyor so I thought I’d share some of it more widely rather than confine it solely to individual private messaging and emails.

There does seem to be a shortage of threads detailing how some of the artistic stuff is achieved, so it seems perhaps appropriate to have one which looks a bit more closely at the creative side.

If it’s of any value perhaps we could share thoughts and ideas so that we can all hope to improve and help raise the bar.

I hope this might prove to be a useful thread.

Cheers
Casper
:)


Here are some of the ideas I’ve used on some recent World building.

The mountain textures vary depending on whether I’m doing a UK or Italian route. I try to keep to the native type of rock/tree/grass and just use 4 or 5 to keep the resource usage to a minimum. I rotate them and vary the scale to avoid checkerboard effects. The closer they are to the view point, the more precise this needs to be.

The real knack seems to be to crank up good weather fog. In some of my screenshots posted elsewhere there have been no textures at all on some of the distant “peaks”.

There are a couple of hints and tips which help enormously. First, make sure there are several hills between the near and distant landscape. That’s what gives the overlapping “fading into the distance” impression. Next, keep the grid undulations fairly smooth. You don’t need spiky triangular peaks to give the impression of height – in fact that will destroy any illusion of reality, particularly when trying to give the impression of distance. The mountains can also be modelled more closely to the viewpoint than you might think is necessary.

Here are three shots of what I’m currently working on, which probably illustrate the tricks better that I can explain them in words.


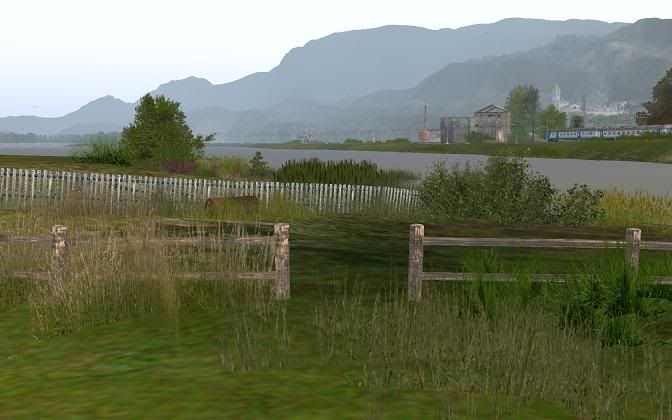
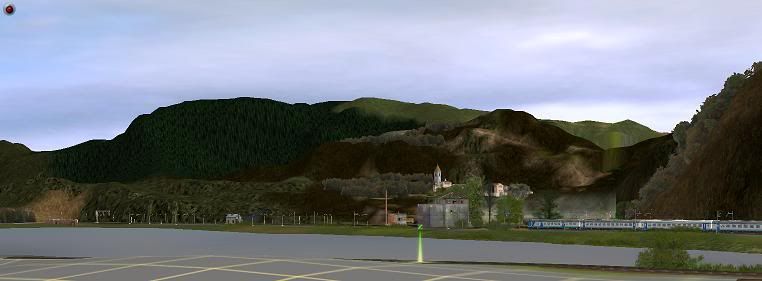
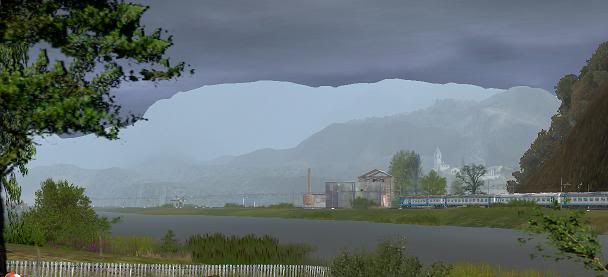
First shot shows the terrain with good weather fog turned up to about three quarters.

b9108b99.jpg~original


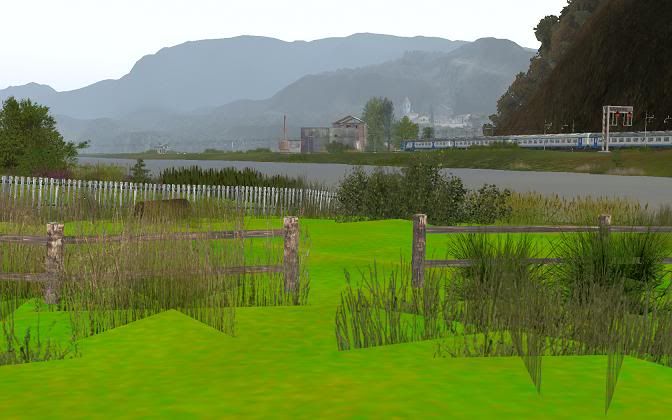
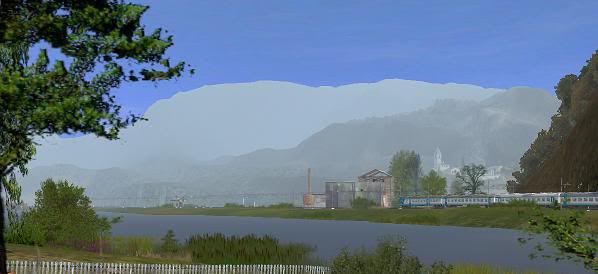
This one shows the same shot with the good weather fog turned off. Not such a good look, but it gives an idea of the texturing.

81a771dd.jpg~original


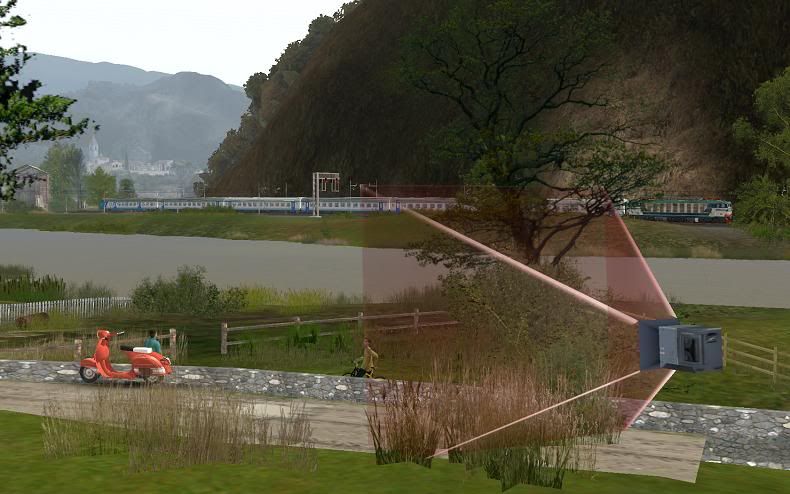
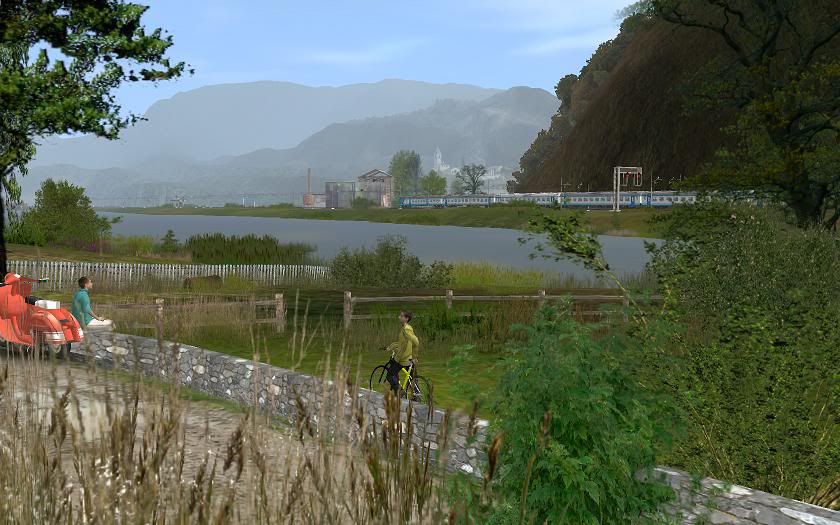
The next one is a closer view of the mountain area. I’ve numbered the different textures. Try to rotate the tree textures so that they appear vertical as far as you can, although this is not possible across all of the undulating terrain. When you’ve laid the basic tree textures, vary the scale and over paint a couple of bits at random, rescale again and over paint another couple of areas. That will remove the checkerboard effect. Small radius works best when doing this.

I also splash a bit of rock and dirt here and there. This gives the broken effect which represents trails and gaps in the wooded areas.

I’ve also placed some tree backdrops (numbered 7), criss-crossing them on some of the skylines of the middle distance ridges. This breaks up the skyline and makes it look more realistic than the peaks generated by the terrain tools.

541ce4ce.jpg~original


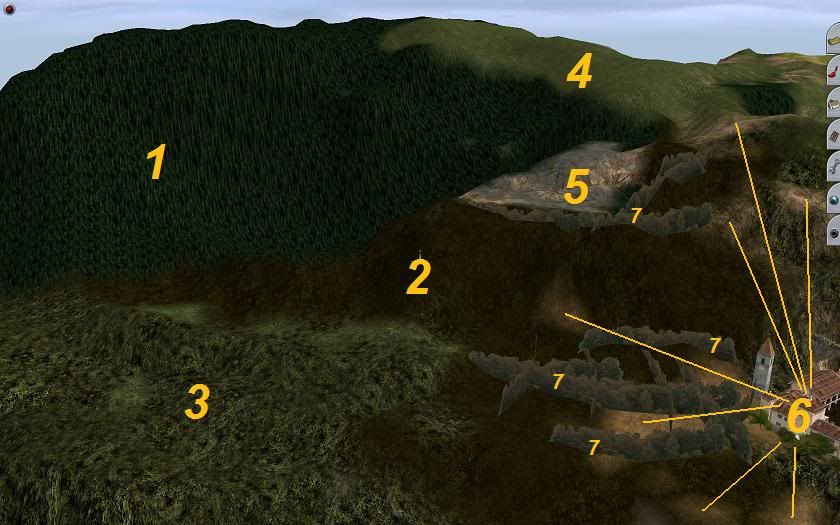
These are the kuids. 1-6 are textures. 7 is a fixed object which I’ve made rollable in the config.txt file so that I can angle it on sloping terrain:
1. -1:100792 Usa_forest_2
2. -1:101139 Ger_forest03
3. 61119:21008 Bush
4. 46819:21002 Scrub2
5. 59545:100243 Rock_008
6. -1:100226 Oz_dirt
7. 147131:1021 Waldhintergrund2


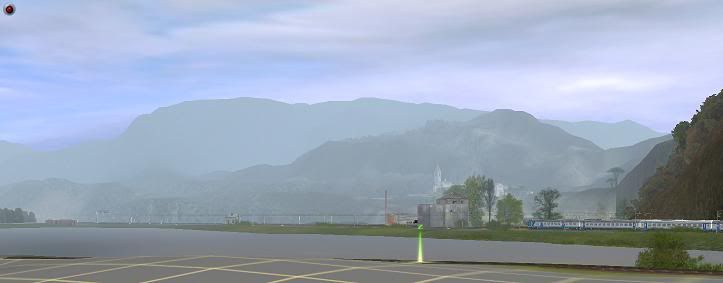
The sky type also helps. Pale colours show off the mountains much better. Skies which are too dark will make the mountains look bleached out and unrealistic. I’ve made no change to time of day in these shots – I’ve only changed the sky. The tones of the mountain scenery are identical, but they don’t look it.

Here are two examples which work well. There are many others.

-1:8001 very cloudy
4392ee56.jpg~original


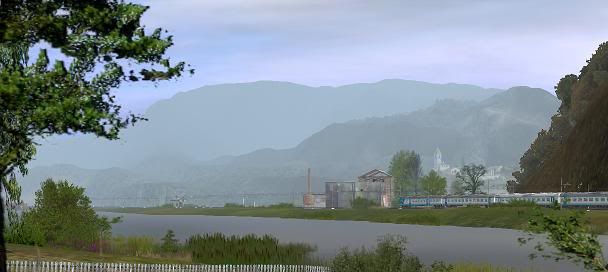
86311:1655 Surie Misty Sky
b2c586ed.jpg~original


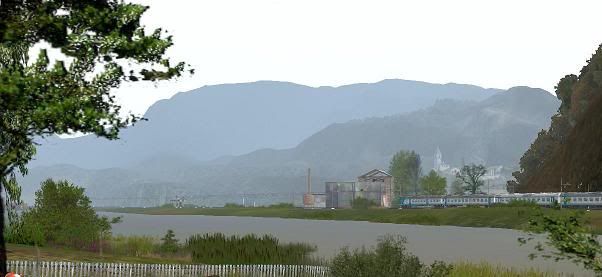
Look what happens with two other skies. Both are great sky assets with the correct lighting, but look at the apparent different colouring of the landscape when good weather fog is used, purely because of the change in contrast against a different sky! It might seem hard to believe but the landscape textures, time of day and good weather fog have not been changed at all.


Kuid2:56732:20007:1 Custom sky5
688a3a91.jpg~original


Kuid2:56732:20007:1 Custom sky 10
db4d4f3e.jpg~original


This one uses kuid: -1:8000 Mediumclouds which gives a quite nice subtle mixed sky effect and brings the scenery back to reality.
125b8d0f.jpg~original
 
Last edited:
I believe you have pointed out a valuable tool Mezzo, that many are probably reluctant to use. We spend so much time and money upgrading our PCs to run as quickly and efficiently as possible that I think many members shy away from the good weather fog. It makes sense that we upgrade to be able to display a game with "all sliders maxed", and the GWF falls by the wayside. It becomes undesirable because it seems to work against all our efforts to speed up our PCs.

With your example, perhaps more members will see GWF as a tool to use to artistically enhance our experience, rather than an indictment of our systems.

Well done, I'll be watching this thread with interest.
 
Hi Casper,

What a great idea to bring all your advice together in one thread. I am a student of your impressive screenshots and would love to learn from you.

I will be following this thread.

Thanks

Scottish
 
Great idea Casper i'll be another keeping an eye on this thread. Thanks for the time and effort you take to do this for us.
Cheers Mick.:wave:
 
I’ve had a few comments and PM’s regarding the techniques I’ve used to create some of my scenery in Surveyor so I thought I’d share some of it more widely rather than confine it solely to individual private messaging and emails.

There does seem to be a shortage of threads detailing how some of the artistic stuff is achieved, so it seems perhaps appropriate to have one which looks a bit more closely at the creative side.

If it’s of any value perhaps we could share thoughts and ideas so that we can all hope to improve and help raise the bar.

I hope this might prove to be a useful thread.

Cheers
Casper
:)

Hello Casper,

Absolutely a great initiative.:clap:

I even have some problems making the simplest of sceneries :( . Having a basic tutorial would be a great help.

I had a look on the www for some tutorials about making landscapes. The websites that I found were all for advanced users. With scenery making software programs, you have to learn how to use the program and then start making a simple drawing. After a period of time, you can start making several objects.

I would like to find a way how to create a landscape in trainz, just by using the elements which are available in trainz or available on the dls. :cool:

Best regards

Kurt :wave:
 
Sky is something that rarely gets discussed. I'm glad you have brought this subject into light (pun) as even I have never thought or noticed the changes in shades/contrast until now.
I'll get back to my routes and do some experimenting with the abundance of available sky's.
Cheers matey. :wave:
 
This is a great idea mate your screenies are some of the if not the best i have seen on here.the sky and good weather fog are something i rarely think about when route building trainz forum becomes the open university for us mere mortals.

cheers bob
 
Brilliant thread Casper. It's made me look at my route and make adjustments with GWF.

This should be made a "Sticky" to help others with creating atmosphere in there routes.
 
Thanks for the support guys. I’ll carry on for a bit then.

I’ll put together some more of my images, methods and how they were achieved over the next few days and post them here.


@belgian46
Getting the basics right for terrain shaping is essential before moving on to the slightly more complex (and rewarding) job of texturing.

I learned to use the height tools from the manual, but found plenty of YouTube stuff later on which I wish I’d seen earlier. Here’s a very old link which shows and talks you through the basics. It’s not particularly good video quality but if you are starting out it’s well worth a look. (You will also hear what an Auran member of staff sounds like too!:D )

There are also several more potentially useful videos which are listed on that link.


If you are very new to creating terrain in Surveyor then plenty of trial and error on a practice Route will pay off really well. Once mastered, then the application of textures and learning to place assets to best effect should produce a much better final result.

When using the height adjustment tools in the Topology (F1) flyout a good tip is to set the sensitivity control to a low setting. Mine is rarely more than two blips up from minimum when raising and lowering the terrain using the Height up or Height down selection. I might go to a slightly higher sensitivity setting when using the Adjust height button because unlike the first two, the user has better mouse movement control over the adjustment. If the sensitivity settings are too high I find that the terrain will very quickly form unwanted raised spikes or pointed depressions in the landscape.

Use a larger radius for rolling downland or mountains, making sure the mouse is kept moving nice and gently as if you are spreading butter. Vary the direction as well, including going over bits you have already done. The smaller radius is good for fine tuning smaller and more detailed areas of land.


Hello Casper,

Thank you for the extra info. I like the You-tube movies, however the makers are realy flying when explaining something. I have to push, quite a lot, on the Pause-button :hehe: .

I have a simple testing route for all kinds of experiments. I just have to find the right way how to use the several buttons ( add height, use height, add water etc etc ) within trainz. I also have to learn how to use a combination of colours ( see screenshots by Darkdan ( my fellow countryman ) ( http://forums.auran.com/trainz/showthread.php?t=39068 ). I just have to spend more time and that is perhaps the most difficult of all - that is finding time. But it just have to be done and my notebook and pencil are in front of me in order to write the used method in it.


Best regards

Kurt :wave:
 
This one uses kuid: -1:8000 Mediumclouds which gives a quite nice subtle mixed sky effect and brings the scenery back to reality.

How do you make that 3d dry grass. I would like to be able to do that. Don
 
@belgian46

Hello Kurt.

Thanks for the Darkdan link. The images in that thread are brilliant as with all of his stuff!

I’m very familiar and a great admirer of Daniel’s work. I have learned a great deal from his methods.

The only route I have ever downloaded was his Autumn Impression. If you haven’t got that route, go grab it from the DLS <kuid:170726:5668>. There were a lot of missing dependencies, at least for me, (including track!), but the foliage and textures are pretty well intact.

I learnt more about texturing and single object placement from that route than from anywhere else.

By the way, I note that you have discovered the need to have by far the best asset required for Trainz – time! :D


~snip~ How do you make that 3d dry grass. I would like to be able to do that. Don

Hello Don.

That effect is pretty easy to do.

I’ve used two single grass assets. The first is one of the nice Trundra (Greenery) assets G: grass13 - starry saxifrage kuid:71619:22113. The one with the darker brown seed stalks is ciuffi erba 2 kuid:146087:27102. I merged the two together to give a more unique effect.

This view shows how I placed them in relation to the (fixed) camera. You’ll notice that the scenery is not complete behind the camera. That’s partly because that section is not yet finished. You can't see it from the train though, and it’s also very near the edge of the baseboard. You have to stop somewhere!

18e5a168.jpg~original


The camera placement and where the grass assets sit are important though. You’ll notice that the base of the darker green grasses contrast sharply with the old road and adjacent grass in which they are placed. However, because this bad looking contrast doesn’t show at all through the camera, it probably doesn’t matter too much. It’s such a small area which will barely be noticeable when using other views in Driver.

Sometimes it is a problem though, as with the grasses in the same picture growing through the fence. You then need to make sure that the chosen ground texture/s work with the colour at the base of the foliage asset. That’s where it can look so wrong. A good contrast between the upper part of the plant and the surroundings is fine, and probably desirable. But the base does need to be right to get a good looking “join” at ground level. The right texture choice will help disguise the unwanted billboard criss-cross effect.


Here are the fences as completed.

7370652f.jpg~original


Here is the same with a deliberately badly chosen texture.

2b677c89.jpg~original


You can see there's not much there really by way of assets. But the right choice of textures seems to pack out the image with the illusion of much more going on and, at the same time, really helps with frame rates.

That's all for now.

Cheers
Casper
:)
 
Last edited:
Fantastic. I have not done much along these lines because I had assumed that there wasn't a way to make any scenery in trainz that really looked good. However, you have done it and now I can see that I was wrong and I have some incentive to try harder. Thanks Don
 
Correct - the base of grass is an issue. I sometimes Reduce the height to sink the base of grass if the texture match is odd. In general though, you are right do the correct ground texture first if possible.:)
 
@belgian46

Hello Kurt.

Thanks for the Darkdan link. The images in that thread are brilliant as with all of his stuff!

I’m very familiar and a great admirer of Daniel’s work. I have learned a great deal from his methods.

The only route I have ever downloaded was his Autumn Impression. If you haven’t got that route, go grab it from the DLS <kuid:170726:5668>. There were a lot of missing dependencies, at least for me, (including track!), but the foliage and textures are pretty well intact.

I learnt more about texturing and single object placement from that route than from anywhere else.

By the way, I note that you have discovered the need to have by far the best asset required for Trainz – time! :D

Cheers
Casper
:)


Hello Casper,

I have 10 routes of Darkdan on my HD - but all of them were not installed in Trainz. So I imported the autumn impression - result I have the track but little scenery. I will try to contact Daniel.

The time issue - now I even write, my tasks to do, in my notebook. Other problem I keep adding and nearly none are disappearing :hehe: .

Best regards

Kurt :wave:
 
casper: I think personally you have started a thread here that has been needed for quite some time..To me it shows how sincere you are about trainz..I will try to put something together and join you if I may..You know if you think how your going to do things helps in the all over plan..You don't have to follow the plan verbatim, but gives you away to go..There used to be an Artist by the Bob Ross, he used oil paints as well as Acrylics..If was oil paints that he was using, he would use the wet on wet style of painting..I used to watch this :wave: man create painting after painting..His style was great because he would capitalize on the Mistakes he made(Happy Little accidents, he called them)..You would look at it and say "What is That??" Before you knew it, it looked beautiful..And I think this applies to trainz scenery:wave: :wave:
 
casper: I think personally you have started a thread here that has been needed for quite some time..To me it shows how sincere you are about trainz..I will try to put something together and join you if I may..You know if you think how your going to do things helps in the all over plan..You don't have to follow the plan verbatim, but gives you away to go..There used to be an Artist by the Bob Ross, he used oil paints as well as Acrylics..If was oil paints that he was using, he would use the wet on wet style of painting..I used to watch this :wave: man create painting after painting..His style was great because he would capitalize on the Mistakes he made(Happy Little accidents, he called them)..You would look at it and say "What is That??" Before you knew it, it looked beautiful..And I think this applies to trainz scenery:wave: :wave:

Hello BobCass,

I'm pretty sure that any artist ( painter or other ) would be able to make some lovely scenery within Trainz.

However, I you are not an artist like myself, then it is rather difficult and any help is well appreciated.

So at this time, I'm busy learning how guys like Casper and Daniel ( Darkdan ) are making a trainz landscape. I hope to figure it out :hehe: .

Best regards

Kurt :wave:
 
casper: I think personally you have started a thread here that has been needed for quite some time..To me it shows how sincere you are about trainz..I will try to put something together and join you if I may..~snip~


Hi Bob.

Feel free to put something together.

My intention for this thread was for everyone to join in and share ideas on styles and techniques. Perhaps I should have been a bit clearer in the opening post.

As this is a non-screenshot thread it might be worth remembering the 800x600 pixel image limit. Although I’m not aware that there is a limit on the number per post I've tried not to overdo it.

~snip~ There used to be an Artist ... Bob Ross ~snip~

Bob Ross! Yes I remember him very well. I still occasionally look at some of his old episodes on YouTube. I believe his stock phrase, when he made one of those minor errors, was, “We don’t make mistakes, we just have happy accidents”. :D

As you say, that often seems very appropriate to Trainz. I’ve often done something completely unintentional which has turned out looking really unexpectedly good. It then becomes part of the “new ideas” tool kit. It's one of the joys of Trainz!


I’m pleased that some other members are finding the thread useful.

I’ve got a whole list of subject ideas which could be covered, e.g. mixing textures, combined use and positioning of assets, enhancing splines in conjunction with terrain shaping, image composition; the list is almost endless.

Cheers
Casper
:)
 
My cmp does not work so I can't download any of that grass. Wish I could. I just installed 2009 a few days ago and don''t know why cmp won't work. I put in those kuids that you gave me but I get nothing. Don
 
Back
Top