Surveyor 2.0 feedback thread

Repeat repeat


A user that actually uses the program and makes great routes, proposes something
or points out where it can be improved, followed by pware and tony defending the status quo
of the current WIP phase it is in. This is counter productive.


The Lead game designer (there should be such a pro) designs based on what users want
the CEO sets the main path/timeline and makes sure the money comes in
the programmer, programs what the Lead game designer asks for


All starts with good base concept, not bits and pieces thrown together and defended


S2 will be great in a few years, there is no hurry whatsoever, cause S1 functions fine
an interface should need NO manual at all if designed well

I’m sorry but Pware actually uses the program, provides lots of helpful advice in forums and in the wiki. As they use the program, they are entitled to put forth their views. Not everyone is going to have the same views.
 
The S20 document at https://docs.trainzsimulator.com/docs/using-the-scrapbook-palette states ...

By renaming a Scrapbook, it will automatically be pinned.

I have found this is not the case. I have renamed a new scrapbook and pressed the enter key and it was not pinned. I repeated the exercise several times with new scrapbooks with the same result.

What does work is either of:-
  • Click the Pin icon, or
  • Click the > icon to move to the next scrapbook. When you return to the new scrapbook it will be pinned.

I do not know if this is a "bug" or simply an error in the documentation.
 
Currently (in S2.0) I have to select each trackside, then expand the menu (e.g. with the T key), then select the options, click.

In S20, use Shift-L-click to select multiple trackside objects, then "T" > Rotate trackside. This changes all selected items in one click.

I have renamed a new scrapbook and pressed the enter key and it was not pinned.
Yes, looks like a bug. As a workaround for now I suggest clicking the Pin once you've renamed the scrapbook.
 
For me, the focus information is neutral, I don't need it too much for my flow, but others may find it useful. I think that over here, the root cause here was incorrect Polish translation that gave no clue that it's about the compass position (and which I fixed in crowdin a couple of days ago, together with many other texts. Now it should be much cleaner, once it gets to the game).

... but we still have this big "Tool options" that is one of the first places that the new users see... and useful options for height and rotation are greyed out, when placing objects. Instead, the user has to expand and figure out that the much smaller "Information" window is not only for displaying things, because some edit boxes are actually editable. "Information" window allows making many great tricks with the rotation and height, but you need to take time to understand the potential behind it.

Example flow for putting lamps rotated by 30 degrees:

1. Select lamp asset from the asset list
2. Put some lamps with 0 rotation in "Placement" mode
3. Select all of them
4. Use "Information" box to edit the rotation angle
5. Move all lamps to the desired places

Another one:

1. Select lamp asset from the asset list
2. Put one lamp and rotate it with gizmo
3. Move it with pressed "Ctrl" to copy it

None of them are obvious for a person who uses S2.0 for the first time. And the obvious flow, when you look at the big "Tool options" window could be:

1. Select lamp asset from the asset list
2. Type "30" in the "Rotation" in "Tool options" in "Placement" mode, which is very well-visible for everyone
3. Start putting lamps rotated by 30 degrees

Personally, I find the new interface extremely productive. At the same time, some options are a bit misleading (especially if you are a new user) or the full potential is unused. "Being productive" does not have to mean that the interface has to be hard to learn.
 
Last edited:
Your examples are correct. Your proposed solution ("when you look at the big "Tool options" window could be:") does make sense.

Part of the "problem" is that the Tool Options Palette is actually more of a Brush Options Palette. Its icons only become active (change colour to "Gold") when you are using the various Brush tool options. But some of them do work on assets as well as brushes but their icons do not change colour to Gold to show that they are active.

I reported this as a "bug" a few weeks ago. The response I received explained why this is the case. From N3V QA.

The height value you enter into Tool Options applies to the selected assets. It does not apply to the Free Move Tool. It is this reason why it is not a gold highlight, otherwise a user may get confused and think the Free Move Tool, with a 5m Height setting, would impact all the assets by 5m when clicking and moving them (which it does not).

I agree that the new interface is extremely productive. The confusion for new users is understandable. Both you and I have been using the original interface for many years now. I still recall the confusion and the learning curve that I experienced when I first started using Trainz and its Surveyor interface, now called "Surveyor Classic". S2.0 is far more sophisticated than the original.

Improvements to the S2.0 interface can still be made, and I hope will be coming. It is not perfect and never will be (nothing is).

My thoughts.
 
Gentlemen, calm down, we're just talking, exchanging views. But more feedback from the producers would be nice ;)

After firs week with Surveyor 2.0 and TrainzPlus, this is my opinon to discusse. I think the producers have forgotten about our habits from the classic surveyor ;(

1) why the "reset settings" option for the right mouse button was removed - I don't understand it ;( I think it should come back.
2) I don't understand the difference in the sampling tool - with alt it selects a texture for me and automatically selects it for laying, and with normal use of this option it doesn't happen, I have to manually confirm the selection - according to I like that there is an alt shortcut, but it's duplicating options. Especially that when we sample something - it's with the intention to set it in a different place.
3) ctrl does not work when lifting in the "z" axis, which makes it hard to raise the spline (e.g. catenary). it comes to the point that to put it down - I go back to the classic surveyor because it is more comfortable.
4) the thickness of the x,y,z axis is too small - making it difficult to choose a specific one to use.
5) the x,y,z axis should stop at ground level when going up/down, even when the spline is 3,093,209m below it.
6) scrapbook is to be re-created - I still have problems with it and it's very complicated, even though the idea itself is great.
7) clicker for trackside rotation option - too many basic options are hidden in the text menu after using the T key. The same about straightening the track / spline.

I showed these problems in a video on YT (the video is in Polish, but you will understand what I mean by looking at it) - https://youtu.be/7nz_hVJU-Ig?t=1390

And a little bonus - since we have to transfer to CMP for preview, maybe it would be possible to introduce the option of removing a given add-on immediately from the level of the surveyor?
 
Regarding point 2 - yeah, this one is a bit annoying :). I keep painting the ground with wrong textures because of that :)
 
3) ctrl does not work when lifting in the "z" axis, which makes it hard to raise the spline (e.g. catenary). it comes to the point that to put it down - I go back to the classic surveyor because it is more comfortable.

The Ctrl and Shift keys that were used in Classic for fine adjustments are now used for other purposes. The same effect is now achieved by zooming in closer to the anchor point. The closer you get the finer and more accurate the movements become.

And a little bonus - since we have to transfer to CMP for preview

There is an Asset Preview Palette that will display the selected asset rotating in 3D. The asset image will be resized as the palette window is resized. The only thing I do not like about it is that you cannot rotate your view point above and below like you could in Classic - or at least I have not yet found out how to do that.
 
The Ctrl and Shift keys that were used in Classic for fine adjustments are now used for other purposes. The same effect is now achieved by zooming in closer to the anchor point. The closer you get the finer and more accurate the movements become.
Yes, wish me luck since then I can't get the right axis because they are far apart or 5m under the track...
There is an Asset Preview Palette that will display the selected asset rotating in 3D. The asset image will be resized as the palette window is resized. The only thing I do not like about it is that you cannot rotate your view point above and below like you could in Classic - or at least I have not yet found out how to do that.
I have the same opinion about view of asset, but i mean since i have options to preview properties in CMP (right click on addon and there is a drop down text list), it would be nice if there was also a delete option, without moving to CMP for deletion.
 
Thanks for the feedback. Some answers for you:
1. I don't understand. Please explain further.
2. Looks like a bug. It should remain selected when changing to the Brush tool (like it does selecting an object and changing to the Placement tool.
3. Ctrl is used to Clone assets in S20. For fine adjustment of spline points, select the spline point, then in the Info > "Pos" section, use your mouse over the arrows to adjust the Z value (or type in a value). This gives you mm precision
4. The clickable area is wider than the line (it changes colour when selectable). It's just a case of positioning your camera to make selecting the correct line easier.
5. How would you handle spline points that you want under the ground? It's easy enough to use Settle on Ground or change the Z value as above.
6. You'll need to explain the problems in much more detail.
7. One key press (T) doesn't sound "hidden" - surely it's just a matter of knowing that the T key is useful?
8. 3D previews in the Asset Palette are coming and the Preview Palette already exists.

Thanks for your answer, my opinions are detailed below, i hope, they will help you look more at the problem of a person who has spent at least an hour in Surveyor every day for 15 years ;)

1. In a classic surveyor, for example, when I placed an object and pressed the right mouse button - the placing was no longer taking place. I expect that with Surveyor 2.0 when adding or moving an object, when I right click the object will deselect and adding more of the same objects will stop.
2. In the case of textures - selection does not work. By the way, if using the alt option works the same as using the R key, why is it duplicated?
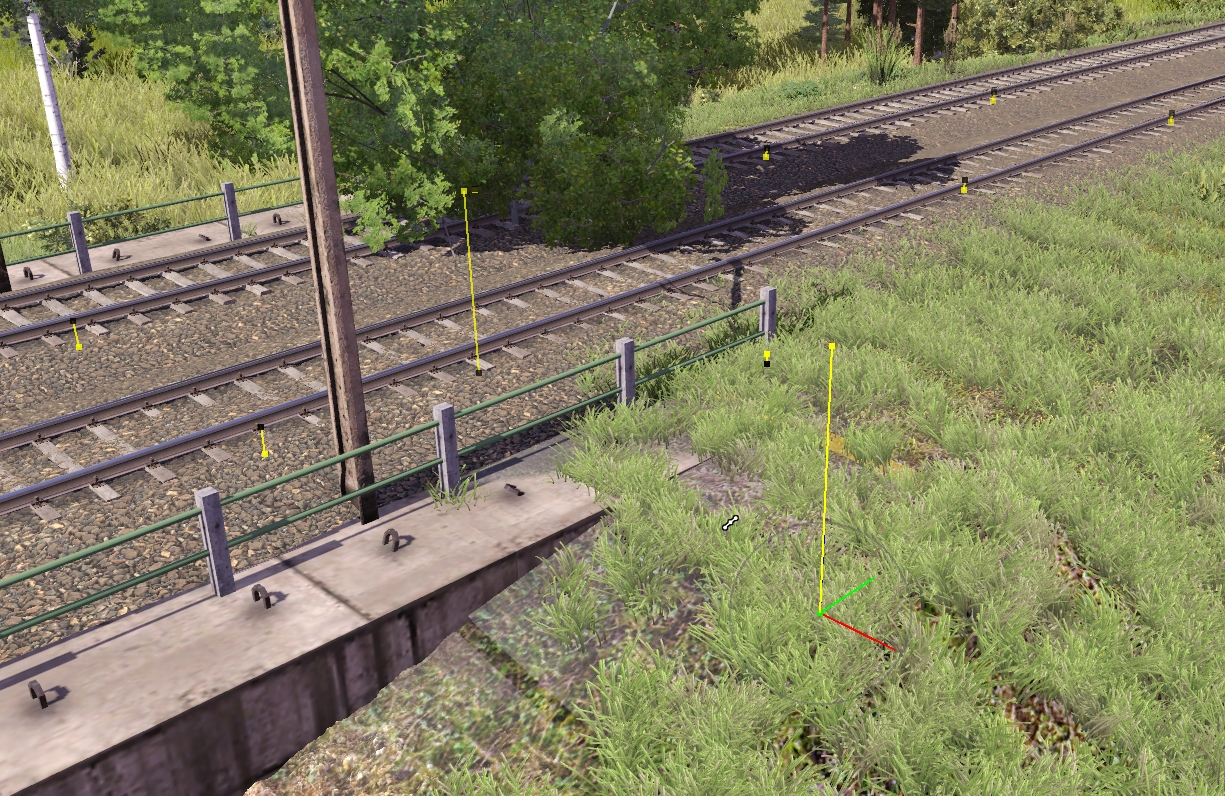
3. I didn't know that, but it still doesn't really help because the detail is too much. I thought maybe reducing the detail and speed of compass movement would help - also no. And is it possible that when a given value is selected in the "Pos" window, it would react to the "scroll" movement in the mouse? Then it would already be a solution - but for me, the value of the Z option should show on the axis - as it used to be when picking up the add-on. Please take a look at this element of my video here - what I'm having trouble with: https://youtu.be/7nz_hVJU-Ig?t=2964 (while doing this, I complain that I have a problem with clicking on the z axis, that I miss it, that I have laid hundreds, if not thousands of kilometers of this catenary and in Surveyor 2.0 it will not be possible to do it as easily as in a classic surveyor).
4. In fact, the problem is the same as in point 3, see the video and you will understand.
5. Show of this pucters, why i have axsis x,y,z under ground? For me, even though the spline is underground, the axle itself should be on the ground for comfortable operation. Okay, it shows where the end of the "spline" is, but there are situations that it is even 10m below the ground.

underground.jpg


7. Okay, the text menu is useful - but without hotkeys it's too big a tool for me, you've included options that are used a lot - trackside rotation in the first place.
8. I mean what I wrote above - i mean since i have options to preview properties in CMP (right click on addon and there is a drop down text list), it would be nice if there was also a delete option, without moving to CMP for deletion.

If Surveyor 2.0 is to be a 100% friendly and sufficient tool - you must take into account our habits that we have had for 15 years. You cannot hide options that are used dozens of times per hour, or change the rules of operation of certain tools. The changes made are good - but not perfect. Because if I have a problem with them - what are less advanced users to say? As I said in my first video about Surveyor 2.0 - this tool is perfect either for mega advanced users or for completely new users. Those who work in the surveyor from time to time - will not be interested because it is too complicated a tool and much different than the classical surveyor.
 
I had some experience with Classic Surveyor, and adapted to Surveyor 2.0 quite smoothly. I think the factor that helped me was the fact that a new editor for Trainz was my dream, so I was veeery determined to learn it and explore how to combine different tools. I also have experience with 2D graphics editors, and to some extent - also 3D and discovered some similarities to them. I'm also a computer programmer, so I'm very used to changes and dealing with them. However, it also took me a while to find some options, incl. how to create new baseboards :).

Some complexity is unavoidable to make other things simple. The problem with Classic Surveyor is that it is too simple. Yes, it is easy to start, but later once you start building a serious route, lack of tooling quickly becomes an obstacle that makes a lot of things hard, and does not forgive errors. The time needed to learn the tool is not comparable to the time you spend on the work on the route later. Learning can be challenging, but it's a one-time investment that later pays off. Once you get it, you have it.

Just thinking... maybe some semi-interactive introduction for newcomers would help? It could launch when you run Surveyor for the first time, with basic explanation, tips and tricks, and maybe highlighting important parts of the interface.
 
Last edited:
As I start working with Surveyor 2.0 the overriding impression is that it provides a massive leap in terms of usability. A real game changer, however I do have some observations regarding minor niggles so here is my feedback thread. This is not for bugs, but rather for feature optimisation suggestions.


* Un-docking and hiding palettes. Why would you? At the moment there is no benefit in doing this because the dock remains as a huge grey bar eating up real-estate at the edge of the screen. Please can we have the palettes "clipping" or "sticking" to the screen edge. No giant grey dock underneath please.

Originally posted December 2021. April 2023 and still waiting for improvements to the palettes. I use a laptop for all my work due to my disabilities. I do not have the room to hook up an external monitor unfortunately and have waited patiently for improvements to the UI for S2.0. It doesn't seem to be forthcoming. S2.0 is a huge improvement and I very rarely revert to classic surveyor but surely this could have been sorted by now Tony.

The ongoing dev work is great and looking forward to the HD terrain and TLR but the interface needs to be revisited. Looking forward (hopefully) to S2.1

Regards,

John
 
I agree it needs some more work. I'd love for it to have been upgraded by now. It all comes down to priorities:
* HD Terrain - major feature for route builders.
* TLR - major feature for people operating their railroad
* S20 UI improvements - polish feature for route builders.

And don't forget the 101 other polish features we want to work on as well.
 
Sadly I wasn't selected for testing, nevertheless I follow these forum threads and I think it is time to give Tony and his crew and testers a big thumbs up for all the hard work they are doing to give us the (i.m.o.) best train sim there is at this moment. N3V rocks!

Ron
 
Returning to layers, yes that topic.

When a layer is hidden and locked, its objects are not visible and cannot be altered. Spline points a still visible.
When a layer is hidden and unlocked, its objects are not visible but can be altered. Rather dangerous and I don't know why I would do that.
When a layer is visible and locked, its objects are visible and can not be altered but they are still selectable. Only when you actually try to do something does the warning popup "Some Items Locked"

And that is my issue. I placed a guide on a visible but locked layer to help align objects on other layers. When I try to adjust those other objects, the guide keeps getting selected. In Classic S1, this does not happen. The visible but locked layer is not selectable allowing me to adjust the other objects without the guide getting selected.
 
1. When a layer is hidden and locked, its objects are not visible and cannot be altered. Spline points a still visible.
2. When a layer is hidden and unlocked, its objects are not visible but can be altered. Rather dangerous and I don't know why I would do that.
3. When a layer is visible and locked, its objects are visible and can not be altered but they are still selectable. Only when you actually try to do something does the warning popup "Some Items Locked"

Just ran some tests and can confirm all the above in both the Trainz+ retail build and the latest beta version.

I do have a query about point 2, hidden and unlocked. I don't necessarily agree that this is dangerous since the layer is unlocked and therefore, by definition, its contents are able to be altered even if they cannot be seen. Otherwise why have separate visibility and locked settings?

My thoughts.
 
I called point #2 dangerous because you could alter an invisible object without any visible feedback only to find much later that what you thought was there is now different. And who knows how many other objects might have been altered unknowingly. Best to make sure all hidden layers are also locked unless ... . The only reason I can think of is when moving multiple objects to another layer. By making the target layer invisible and unlocked, after every successful move, the object you moved disappears. Nice feedback. :)

After more testing I found that point #3 can be overcome by lowering the visible but locked object below the ones I want to select. When I place my guide slightly below the other objects, I can adjust the objects without accidentally selecting the guide. :cool:

Now that I think of it, it's obvious since when two objects are side by side, even if the closer object is mostly empty air and is see-through, the further object cannot be selected until the point of view is changed to bring the further object out from behind the near one. :eek:
 
Back
Top