Install the app
How to install the app on iOS
Follow along with the video below to see how to install our site as a web app on your home screen.
Note: This feature may not be available in some browsers.
You are using an out of date browser. It may not display this or other websites correctly.
You should upgrade or use an alternative browser.
You should upgrade or use an alternative browser.
Tutorial: Getting the most from PBR and why you should be using it in TRS19
- Thread starter MSGSapper
- Start date
Question? Does the Parameters file need an Alpha channel, if so why, as I see some with and some without the Alpha channel. And does the file size, as in pixels, of the Parameters, matter and does the DPI of any of the textures matter.
John
According to the spec ( http://online.ts2009.com/mediaWiki/index.php/M.pbrmetal) you are supposed to provide one. But it wouldn't surprise me if Trainz defaulted to some value. If it were all white then the material should be very metallic and probably shiny. If black then it would be dull (dirlectric).
Size is not a good measure since many creators are switching to PNG format which is invariably smaller than TGA. Once committed it will be Trainz texture format anyway. By DPI I assume you mean number of pixels per inch (PPI) rather than a TV/monitor resolution. Generally the more pixels per inch then better the quality. It's up to the creator to choose - at least within the range allowed to us.
To be serious , if there was a way to batch produce textures and save a lot of time I'd be more keen to take up the challenge .
There is it is called substance painter LOL I import the mesh and texture it using layers and then when I export it makes the 3 files (albedo, perimeter, and normal) lickety split and I do not have to do anything but set the res and hit a button
You only need that shader node model when you are ready to export the FBX files for Trainz. i.e. you can use other node setups to achieve the effects you want, bake the textures, and then swap to the export model and link the textures as you described.
BTW, you can save that Trainz node setup using the Material Library VX tool located in the material section. I saved mine as a "rename-me.m.pbrmetal". You can do something similar with the other PBR material types.
Paul:
That is an extremely useful tip which I will check out. Thanks!
Bob
johnwhelan
Well-known member
There is it is called substance painter LOL I import the mesh and texture it using layers and then when I export it makes the 3 files (albedo, perimeter, and normal) lickety split and I do not have to do anything but set the res and hit a button
But what you haven't really explained is do you create the texture files in the conventional way, UV map in Blender or do I get the impression that Blender uses them directly. How do you make changes to the texture file for things such as reskinning?
Cheerio John
There is it is called substance painter LOL I import the mesh and texture it using layers and then when I export it makes the 3 files (albedo, perimeter, and normal) lickety split and I do not have to do anything but set the res and hit a button
I think the point is that it's not free and as Adobe have taken over and if it survives in the same form, will probably get a price hike.
The Perpetual License version has a lot of bad reviews on Steam re frequent crashes, possibly not the same version as the rental one? Or just the can't use it properly club? Probably requires a Steam account which is something I will never use.
Has anyone looked at 3d coat?
But what you haven't really explained is do you create the texture files in the conventional way, UV map in Blender or do I get the impression that Blender uses them directly. How do you make changes to the texture file for things such as reskinning?
Cheerio John
I use 3ds max and yes I model the same old way and set up the UV's now where the workflow has changed for me anyway is as I am working I keep track of how many materials I want on the model. I assign each material a separate ID and assign a different color to each using the multi sub object (and I am sure there is something similar in blender) now once I get all the parts and pieces colored the way I want I render that out to a single texture and set up a simple material and use that map and put that on all the meshes.
Then there is a fbx exporter for substance for 3ds as I am sure there is for blender as well that exports the mesh to substance and once you are in substance I put different materials on layer by layer using a COLOR map as a guide. Now you CAN free paint anything you want but if I am just gonna have 8 materials 3 wood and 5 metal for example, I use color selection since it is fast and easy and I can tweak the look as I go along.
Then once the model looks good in substance I export those textures and clicking one button after setting res and exporter and my 3 files are done and ready to place on that simple material in 3ds and then name it properly and export...
Basically it is color masking on steroids
That is the workflow in a nutshell and YES it is easier than doing photo textures when you are trying to skew and distort and stretch to make a pic work if you didn't take it and get perfect 90 degree shots.
I do not reskin to me that is a exercise in futility since without the mesh you are just guessing
Last edited:
I think the point is that it's not free and as Adobe have taken over and if it survives in the same form, will probably get a price hike.
The Perpetual License version has a lot of bad reviews on Steam re frequent crashes, possibly not the same version as the rental one? Or just the can't use it properly club? Probably requires a Steam account which is something I will never use.
Has anyone looked at 3d coat?
Ya paid 60 bux for the game.
")
Now look I get the whole "it aint free" argument but it rings hollow when you are buying a 60 dollar game and pay JR 15 bux for a loco...
Sorry
My 3ds Max FBX exporter is incompatible with TANE / TRS19, I have Max10, needs a minimum of 2013 I think . There is a convoluted method of using Autodesk's FBX converter which will convert the old FBX to a newer version or convert 3ds to FBX as well, not entirely successful though and you loose the animation. Also got Softimage, same problem with the FBX exporter.
Meanwhile I'm trying to get my head around Blender which compared to Max is not an easy to learn program, especially when they keep changing it.
I can get 3ds into Blender which is a help.
Afraid Autodesk is not getting any more custom from me since going all subscription, which really is way too expensive for a hobby.
But what you haven't really explained is do you create the texture files in the conventional way, UV map in Blender or do I get the impression that Blender uses them directly. How do you make changes to the texture file for things such as reskinning?
Cheerio John
John:
Re-skinning should not be all that hard, although it will take some more effort on your part as you are dealing with three textures and not one or two. You would use a combination of Materialize and GIMP, both of which are free to do that, or their commercial equivalents for those who want to pay. Basically it would work like this:
1. Use GIMP to determine the size of the existing textures (albedo, normal and parameters) you would need to replace and the file format (ie; tga or png).
2. Create an albedo file (AKA Diffuse texture) to be the same size and file format. I often use .jpg texture files I have found and with GIMP converted them to the size and file format I need.
3. Use the Materialize program to create the normal, height map, AO and other textures maps you will need from the albedo file you created and save them. See my Materialize tutorial at for more details about this process:
https://forums.auran.com/trainz/sho...BR-ground-textures-using-Materialize-and-GIMP
4. Now edit them in GIMP per the instructions in my Materialize tutorial.
5. You have now generated the new skins.
This sounds hard but really isn't once you get used to it.
Bob
Last edited:
My 3ds Max FBX exporter is incompatible with TANE / TRS19, I have Max10, needs a minimum of 2013 I think . There is a convoluted method of using Autodesk's FBX converter which will convert the old FBX to a newer version or convert 3ds to FBX as well, not entirely successful though and you loose the animation. Also got Softimage, same problem with the FBX exporter.
Meanwhile I'm trying to get my head around Blender which compared to Max is not an easy to learn program, especially when they keep changing it.
I can get 3ds into Blender which is a help.
Afraid Autodesk is not getting any more custom from me since going all subscription, which really is way too expensive for a hobby.
OK people KEEP making excuses that it is "too expensive for a hobby" well I know here in Yuma registering with the community college here was 30 bux. That gets me a student ID. I can get a student version of 3ds from 2015-2020 I believe for free. Now I have a license as part of a business years ago but I have sent many people wanting to learn 3ds the student way. Same for Substance they also have a free student license.
Now some will whine about the DLC and how all assets have to be payware etc. LOOK if YOU are doing it as a hobby and NOT charging for the work WHILE you are learning you will never run afoul of a student license. But people are gonna whine about it and argue it anyway.
I know payware authors using student versions and no I am not gonna out them LOL but if you are gonna pick gnat crap out of pepper to have an EXCUSE NOT to do it, then you just aint gonna do it LOL
According to the spec ( http://online.ts2009.com/mediaWiki/index.php/M.pbrmetal) you are supposed to provide one. But it wouldn't surprise me if Trainz defaulted to some value. If it were all white then the material should be very metallic and probably shiny. If black then it would be dull (dirlectric).
Size is not a good measure since many creators are switching to PNG format which is invariably smaller than TGA. Once committed it will be Trainz texture format anyway. By DPI I assume you mean number of pixels per inch (PPI) rather than a TV/monitor resolution. Generally the more pixels per inch then better the quality. It's up to the creator to choose - at least within the range allowed to us.
Paul:
Based on my own experience:
1. The albedo file does not normally have a alpha channel. The exception would be for glass where transparency is needed. For more on this see my PBR night mode tutorial at:
https://forums.auran.com/trainz/sho...PBR-Textures-to-create-a-structure-night-mode
2. Alphas for the normal file are going to be necessary if you intend to use a height map (it's placed into the Alpha channel). If a height map is not used then the alpha channel can be all white. Either way you seem to need an alpha channel here.
3. Alphas for the parameters file is going to be necessary if you intend to use a metallic map (it's placed into the Alpha channel). If a metallic map is not used then the alpha channel can be all white. Either way you seem to need an alpha channel here.
I am no expert by any means on this so please feel free to correct me, where needed.
Bob
Last edited:
johnwhelan
Well-known member
John:
Re-skinning should not be all that hard, although it will take some more effort on your part as you are dealing with three textures and not one or two. You would use a combination of Materialize and GIMP, both of which are free to do that, or their commercial equivalents for those who want to pay. Basically it would work like this:
1. Use GIMP to determine the size of the existing textures (albedo, normal and parameters) you would need to replace and the file format (ie; tga or png).
2. Create an albedo file (AKA Diffuse texture) to be the same size and file format. I often use .jpg texture files I have found and with GIMP converted them to the size and file format I need.
3. Use the Materialize program to create the normal, height map, AO and other textures maps you will need from the albedo file you created and save them. See my Materialize tutorial at for more details about this process:
https://forums.auran.com/trainz/sho...BR-ground-textures-using-Materialize-and-GIMP
4. Now edit them in GIMP per the instructions in my Materialize tutorial.
5. You have now generated the new skins.
This sounds hard but really isn't once you get used to it.
Bob
The difficulty is getting new people started in content creation. Currently reskinning is about the easiest way to create a reskin. Clone, open up the .bmp texture file in paint.net add a logo save and after you've added your name in the config.txt file and changed the name its done.
GIMP is not the most friendly interface for a beginner never mind working out which file to change etc. It creates a barrier to entry.
Cheerio John
And with a PBR asset it's exactly the same. Clone, open the albedo (diffuse) texture file, add a logo, save, change the config file as required. You don't need to edit the parameter file if don't need to change the roughness of the material or to add bare metal areas.The difficulty is getting new people started in content creation. Currently reskinning is about the easiest way to create a reskin. Clone, open up the .bmp texture file in paint.net add a logo save and after you've added your name in the config.txt file and changed the name its done.
It doesn't have to be GIMP, but it's really not that hard. If you need to learn something new then just start using it. If you put off starting you'll never achieve anything. I switched over to Blender 2.81 in two days over Christmas by just playing with it for a few hours - admittedly I may to able to do this a lot more easily than a lot of people but if I hadn't tried I still be using 2.79b.GIMP is not the most friendly interface for a beginner never mind working out which file to change etc. It creates a barrier to entry.
Paul
OK people KEEP making excuses that it is "too expensive for a hobby" well I know here in Yuma registering with the community college here was 30 bux. That gets me a student ID. I can get a student version of 3ds from 2015-2020 I believe for free. Now I have a license as part of a business years ago but I have sent many people wanting to learn 3ds the student way. Same for Substance they also have a free student license.
Now some will whine about the DLC and how all assets have to be payware etc. LOOK if YOU are doing it as a hobby and NOT charging for the work WHILE you are learning you will never run afoul of a student license. But people are gonna whine about it and argue it anyway.
I know payware authors using student versions and no I am not gonna out them LOL but if you are gonna pick gnat crap out of pepper to have an EXCUSE NOT to do it, then you just aint gonna do it LOL
You can't go to a Community college in the UK they do not exist as such and there is nothing at all around here unless you want to learn about gardening or basket weaving or are an unemployed youngster, don't think I'd qualify at 67!
Autodesk now requires a copy of your Student Registration, and proof of the course and it only lasts for three years after which you pay full price or it expires, as of January 2019 they are clamping down on people using student licenses indefinitely which used to be possible. I got my first version, Max3 that way and they never checked properly if I was in Education, I was actually working at a Government Training Centre at the time.
Even professional and Indie users of Autodesk Products are complaining about the cost of the subscriptions. I can afford the subscriptions by the way but prefer to actually have permanent versions of software not ones that might suddenly expire. However on a positive note ;o) , picked this up from the Autodesk Forums apparently this is Autodesk taking note of the too expensive criticism! https://area.autodesk.com/3ds-max-indie/ for 12 months it is £275.86, may be plus VAT that's not terribly clear compared to £1782 inc VAT, that is a bit more reasonable. That link isn't on the main Autodesk site, so looks like they are keeping it low key!
Substance Perpetual license is reasonable as long as Adobe continue to make it available without ramping up the cost so anyone contemplating it, I wouldn't hang about too long.
Just watched a video and it is about the same price as substance but material wise does not seem to have as much.Has anyone looked at 3d coat?
You can't go to a Community college in the UK they do not exist as such and there is nothing at all around here unless you want to learn about gardening or basket weaving or are an unemployed youngster, don't think I'd qualify at 67!
Autodesk now requires a copy of your Student Registration, and proof of the course and it only lasts for three years after which you pay full price or it expires, as of January 2019 they are clamping down on people using student licenses indefinitely which used to be possible. I got my first version, Max3 that way and they never checked properly if I was in Education, I was actually working at a Government Training Centre at the time.
Even professional and Indie users of Autodesk Products are complaining about the cost of the subscriptions. I can afford the subscriptions by the way but prefer to actually have permanent versions of software not ones that might suddenly expire. However on a positive note ;o) , picked this up from the Autodesk Forums apparently this is Autodesk taking note of the too expensive criticism! https://area.autodesk.com/3ds-max-indie/ for 12 months it is £275.86, may be plus VAT that's not terribly clear compared to £1782 inc VAT, that is a bit more reasonable. That link isn't on the main Autodesk site, so looks like they are keeping it low key!
Substance Perpetual license is reasonable as long as Adobe continue to make it available without ramping up the cost so anyone contemplating it, I wouldn't hang about too long.
Well I can just speak for myself and I will continue to use 3ds and substance. 3D coat didn't look to have any better ability than substance so for about the same price I will go with what I know
What I am doing currently is basically re-engineering structure, bridges and other key content items for use in upgrading my existing routes. Most of what I have done, but not all, are from original content items from Ben Dorsey, of which there over 6700 on the DLS.
My re-engineering process involves the following:
1. Use the 3D Object Converter application to convert the .IM files to both 3D Studio Binary Mesh (.3ds) and Wavefront (.obj) files. Why both? One provides a text file for attachment point and animation bone identification and coordinates, the other does not, so I need both. The mesh comes across perfectly but the UV mapping and any animation does not come across at all. FYI 3D Object Converter is a non-free low cost shareware program which really does a good job of this and supports converting of Trainz .IM files to whatever else you may need. This program is virtually the only way we can save content items where the author is no longer around or has abandoned it for whatever reason. It is also great for those authors who have lost their original project files for whatever reason and need to recover the meshes. You can get that program here:
http://3doc.i3dconverter.com/
2. Import the Wavefront .obj in Blender.
3. Fix any problems that may have been in the original mesh (missing things, reverse normals, etc).
4. Add additional night and snow modes where needed and not originally made available.
5. Re-do any animation based on observations of the old item in operation in TRS19. This is mostly by-guess-and-by-golly but I come pretty darn close to what was done originally.
6. Add the attachment points back into the mesh as empties.
7. Change existing material types to the newer PBR types for each mesh object.
8. Establish the nodes in the shader editor.
9. Re-do the UV maps for each object.
10. Export the resulting mesh as a .FBX file for use in a Trainz content file and make any needed changes to the config.txt file to bring the item up to build 4.6 standards.
11. Test everything in TRS19!
With the exception of non-visible products, almost everything I have done as Build 4.6 includes all my Blender project files for the content item. Why do I do this?
1. I want to ensure that the items continue forever in Trainz, even after I am gone from the scene for whatever reason. Having the source code for the project allows for easy upgrading when needed to accommodate future changes in major Trainz versions.
2. I want to encourage people out there to become Blender content creators. Having real world examples to work with makes that easier as they can see how I did it. I wish I had had that when I first started working with Trainz. I had to learn the hard way by trial and error.
3. I want to encourage re-skinning and content item variants of all types. As an example you can use different parts of my bridges to create bridges of your own or to re-skin the existing ones. Having the Blender project can help that along much quicker since you can see what I did and how I did it instead of having to guess.
So far I have been disappointed in not seeing any variants of what I have done to date, or even re-skins for that matter, come up on the DLS. I can't do everything folks, nor come up with every possible variant. That is what I am hoping you will do to help things along in TRS19.
Someone said earlier it may take 10 years or more to convert a sizable number of older content items on the DLS to the new PBR format and that figure is probably pretty darn close. There is more then enough older items available on the DLS as it is without adding even more to that number that will later have to be converted to PBR by some person like me, if you are no longer around. Content creators are needed to help in the process of converting content older items to PBR ones for TRS19 and future versions of Trainz.
BTW, please no more comments on the merits of PBR, pro or con, in this forum thread which I started. N3V has already made that commercial decision for us and moved everyone who purchased TRS19 to it. If you have a bone to pick over the adoption of PBR, then you need to contact N3V about it to complain. Content creators must follow suit and start supporting PBR for TRS19 based routes, or stay with the older version of Trainz and risk eventually being left behind - its your choice as it always has been. Constructive comments on how we can work with PBR to make Trainz content items better is what is needed here this thread, along with any tips you might have for doing that. Thank you for your cooperation on this matter.
Bob
Last edited:
...
Based on my own experience:
1. The albedo file does not normally have a alpha channel. The exception would be for glass where transparency is needed. For more on this see my PBR night mode tutorial at:
I agree and the glass material works very well.
...
2. Alphas for the normal file are going to be necessary if you intend to use a height map (it's placed into the Alpha channel). If a height map is not used then the alpha channel can be all white. Either way you seem to need an alpha channel here.
The WiKi page is a bit vague on the alpha requirement but my interpretation is not to use one unless you want a height map.
...
3. Alphas for the parameters file is going to be necessary if you intend to use a metallic map (it's placed into the Alpha channel). If a metallic height map is not used then the alpha channel can be all white. Either way you seem to need an alpha channel here.
I've always assumed an alpha (metallic) was necessary but, intrigued by your statement, I tried exporting a test cube with different parameter alpha channels. The results looks like this:
Left to right:
Box with the original metallic channel. This channel is mostly white except for black edges that are the box edges.
Box with no parameter alpha channel.
Box with a black parameter alpha channel.
Box with an all white alpha channel.
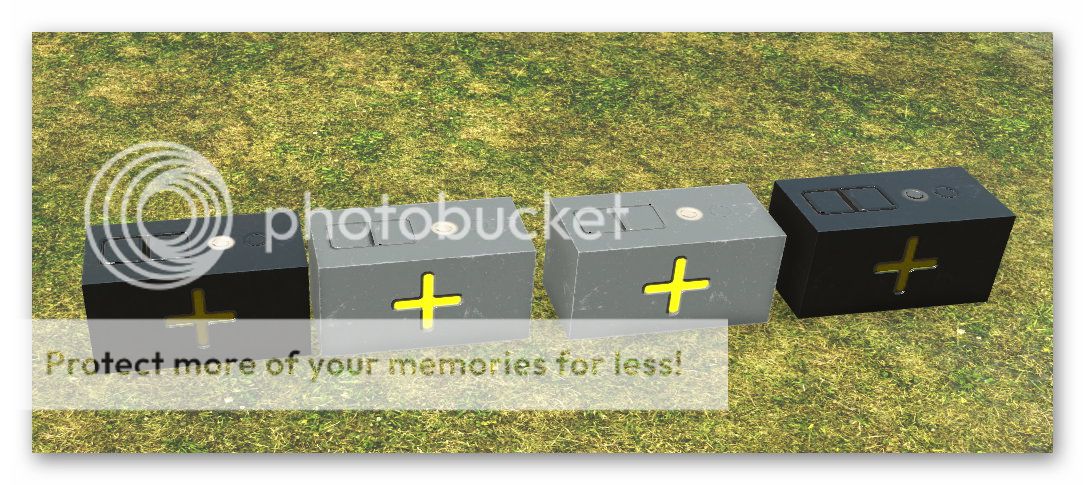
The results suggest that Trainz is substituting a black alpha channel where one does not exist. i.e. the boxes with no alpha channel and an all black channel look much the same to me. Not that Trainz doesn't raise an error so I assume it is deliberate.
The all white version looks much the same as the original since the original was mostly white.
I would always include an alpha channel in the parameter because metal is a significant part of the PBR model. There will be materials that incorporate true metal objects and non metal.
It seems to me that the roughness and metallic channels should both be adjusted to get the right reflective look. But not necessarily with the same valuess. If you had an all white metallic channel, it still will not be reflective as gold, for example, if you have a lot of roughness.
...
I am no expert by any means on this so please feel free to correct me, where needed.
Bob
Neither am I, but I do like playing with PBR materials.
Bob,
You sure can draw a crowd. I started a thread about PBR two years ago and got only one response. Creators are a tough bunch to convince them of the need to change. :hehe:
You sure can draw a crowd. I started a thread about PBR two years ago and got only one response. Creators are a tough bunch to convince them of the need to change. :hehe:
Similar threads
- Replies
- 17
- Views
- 644
- Replies
- 9
- Views
- 606
- Replies
- 13
- Views
- 1K
- Replies
- 2
- Views
- 326
- Replies
- 21
- Views
- 1K