Install the app
How to install the app on iOS
Follow along with the video below to see how to install our site as a web app on your home screen.
Note: This feature may not be available in some browsers.
You are using an out of date browser. It may not display this or other websites correctly.
You should upgrade or use an alternative browser.
You should upgrade or use an alternative browser.
Cars won't haul Anything
- Thread starter Justin99
- Start date
trainzbroken
New member
thats something that bugs me in all the trs games. you also got passenger cars that cannot haul passengers. so whats the sense in having them
Hi Ben --
This issue seems to come up from time to time and what you say is not strictly correct.
If you don't have the original mesh it's still possible to add an attachment point.
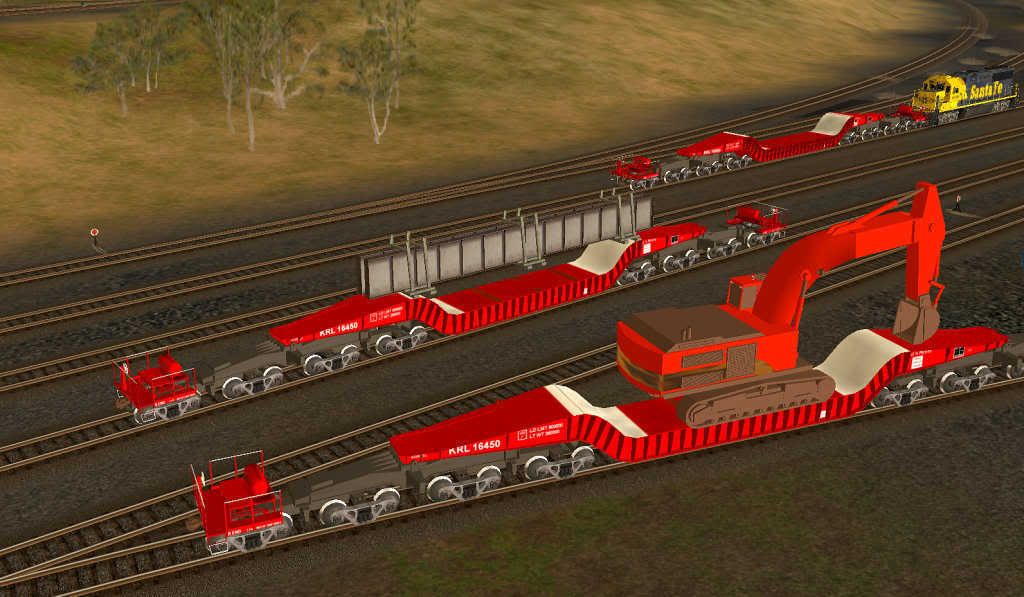
This freight car, example, was not originally configured to carry loads:
I didn't have the mesh, but made an attachment point.
See here:
http://forums.auran.com/trainz/showthread.php?t=24505&highlight=attachment
and here:
http://forums.auran.com/trainz/showthread.php?t=15984&highlight=attachment
The process is quite simple though, perhaps, not for the faint hearted.
And Ben, thanks for your continuing contributions.
Also:
"you also got passenger cars that cannot haul passengers. so whats the sense in having them"
Exactly my thoughts too!~! Who wants them damn passengers anyway. All they do is get in the way of our freight trains. Us short line operators would be more than pleased to see all passenger trains banned.
Phil
This issue seems to come up from time to time and what you say is not strictly correct.
If you don't have the original mesh it's still possible to add an attachment point.
This freight car, example, was not originally configured to carry loads:
I didn't have the mesh, but made an attachment point.
See here:
http://forums.auran.com/trainz/showthread.php?t=24505&highlight=attachment
and here:
http://forums.auran.com/trainz/showthread.php?t=15984&highlight=attachment
The process is quite simple though, perhaps, not for the faint hearted.
And Ben, thanks for your continuing contributions.
Also:
"you also got passenger cars that cannot haul passengers. so whats the sense in having them"
Exactly my thoughts too!~! Who wants them damn passengers anyway. All they do is get in the way of our freight trains. Us short line operators would be more than pleased to see all passenger trains banned.
Phil
Justin --
Load and Cab Attachment Points
You will need:
Turbo Squid “gmax”
and
“Trainz Asset Creation”.
Use a Google search to find them.
_____
Fire up Trainz Asset Creation.
1. Make a Box:
On the left side of the screen under “Object Type” select “Box”.
Make a box in the “Perspective” pane.
2. Texturing:
Texture the box by selecting the red coloured globe towards the top of screen “gmax Material Editor”, the second icon from the right.
In the new screen, select “New”, then “Standard”.
Back in the left screen, expand “Maps”, place a tick against “”Diffuse Color”, then select “None”.
Select “Bitmap” and then “black.tga” (may have to do a search in the gmax folders for this – try gmax\gamepacks\Trainz).
Next to “Map #1” select the blue and white chequered ball and drag the black coloured texture to the box. The box should now be all black.
Close the Material Editor.
3. Resize the box:
Resize the box by making the length, width and height under “Parameters” equal to 0.01.
4. Position the box:
Click on the 4-way arrow icon “Select and Move”.
At the bottom, make X, Y and Z equal 0.0
5. Make an attachment point:
Select the “Helpers” tab at the top of the screen.
Click on the target icon, “Point Object”.
Click anywhere close to the zero axis in the “Top” view pane.
Make “Name and Color” “a.load0” for load attachment point.
For cab attachment point, “a.cabfront”.
6. Position the attachment point:
Go back to the “Main Toolbar” tab.
Now “Select and Move”.
Set the values of X and Y to 0.0.
The Z value determines the height above the rails.
Load attachment:
6 axle depressed center lower 0.7
upper 1.4
SAR OB gondola 1.2
KRL Schnabel lower 1.25
upper 2.625
Repeat for the next load attachment points, a.load1, a.load2, … .
Cab attachment:
Try 2.0
Adjust the X and Y values of the cab attachment point by trail and error if necessary.
7. Save:
Select the outline box icon, “Rectangular Selection Region” and capture all the points in the “Perspective” pane.
In the “File” menu, choose “Export”. Save as, say, “load_attachment_1.im” for load attachment point and, say, “cab_attachment_1.im” for cab attachment point.
8. config.txt:
Make a folder, say, “load_mesh” in the rolling stock folder, or “cab_mesh” in the locomotive folder.
Place the .im file in this folder.
Edit the config.txt file by adding the text:
Load attachment:
mesh-table {
default {
mesh "sar_ob_body/sar_ob_body.pm"
auto-create 1
}
shadow {
mesh "sar_ob_shadow/sar_ob_shadow.pm"
}
load {
mesh "load_mesh/load_attachment_1.im"
auto-create 1
}
}
queues {
load0 {
size 1
initial-count 0
attachment-points {
0 "a.load0"
}
allowed-products {
0 <kuid:-3:10014>
}
conflicts-with-queues {
0 "load1"
}
}
load1 {
size 2
initial-count 0
attachment-points {
0 "a.load1"
1 "a.load2"
}
allowed-products {
0 <kuid:-3:10014>
}
conflicts-with-queues {
0 "load0"
}
}
}
Cab attachment:
mesh-table {
default {
mesh "ng30_whitcomb_body/ng30_whitcomb_body.im"
auto-create 1
}
cab {
mesh "cab_mesh/cab_attachment_1.im"
auto-create 1
}
shadow {
mesh "NG30_whitcomb_shadow/NG30_whitcomb_shadow.im"
}
}
_____
Good luck !~!
(you might need it!)
Phil
They're leftovers from the primitive days before TRS04 started hauling freight and passengers. You can make them active by opening the config and adding the script for loading invisible passengers. I've been doing that lately for rolling stock I like.thats something that bugs me in all the trs games. you also got passenger cars that cannot haul passengers. so whats the sense in having them
 Claude
trainzbroken
New member
I was talking about the passenger cars in the game but sense you want to go this routeHi Ben --
Also:
"you also got passenger cars that cannot haul passengers. so whats the sense in having them"
Exactly my thoughts too!~! Who wants them damn passengers anyway. All they do is get in the way of our freight trains. Us short line operators would be more than pleased to see all passenger trains banned.
Phil
YOUR DAMN FREIGHT TRAINS GET IN THE WAY OF AMTRAK. you freight companys used to run passengers now you hate us well i REFUSE TO FLY i take the train or greyhound. BAN UP CSX AND NS FOR DELAYING AMTRAK. FORCE THOSE RAILROADS TO HAND OVER TRAINS TO BNSF
Last edited:
Similar threads
- Replies
- 2
- Views
- 374
- Replies
- 0
- Views
- 740